HP CP1518ni HP Color LaserJet CP1510 Series - Software Technical Reference - Page 162
Recommended Install — Advanced Install opton
 |
UPC - 883585140633
View all HP CP1518ni manuals
Add to My Manuals
Save this manual to your list of manuals |
Page 162 highlights
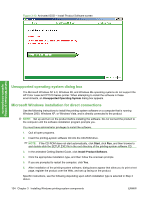
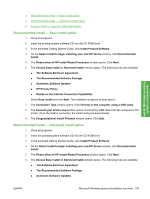
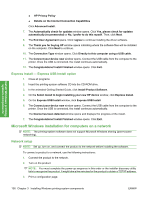
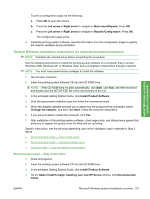
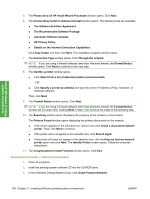
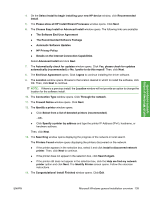
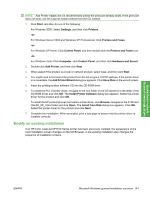
Install Windows printingsystem components 5. The Please allow all HP Install Wizard Processes window opens. Click Next. 6. The Choose Easy Install or Advanced Install window opens. The following links are available: ● The Software End User Agreement ● The Recommended Software Package ● Automatic Software Updates ● HP Privacy Policy ● Details on the Internet Connection Capabilities Click Easy Install, and then click Next. The installation progress window opens. 7. The Connection Type window opens. Click Through the network. NOTE: If you are using a firewall software other than Windows firewall, the Firewall Notice window opens. Click Next to continue to the next step. 8. The Identify a printer window opens. ● Click Select from a list of detected printers (recommended). -OR- ● Click Specify a printer by address and type the printer IP Address (IPv4), hostname, or hardware address. Then, click Next. 9. The Firewall Notice window opens. Click Next. NOTE: If you are using a firewall software other than Windows firewall, the Firewall Notice window will not open here. Clicking Next in Step 7 will continue the install to the following step. 10. The Searching window opens displaying the progress of the network or local search. The Printers Found window opens displaying the printers discovered on the network. ● If the printer appears in the selection box, select it and click Install a discovered network printer. Then, click Next to continue. ● If the printer does not appear in the selection box, click Search Again. ● If the printer still does not appear in the selection box, click the Help me find my network printer option and click Next. The Identify Printer screen opens. Follow the onscreen instructions. 11. The Congratulations! Install Finished window opens. Click Exit. Recommended Install - Advanced Install opton 1. Close all programs. 2. Insert the printing-system software CD into the CD-ROM drive. 3. In the animated Getting Started Guide, click Install Product Software. 138 Chapter 3 Installing Windows printing-system components ENWW
-
 1
1 -
2
-
3
-
4
-
5
-
6
-
7
-
8
-
9
-
10
-
11
-
12
-
13
-
14
-
15
-
16
-
17
-
18
-
19
-
20
-
21
-
22
-
23
-
24
-
25
-
26
-
27
-
28
-
29
-
30
-
31
-
32
-
33
-
34
-
35
-
36
-
37
-
38
-
39
-
40
-
41
-
42
-
43
-
44
-
45
-
46
-
47
-
48
-
49
-
50
-
51
-
52
-
53
-
54
-
55
-
56
-
57
-
58
-
59
-
60
-
61
-
62
-
63
-
64
-
65
-
66
-
67
-
68
-
69
-
70
-
71
-
72
-
73
-
74
-
75
-
76
-
77
-
78
-
79
-
80
-
81
-
82
-
83
-
84
-
85
-
86
-
87
-
88
-
89
-
90
-
91
-
92
-
93
-
94
-
95
-
96
-
97
-
98
-
99
-
100
-
101
-
102
-
103
-
104
-
105
-
106
-
107
-
108
-
109
-
110
-
111
-
112
-
113
-
114
-
115
-
116
-
117
-
118
-
119
-
120
-
121
-
122
-
123
-
124
-
125
-
126
-
127
-
128
-
129
-
130
-
131
-
132
-
133
-
134
-
135
-
136
-
137
-
138
-
139
-
140
-
141
-
142
-
143
-
144
-
145
-
146
-
147
-
148
-
149
-
150
-
151
-
152
-
153
-
154
-
155
-
156
-
 157
157 -
 158
158 -
 159
159 -
 160
160 -
 161
161 -
 162
162 -
 163
163 -
 164
164 -
 165
165 -
 166
166 -
 167
167 -
168
-
169
-
170
-
171
-
172
-
173
-
174
-
175
-
176
-
177
-
178
-
179
-
180
-
181
-
182
-
183
-
184
-
185
-
186
-
187
-
188
-
189
-
190
-
191
-
192
-
193
-
194
-
195
-
196
-
197
-
198
-
199
-
200
-
201
-
202
-
203
-
204
-
205
-
206
-
207
-
208
-
209
-
210
-
211
-
212
-
213
-
214
-
215
-
216
-
217
-
218
-
219
-
220
-
221
-
222
-
223
-
224
-
225
-
226
-
227
-
228
-
229
-
230
-
231
-
232
-
233
-
234
-
235
-
236
-
237
-
238
-
239
-
240
-
241
-
242
-
243
-
244
-
245
-
246
-
247
-
248
-
249
-
250
-
251
-
252
-
253
-
254
-
255
-
256
-
257
-
258
-
259
-
260
-
261
-
262
-
263
-
264
-
265
-
266
-
267
-
268
-
269
-
270
-
271
-
272
-
273
-
274
-
275
-
276
-
277
-
278
-
279
-
280
-
281
-
282
-
283
-
284
-
285
-
286
-
287
-
288
-
289
-
290
-
291
-
292
-
293
-
294
-
295
-
296
-
297
-
298
-
299
-
300
-
301
-
302
-
303
-
304
-
305
-
306
-
307
-
308
-
309
-
310
-
311
-
312
-
313
-
314
-
315
-
316
-
317
-
318
-
319
-
320
-
321
-
322
-
323
-
324
-
325
-
326
-
327
-
328
-
329
-
330
-
331
-
332
-
333
-
334
-
335
-
336
-
337
-
338
-
339
-
340
 |
 |