HP CP3505 HP Color LaserJet CP3505 Series Printers - User Guide - Page 106
Set a custom paper size from the printer driver, Print, Properties, Preferences, Paper, Paper/Quality
 |
View all HP CP3505 manuals
Add to My Manuals
Save this manual to your list of manuals |
Page 106 highlights
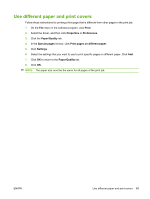
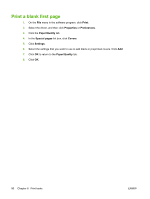
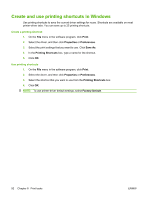
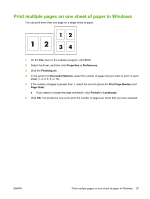
Set a custom paper size from the printer driver 1. On the File menu in the software program, click Print. 2. Select the driver, and then click Properties or Preferences. 3. On the Paper or Paper/Quality tab, click Custom. 4. On the Custom Paper Size window, type the name of the custom paper size. 5. Type the paper-size length and width. If you type a size that is too small or too large, the driver adjusts the size to the minimum or maximum size that is allowed. 6. If necessary, click the button to change the unit of measure between millimeters and inches. 7. Click Save. 8. Click Close. The name that you saved appears in the paper-size list for future use. 94 Chapter 8 Print tasks ENWW
-
 1
1 -
2
-
3
-
4
-
5
-
6
-
7
-
8
-
9
-
10
-
11
-
12
-
13
-
14
-
15
-
16
-
17
-
18
-
19
-
20
-
21
-
22
-
23
-
24
-
25
-
26
-
27
-
28
-
29
-
30
-
31
-
32
-
33
-
34
-
35
-
36
-
37
-
38
-
39
-
40
-
41
-
42
-
43
-
44
-
45
-
46
-
47
-
48
-
49
-
50
-
51
-
52
-
53
-
54
-
55
-
56
-
57
-
58
-
59
-
60
-
61
-
62
-
63
-
64
-
65
-
66
-
67
-
68
-
69
-
70
-
71
-
72
-
73
-
74
-
75
-
76
-
77
-
78
-
79
-
80
-
81
-
82
-
83
-
84
-
85
-
86
-
87
-
88
-
89
-
90
-
91
-
92
-
93
-
94
-
95
-
96
-
97
-
98
-
99
-
100
-
 101
101 -
 102
102 -
 103
103 -
 104
104 -
 105
105 -
 106
106 -
 107
107 -
 108
108 -
 109
109 -
 110
110 -
 111
111 -
112
-
113
-
114
-
115
-
116
-
117
-
118
-
119
-
120
-
121
-
122
-
123
-
124
-
125
-
126
-
127
-
128
-
129
-
130
-
131
-
132
-
133
-
134
-
135
-
136
-
137
-
138
-
139
-
140
-
141
-
142
-
143
-
144
-
145
-
146
-
147
-
148
-
149
-
150
-
151
-
152
-
153
-
154
-
155
-
156
-
157
-
158
-
159
-
160
-
161
-
162
-
163
-
164
-
165
-
166
-
167
-
168
-
169
-
170
-
171
-
172
-
173
-
174
-
175
-
176
-
177
-
178
-
179
-
180
-
181
-
182
-
183
-
184
-
185
-
186
-
187
-
188
-
189
-
190
-
191
-
192
-
193
-
194
-
195
-
196
-
197
-
198
-
199
-
200
-
201
-
202
-
203
-
204
-
205
-
206
-
207
-
208
-
209
-
210
-
211
-
212
-
213
-
214
-
215
-
216
-
217
-
218
-
219
-
220
-
221
-
222
-
223
-
224
-
225
-
226
 |
 |

Set a custom paper size from the printer driver
1.
On the
File
menu in the software program, click
Print
.
2.
Select the driver, and then click
Properties
or
Preferences
.
3.
On the
Paper
or
Paper/Quality
tab, click
Custom
.
4.
On the
Custom Paper Size
window, type the name of the custom paper size.
5.
Type the paper-size length and width. If you type a size that is too small or too large, the driver
adjusts the size to the minimum or maximum size that is allowed.
6.
If necessary, click the button to change the unit of measure between millimeters and inches.
7.
Click
Save
.
8.
Click
Close
. The name that you saved appears in the paper-size list for future use.
94
Chapter 8
Print tasks
ENWW