HP CP3505 HP Color LaserJet CP3505 Series Printers - User Guide - Page 135
Replace supplies and parts, Supply replacement guidelines, Change print cartridges - transfer unit
 |
View all HP CP3505 manuals
Add to My Manuals
Save this manual to your list of manuals |
Page 135 highlights
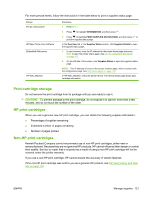
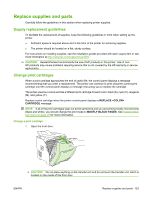
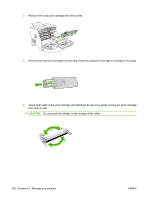
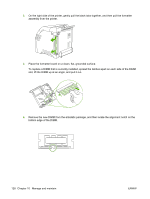
Replace supplies and parts Carefully follow the guidelines in this section when replacing printer supplies. Supply replacement guidelines To facilitate the replacement of supplies, keep the following guidelines in mind when setting up the printer. ● Sufficient space is required above and in the front of the printer for removing supplies. ● The printer should be located on a flat, sturdy surface. For instructions on installing supplies, see the installation guides provided with each supply item or see more information at http://www.hp.com/support/cljcp3505. CAUTION: Hewlett-Packard recommends the use of HP products in this printer. Use of nonHP products may cause problems requiring service that is not covered by the HP warranty or service agreements. Change print cartridges When a print cartridge approaches the end of useful life, the control panel displays a message recommending that you order a replacement. The printer can continue to print using the current print cartridge until the control panel displays a message instructing you to replace the cartridge. The printer uses four colors and has a different print cartridge for each color: black (K), cyan (C), magenta (M), and yellow (Y). Replace a print cartridge when the printer control panel displays a REPLACE CARTRIDGE message. NOTE: If all of the print cartridges wear out at the same time and you are printing mostly monochrome (black and white), you should change the print mode to MOSTLY BLACK PAGES. See System Setup sub-menu on page 20 for more information. Change a print cartridge 1. Open the front door. CAUTION: Do not place anything on the transfer unit and do not touch the transfer unit, which is located on the inside of the front door. ENWW Replace supplies and parts 123
-
 1
1 -
2
-
3
-
4
-
5
-
6
-
7
-
8
-
9
-
10
-
11
-
12
-
13
-
14
-
15
-
16
-
17
-
18
-
19
-
20
-
21
-
22
-
23
-
24
-
25
-
26
-
27
-
28
-
29
-
30
-
31
-
32
-
33
-
34
-
35
-
36
-
37
-
38
-
39
-
40
-
41
-
42
-
43
-
44
-
45
-
46
-
47
-
48
-
49
-
50
-
51
-
52
-
53
-
54
-
55
-
56
-
57
-
58
-
59
-
60
-
61
-
62
-
63
-
64
-
65
-
66
-
67
-
68
-
69
-
70
-
71
-
72
-
73
-
74
-
75
-
76
-
77
-
78
-
79
-
80
-
81
-
82
-
83
-
84
-
85
-
86
-
87
-
88
-
89
-
90
-
91
-
92
-
93
-
94
-
95
-
96
-
97
-
98
-
99
-
100
-
101
-
102
-
103
-
104
-
105
-
106
-
107
-
108
-
109
-
110
-
111
-
112
-
113
-
114
-
115
-
116
-
117
-
118
-
119
-
120
-
121
-
122
-
123
-
124
-
125
-
126
-
127
-
128
-
129
-
 130
130 -
 131
131 -
 132
132 -
 133
133 -
 134
134 -
 135
135 -
 136
136 -
 137
137 -
 138
138 -
 139
139 -
 140
140 -
141
-
142
-
143
-
144
-
145
-
146
-
147
-
148
-
149
-
150
-
151
-
152
-
153
-
154
-
155
-
156
-
157
-
158
-
159
-
160
-
161
-
162
-
163
-
164
-
165
-
166
-
167
-
168
-
169
-
170
-
171
-
172
-
173
-
174
-
175
-
176
-
177
-
178
-
179
-
180
-
181
-
182
-
183
-
184
-
185
-
186
-
187
-
188
-
189
-
190
-
191
-
192
-
193
-
194
-
195
-
196
-
197
-
198
-
199
-
200
-
201
-
202
-
203
-
204
-
205
-
206
-
207
-
208
-
209
-
210
-
211
-
212
-
213
-
214
-
215
-
216
-
217
-
218
-
219
-
220
-
221
-
222
-
223
-
224
-
225
-
226
 |
 |