HP CP3505 HP Color LaserJet CP3505 Series Printers - User Guide - Page 59
Software installation types for Macintosh, Install Macintosh software for direct connections (USB)
 |
View all HP CP3505 manuals
Add to My Manuals
Save this manual to your list of manuals |
Page 59 highlights
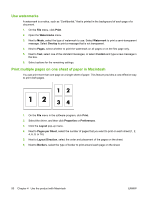
To change the settings for all print jobs until the software program is closed To change the default settings for all To change the device configuration print jobs settings These settings are saved in the 3. Presets menu. To use the new settings, you must select the saved preset option 4. every time you open a program and print. Click on the print queue. On the Printers menu, click Show Info. 5. Click the Installable Options menu. NOTE: Configuration settings might not be available in Classic mode. Software installation types for Macintosh Install Macintosh software for direct connections (USB) 1. Connect a USB cable between the device USB port and the computer USB port. Use a standard 2-meter (6.56-foot) USB cable. 2. Insert the device CD into the CD-ROM drive and run the installer. If the CD menu not run automatically, double-click the CD icon on the desktop. 3. Double-click the Installer icon in the HP LaserJet Installer folder. 4. Follow the instructions on the computer screen. USB printer queues are created automatically when the device is attached to the computer. However, the queue will use a generic PPD if the installer has not been run before the USB cable is connected. Complete the following steps to change the queue PPD. 5. On the computer hard drive, open Applications, open Utilities, and then open Print Center or Printer Setup Utility. NOTE: If you are using Mac OS X V10.3 or Mac OS X V10.4, then the Printer Setup Utility has replaced the Print Center. 6. Select the correct printer queue, and then click Show Info to open the Printer Info dialog box. 7. In the pop-up menu, select Printer Model, and then, in the pop-up menu in which Generic is selected, select the correct PPD for the device. 8. Print a test page from any software program to make sure that the software is correctly installed. If installation fails, reinstall the software. If this fails, see the installation notes or late-breaking readme files on the device CD or the flyer that came in the box for help. Install Macintosh software for networks 1. Connect the network cable between the HP Jetdirect print server and a network port. 2. Insert the CD into the CD-ROM drive. If the CD does not run automatically, double-click the CD icon on the desktop. 3. Double-click the Installer icon in the HP LaserJet Installer folder. 4. Follow the instructions on the computer screen. ENWW Software for Macintosh 47
-
 1
1 -
2
-
3
-
4
-
5
-
6
-
7
-
8
-
9
-
10
-
11
-
12
-
13
-
14
-
15
-
16
-
17
-
18
-
19
-
20
-
21
-
22
-
23
-
24
-
25
-
26
-
27
-
28
-
29
-
30
-
31
-
32
-
33
-
34
-
35
-
36
-
37
-
38
-
39
-
40
-
41
-
42
-
43
-
44
-
45
-
46
-
47
-
48
-
49
-
50
-
51
-
52
-
53
-
 54
54 -
 55
55 -
 56
56 -
 57
57 -
 58
58 -
 59
59 -
 60
60 -
 61
61 -
 62
62 -
 63
63 -
 64
64 -
65
-
66
-
67
-
68
-
69
-
70
-
71
-
72
-
73
-
74
-
75
-
76
-
77
-
78
-
79
-
80
-
81
-
82
-
83
-
84
-
85
-
86
-
87
-
88
-
89
-
90
-
91
-
92
-
93
-
94
-
95
-
96
-
97
-
98
-
99
-
100
-
101
-
102
-
103
-
104
-
105
-
106
-
107
-
108
-
109
-
110
-
111
-
112
-
113
-
114
-
115
-
116
-
117
-
118
-
119
-
120
-
121
-
122
-
123
-
124
-
125
-
126
-
127
-
128
-
129
-
130
-
131
-
132
-
133
-
134
-
135
-
136
-
137
-
138
-
139
-
140
-
141
-
142
-
143
-
144
-
145
-
146
-
147
-
148
-
149
-
150
-
151
-
152
-
153
-
154
-
155
-
156
-
157
-
158
-
159
-
160
-
161
-
162
-
163
-
164
-
165
-
166
-
167
-
168
-
169
-
170
-
171
-
172
-
173
-
174
-
175
-
176
-
177
-
178
-
179
-
180
-
181
-
182
-
183
-
184
-
185
-
186
-
187
-
188
-
189
-
190
-
191
-
192
-
193
-
194
-
195
-
196
-
197
-
198
-
199
-
200
-
201
-
202
-
203
-
204
-
205
-
206
-
207
-
208
-
209
-
210
-
211
-
212
-
213
-
214
-
215
-
216
-
217
-
218
-
219
-
220
-
221
-
222
-
223
-
224
-
225
-
226
 |
 |