HP CP3505 HP Color LaserJet CP3505 Series Printers - User Guide - Page 87
Con tray 2 or tray 3 for custom paper, Print, ANY CUSTOM, CUSTOM
 |
View all HP CP3505 manuals
Add to My Manuals
Save this manual to your list of manuals |
Page 87 highlights
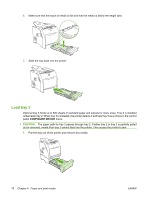
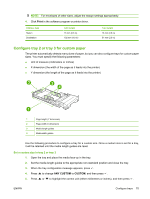
NOTE: For envelopes of other sizes, adjust the margin settings appropriately. 4. Click Print in the software program or printer driver. Address type Return Destination Left margin 15 mm (0.6 in) 102 mm (4.0 in) Top margin 15 mm (0.6 in) 51 mm (2.0 in) Configure tray 2 or tray 3 for custom paper The printer automatically detects many sizes of paper, but you can also configure trays for custom paper sizes. You must specify the following parameters: ● Unit of measure (millimeters or inches) ● X dimension (the width of the page as it feeds into the printer) ● Y dimension (the length of the page as it feeds into the printer) 2 X 3 4 Y 1 1 Page length (Y dimension) 2 Page width (X dimension) 3 Media length guides 4 Media width guides Use the following procedure to configure a tray for a custom size. Once a custom size is set for a tray, it will be retained until the media length guides are reset. Set a custom size in tray 2 or tray 3 1. Open the tray and place the media face-up in the tray. 2. Set the media length guides to the appropriate non-standard position and close the tray. 3. When the tray configuration message appears, press . 4. Press to change ANY CUSTOM to CUSTOM, and then press . 5. Press or to highlight the correct unit (either millimeters or inches), and then press . ENWW Configure trays 75
-
 1
1 -
2
-
3
-
4
-
5
-
6
-
7
-
8
-
9
-
10
-
11
-
12
-
13
-
14
-
15
-
16
-
17
-
18
-
19
-
20
-
21
-
22
-
23
-
24
-
25
-
26
-
27
-
28
-
29
-
30
-
31
-
32
-
33
-
34
-
35
-
36
-
37
-
38
-
39
-
40
-
41
-
42
-
43
-
44
-
45
-
46
-
47
-
48
-
49
-
50
-
51
-
52
-
53
-
54
-
55
-
56
-
57
-
58
-
59
-
60
-
61
-
62
-
63
-
64
-
65
-
66
-
67
-
68
-
69
-
70
-
71
-
72
-
73
-
74
-
75
-
76
-
77
-
78
-
79
-
80
-
81
-
 82
82 -
 83
83 -
 84
84 -
 85
85 -
 86
86 -
 87
87 -
 88
88 -
 89
89 -
 90
90 -
 91
91 -
 92
92 -
93
-
94
-
95
-
96
-
97
-
98
-
99
-
100
-
101
-
102
-
103
-
104
-
105
-
106
-
107
-
108
-
109
-
110
-
111
-
112
-
113
-
114
-
115
-
116
-
117
-
118
-
119
-
120
-
121
-
122
-
123
-
124
-
125
-
126
-
127
-
128
-
129
-
130
-
131
-
132
-
133
-
134
-
135
-
136
-
137
-
138
-
139
-
140
-
141
-
142
-
143
-
144
-
145
-
146
-
147
-
148
-
149
-
150
-
151
-
152
-
153
-
154
-
155
-
156
-
157
-
158
-
159
-
160
-
161
-
162
-
163
-
164
-
165
-
166
-
167
-
168
-
169
-
170
-
171
-
172
-
173
-
174
-
175
-
176
-
177
-
178
-
179
-
180
-
181
-
182
-
183
-
184
-
185
-
186
-
187
-
188
-
189
-
190
-
191
-
192
-
193
-
194
-
195
-
196
-
197
-
198
-
199
-
200
-
201
-
202
-
203
-
204
-
205
-
206
-
207
-
208
-
209
-
210
-
211
-
212
-
213
-
214
-
215
-
216
-
217
-
218
-
219
-
220
-
221
-
222
-
223
-
224
-
225
-
226
 |
 |