HP CP3505 HP Color LaserJet CP3505 Series Printers - User Guide - Page 88
Automatic media type sensing (auto sense mode), Tray 1 sensing - color laserjet printers
 |
View all HP CP3505 manuals
Add to My Manuals
Save this manual to your list of manuals |
Page 88 highlights
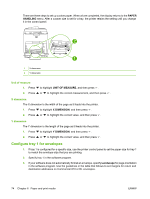
After the unit of measure is set properly, set the X dimension as follows: 6. Press or to highlight the correct value, and then press . If the value entered is outside the valid range, Invalid value appears for two seconds. The controlpanel display prompts you to enter another value. After the X dimension is set properly, set the Y dimension as follows: 7. Press or to highlight the correct value, and then press . If the value entered is outside the valid range, Invalid value appears for two seconds. The controlpanel display prompts you to enter another value. The printer shows a message indicating the dimensions for the custom size. Automatic media type sensing (auto sense mode) The HP Color LaserJet CP3505 automatically classifies media into one of the following categories: ● Plain ● Transparency ● Glossy ● Extra-heavy glossy ● Glossy film ● Heavy ● Light The automatic media type sensor functions only when that tray is configured to Any Type Plain. Configuring a tray to any other type, such as Bond or Glossy, deactivates the media sensor in that tray. NOTE: Get optimal performance with the automatic media sensing feature when using original HP media designed for use in HP color LaserJet printers. NOTE: When printing on heavy media such as cardstock, glossy, or envelopes, achieve optimum print quality by setting the media type through the control panel or software application before printing the job. Tray 1 sensing Full sensing (default) ● The printer stops at each page to sense media type. ● This is the best mode for using mixed media in a single print job. Expanded sensing ● Each time the printer begins a print job, it stops the first page to sense the type. ● The printer assumes that the second and all subsequent pages are of the same media type as the first page. ● This is the second-fastest mode, and is useful for using stacks of the same media type. 76 Chapter 6 Paper and print media ENWW
-
 1
1 -
2
-
3
-
4
-
5
-
6
-
7
-
8
-
9
-
10
-
11
-
12
-
13
-
14
-
15
-
16
-
17
-
18
-
19
-
20
-
21
-
22
-
23
-
24
-
25
-
26
-
27
-
28
-
29
-
30
-
31
-
32
-
33
-
34
-
35
-
36
-
37
-
38
-
39
-
40
-
41
-
42
-
43
-
44
-
45
-
46
-
47
-
48
-
49
-
50
-
51
-
52
-
53
-
54
-
55
-
56
-
57
-
58
-
59
-
60
-
61
-
62
-
63
-
64
-
65
-
66
-
67
-
68
-
69
-
70
-
71
-
72
-
73
-
74
-
75
-
76
-
77
-
78
-
79
-
80
-
81
-
82
-
 83
83 -
 84
84 -
 85
85 -
 86
86 -
 87
87 -
 88
88 -
 89
89 -
 90
90 -
 91
91 -
 92
92 -
 93
93 -
94
-
95
-
96
-
97
-
98
-
99
-
100
-
101
-
102
-
103
-
104
-
105
-
106
-
107
-
108
-
109
-
110
-
111
-
112
-
113
-
114
-
115
-
116
-
117
-
118
-
119
-
120
-
121
-
122
-
123
-
124
-
125
-
126
-
127
-
128
-
129
-
130
-
131
-
132
-
133
-
134
-
135
-
136
-
137
-
138
-
139
-
140
-
141
-
142
-
143
-
144
-
145
-
146
-
147
-
148
-
149
-
150
-
151
-
152
-
153
-
154
-
155
-
156
-
157
-
158
-
159
-
160
-
161
-
162
-
163
-
164
-
165
-
166
-
167
-
168
-
169
-
170
-
171
-
172
-
173
-
174
-
175
-
176
-
177
-
178
-
179
-
180
-
181
-
182
-
183
-
184
-
185
-
186
-
187
-
188
-
189
-
190
-
191
-
192
-
193
-
194
-
195
-
196
-
197
-
198
-
199
-
200
-
201
-
202
-
203
-
204
-
205
-
206
-
207
-
208
-
209
-
210
-
211
-
212
-
213
-
214
-
215
-
216
-
217
-
218
-
219
-
220
-
221
-
222
-
223
-
224
-
225
-
226
 |
 |