HP CP3525dn HP Color LaserJet CP3525 Series Printers - Manage and maintain
HP CP3525dn - Color LaserJet Laser Printer Manual
 |
UPC - 883585891948
View all HP CP3525dn manuals
Add to My Manuals
Save this manual to your list of manuals |
HP CP3525dn manual content summary:
- HP CP3525dn | HP Color LaserJet CP3525 Series Printers - Manage and maintain - Page 1
HP Color LaserJet CP3525 Series - Manage and maintain Load paper and print media How do I? Load Tray 1 Steps to perform 1 Open Tray 1. CAUTION: To avoid jams, never add or remove paper from Tray 1 during printing. 2 Fold out the tray extension to support the paper and set the side guides to the - HP CP3525dn | HP Color LaserJet CP3525 Series Printers - Manage and maintain - Page 2
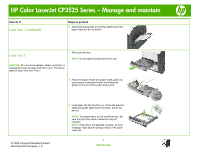
HP Color LaserJet CP3525 Series - Manage and maintain How do I? Load Tray 1 (continued) Steps to perform 5 Adjust the side guides so that they L.P. 3 Load paper into the tray face up. Check the paper to verify the guides lightly touch the stack, but do not bend it. NOTE: To prevent jams, do - HP CP3525dn | HP Color LaserJet CP3525 Series Printers - Manage and maintain - Page 3
HP Color LaserJet CP3525 Series - Manage and maintain How do I? Load Tray 2 (continued) Steps to perform 4 Slide the tray into the product. 5 The control panel shows the tray's paper type and size. If the configuration is not correct, follow the instructions on the control panel to change the - HP CP3525dn | HP Color LaserJet CP3525 Series Printers - Manage and maintain - Page 4
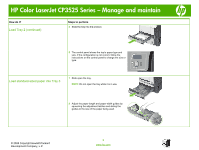
HP Color LaserJet CP3525 Series - Manage and maintain How do I? Load standard-sized paper into Tray 3 (continued) Steps to perform 3 Load paper into the tray face up. Check the paper to verify the guides is not correct, follow the instructions on the control panel to change the size or type - HP CP3525dn | HP Color LaserJet CP3525 Series Printers - Manage and maintain - Page 5
HP Color LaserJet CP3525 Series - Manage and maintain Change print cartridges How do I? Change print cartridges Steps to perform 1 Open the front door. Make sure that the door is completely open. CAUTION: If toner gets on clothing, wipe it off with a dry 2 Grasp the handle of the used print - HP CP3525dn | HP Color LaserJet CP3525 Series Printers - Manage and maintain - Page 6
HP Color LaserJet CP3525 Series - Manage and maintain How do I? Change print cartridges (continued) Steps to perform 5 Grasp both sides of the print cartridge and distribute the toner by gently rocking the print cartridge. CAUTION: Avoid prolonged exposure to light. 6 Remove the orange - HP CP3525dn | HP Color LaserJet CP3525 Series Printers - Manage and maintain - Page 7
HP Color LaserJet CP3525 Series - Manage and maintain Replace the toner collection unit How do I? Replace the toner collection unit Steps to perform 1 Open the front door. Make sure that the door is completely open. NOTE: The toner collection unit is designed for a single use. Do not attempt to - HP CP3525dn | HP Color LaserJet CP3525 Series Printers - Manage and maintain - Page 8
HP Color LaserJet CP3525 Series - Manage and maintain How do I? Replace the toner collection unit (continued) Steps to perform 5 Insert the bottom of the new unit into the product first and then push the top of the unit until it clicks into place. NOTE: If the toner collection unit is not - HP CP3525dn | HP Color LaserJet CP3525 Series Printers - Manage and maintain - Page 9
HP Color LaserJet CP3525 Series - Manage and maintain Clear jams How do I? Clear jams in the right door product is in 2 If paper is jammed as it enters the output bin, gently use. Wait for the fuser to cool before handling it. pull the paper downward to remove it. 3 If paper is jammed inside - HP CP3525dn | HP Color LaserJet CP3525 Series Printers - Manage and maintain - Page 10
HP Color LaserJet CP3525 Series - Manage and maintain How do I? Clear jams in the right door (continued) Steps to perform 5 Close the paper-feed cover. 6 Gently pull the paper out of the pickup area. 7 Look for paper in the Tray 2 roller area. Near the bottom of the right side, squeeze the two - HP CP3525dn | HP Color LaserJet CP3525 Series Printers - Manage and maintain - Page 11
HP Color LaserJet CP3525 Series - Manage and maintain How do I? Clear jams in the right door (continued) Steps to perform 9 Paper could be jammed inside the fuser where it would not be visible. Remove the fuser to check for jammed paper inside. CAUTION: Do not touch the rollers on the transfer - HP CP3525dn | HP Color LaserJet CP3525 Series Printers - Manage and maintain - Page 12
HP Color LaserJet CP3525 Series - Manage and maintain How do I? Clear jams in the output bin area Steps to perform 1 If paper is visible from the no jammed paper is visible in Tray 1, close Tray 1 and open the right door. © 2008 Copyright Hewlett-Packard Development Company, L.P. 12 www.hp.com - HP CP3525dn | HP Color LaserJet CP3525 Series Printers - Manage and maintain - Page 13
HP Color LaserJet CP3525 Series - Manage and maintain How do I? Clear jams in Tray 1 (continued) Steps to perform 3 If paper is visible inside the paper is stacked correctly. Remove any jammed or damaged sheets of paper. © 2008 Copyright Hewlett-Packard Development Company, L.P. 13 www.hp.com - HP CP3525dn | HP Color LaserJet CP3525 Series Printers - Manage and maintain - Page 14
HP Color LaserJet CP3525 Series - Manage and maintain How do I? Clear jams in Tray 2 (continued) Steps to perform 2 Close the tray. 1 Open Tray 3 3. 1 Open the lower right door. Clear jams in the lower right door (Tray 3) © 2008 Copyright Hewlett-Packard Development Company, L.P. 14 www.hp.com - HP CP3525dn | HP Color LaserJet CP3525 Series Printers - Manage and maintain - Page 15
HP Color LaserJet CP3525 Series - Manage and maintain How do I? Steps to perform Clear jams in the lower right door (Tray 3) (continued) 2 If paper is jammed paper up or down to remove it. 3 Close the lower right door. © 2008 Copyright Hewlett-Packard Development Company, L.P. 15 www.hp.com
-
 1
1 -
 2
2 -
 3
3 -
 4
4 -
 5
5 -
 6
6 -
 7
7 -
8
-
9
-
10
-
11
-
12
-
13
-
14
-
15
 |
 |
HP Color LaserJet CP3525 Series – Manage and maintain
© 2008 Copyright Hewlett-Packard
Development Company, L.P.
1
www.hp.com
Load paper and print media
How do I?
Steps to perform
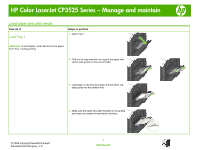
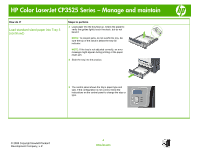
Load Tray 1
CAUTION:
To avoid jams, never add or remove paper
from Tray 1 during printing.
1
Open Tray 1.
2
Fold out the tray extension to support the paper and
set the side guides to the correct width.
3
Load paper in the tray face down and the short, top
edge going into the product first.
4
Make sure the stack fits under the tabs on the guides
and does not exceed the load-level indicators.