HP CP6015dn HP Color LaserJet CP6015 Series - User Guide - Page 174
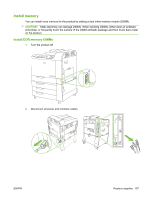
release tab back into place on the formatter board., correct type of DIMM.
 |
UPC - 883585363018
View all HP CP6015dn manuals
Add to My Manuals
Save this manual to your list of manuals |
Page 174 highlights
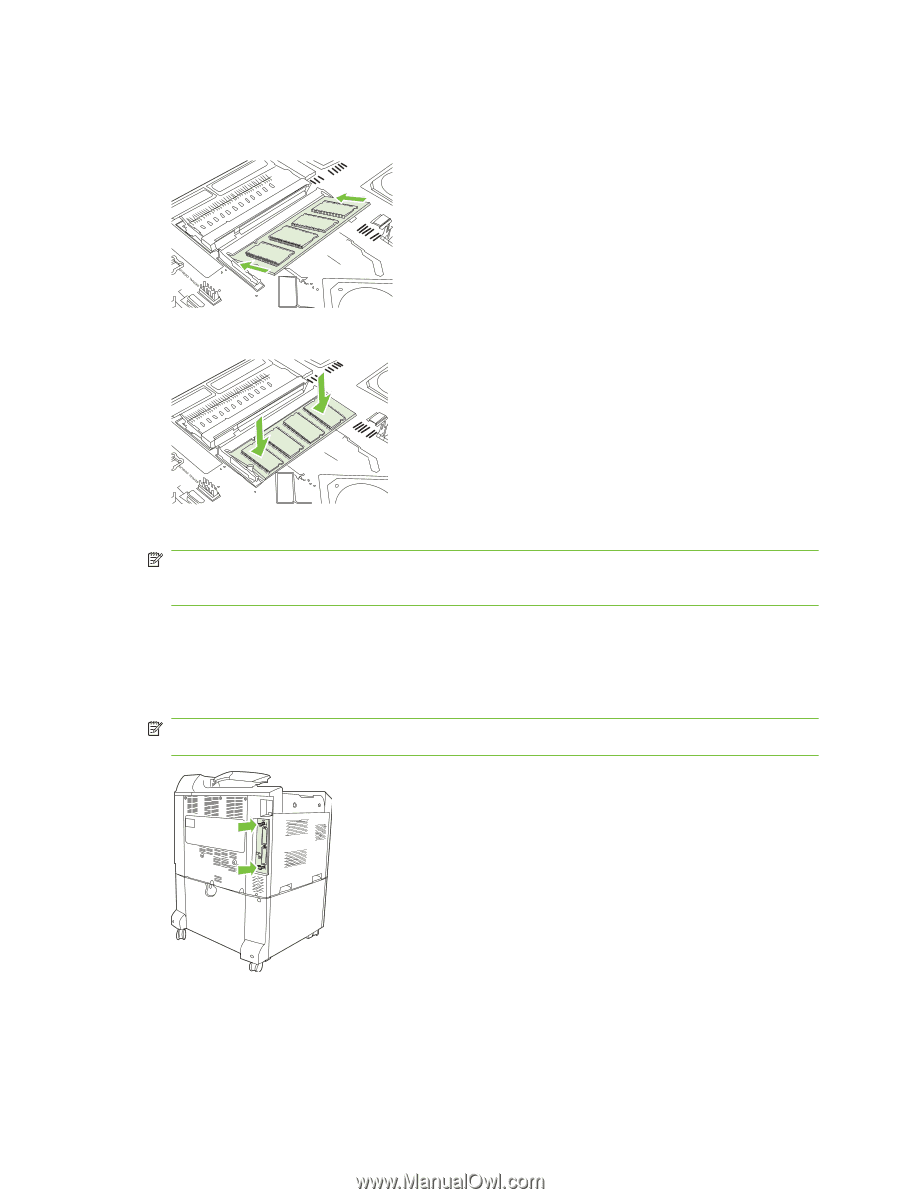
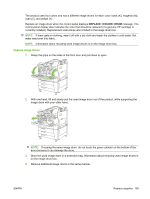
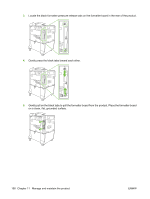
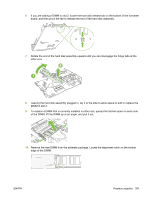
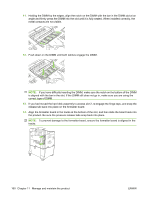
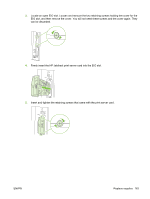
11. Holding the DIMM by the edges, align the notch on the DIMM with the bar in the DIMM slot at an angle and firmly press the DIMM into the slot until it is fully seated. When installed correctly, the metal contacts are not visible. XOXOXOXOXO XOXOXOXOXO XOXOXOXOXO XOXOXOXOXO XOXXOOXXOOXO XOXOXXOOXOXO XOXOXO XOXOXO XOXOXO XOXOXO XOXOXO XOXOXO XOXOXO XOXOXOXO XOXOXO XOXOXO XOXOXO XOXOXO XOXOXO XOXOXOXOXOXO XOXOXOXOXOXO XOXO XOXOXO 12. Push down on the DIMM until both latches engage the DIMM. XOXXOOXXOOXO XOXOXXOOXOXO XOXOXO XIOXIO XIOXIOXIXO XIOXIO XIOXIOXIXO XIOXIO XIOXIOXIXO XIOXIO XIOXIOXIXO OXIXO OXIXO OXIXO OXIXO XOXOXO XOXOXO XOXOXO XOXOXO XOXOXO XOXOXO XOXOXOXO XOXOXO XOXOXO XOXOXO XOXOXO XOXOXO XOXOXOXOXOXO XOXOXOXOXOXO XOXO XOXOXO NOTE: If you have difficulty inserting the DIMM, make sure the notch on the bottom of the DIMM is aligned with the bar in the slot. If the DIMM still does not go in, make sure you are using the correct type of DIMM. 13. If you had moved the hard disk assembly to access slot 2, re engage the hinge taps, and snap the release tab back into place on the formatter board. 14. Align the formatter board in the tracks at the bottom of the slot, and then slide the board back into the product. Be sure the pressure release tabs snap back into place. NOTE: To prevent damage to the formatter board, ensure the formatter board is aligned in the tracks. 160 Chapter 11 Manage and maintain the product ENWW
-
 1
1 -
2
-
3
-
4
-
5
-
6
-
7
-
8
-
9
-
10
-
11
-
12
-
13
-
14
-
15
-
16
-
17
-
18
-
19
-
20
-
21
-
22
-
23
-
24
-
25
-
26
-
27
-
28
-
29
-
30
-
31
-
32
-
33
-
34
-
35
-
36
-
37
-
38
-
39
-
40
-
41
-
42
-
43
-
44
-
45
-
46
-
47
-
48
-
49
-
50
-
51
-
52
-
53
-
54
-
55
-
56
-
57
-
58
-
59
-
60
-
61
-
62
-
63
-
64
-
65
-
66
-
67
-
68
-
69
-
70
-
71
-
72
-
73
-
74
-
75
-
76
-
77
-
78
-
79
-
80
-
81
-
82
-
83
-
84
-
85
-
86
-
87
-
88
-
89
-
90
-
91
-
92
-
93
-
94
-
95
-
96
-
97
-
98
-
99
-
100
-
101
-
102
-
103
-
104
-
105
-
106
-
107
-
108
-
109
-
110
-
111
-
112
-
113
-
114
-
115
-
116
-
117
-
118
-
119
-
120
-
121
-
122
-
123
-
124
-
125
-
126
-
127
-
128
-
129
-
130
-
131
-
132
-
133
-
134
-
135
-
136
-
137
-
138
-
139
-
140
-
141
-
142
-
143
-
144
-
145
-
146
-
147
-
148
-
149
-
150
-
151
-
152
-
153
-
154
-
155
-
156
-
157
-
158
-
159
-
160
-
161
-
162
-
163
-
164
-
165
-
166
-
167
-
168
-
 169
169 -
 170
170 -
 171
171 -
 172
172 -
 173
173 -
 174
174 -
 175
175 -
 176
176 -
 177
177 -
 178
178 -
 179
179 -
180
-
181
-
182
-
183
-
184
-
185
-
186
-
187
-
188
-
189
-
190
-
191
-
192
-
193
-
194
-
195
-
196
-
197
-
198
-
199
-
200
-
201
-
202
-
203
-
204
-
205
-
206
-
207
-
208
-
209
-
210
-
211
-
212
-
213
-
214
-
215
-
216
-
217
-
218
-
219
-
220
-
221
-
222
-
223
-
224
-
225
-
226
-
227
-
228
-
229
-
230
-
231
-
232
-
233
-
234
-
235
-
236
-
237
-
238
-
239
-
240
-
241
-
242
-
243
-
244
-
245
-
246
-
247
-
248
-
249
-
250
-
251
-
252
-
253
-
254
-
255
-
256
-
257
-
258
-
259
-
260
-
261
-
262
-
263
-
264
-
265
-
266
-
267
-
268
-
269
-
270
-
271
-
272
-
273
-
274
-
275
-
276
-
277
-
278
-
279
-
280
-
281
-
282
-
283
-
284
-
285
-
286
-
287
-
288
-
289
-
290
-
291
-
292
-
293
-
294
-
295
-
296
-
297
-
298
-
299
-
300
-
301
-
302
-
303
-
304
-
305
-
306
-
307
-
308
 |
 |