HP CP6015dn HP Color LaserJet CP6015 Series - User Guide - Page 203
Control panel message, Description, Recommended action, CAUTION, INSTALL <COLOR> CARTRIDGE
 |
UPC - 883585363018
View all HP CP6015dn manuals
Add to My Manuals
Save this manual to your list of manuals |
Page 203 highlights
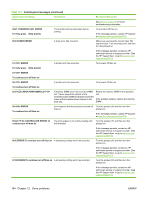
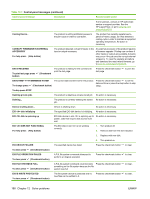
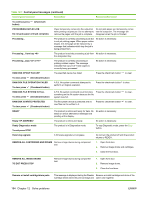
Table 12-1 Control-panel messages (continued) Control panel message Description Recommended action EXTERNAL DEVICE INITIALIZING The external paper handling device is initializing. No action is necessary. FINISHING PROCESS NOT FUNCTIONAL A finishing process has failed. Press the help button for help. For help press (Help button) INCOMPATIBLE FUSER The incorrect fuser was installed. CAUTION: The fuser can be hot while the product is in use. Wait for the fuser to cool before handling it. 1. Open right door. 2. Turn blue levers to unlock position. 3. Remove incompatible fuser. 4. Install correct fuser. 5. Turn blue levers to lock position. 6. Close the right door. INCOMPATIBLE ROLLER KIT Installed roller kit is incompatible. 1. Open right door. 2. Remove incompatible roller kit. 3. Install correct roller kit. 4. Close the right door. Initializing permanent storage Displayed when the product is turned on to show that permanent storage is being initialized. No action is necessary. INPUT PAPER PATH OPEN For help press (Help button) The paper path between the product and the external paper handling input device is open and must be closed before printing can continue. Close the paper path. INSTALL CARTRIDGE For help press (Help button) The print cartridge has been removed or has Replace or reinstall the print cartridge been installed incorrectly. correctly to continue printing. See Change print cartridges on page 152. INSTALL DRUM For help press (Help button) One or more of the drums have been Replace or reinstall the image drum correctly removed or installed incorrectly. to continue printing. See Change image drums on page 154. INSTALL FUSER For help press (Help button) The fuser has been removed or installed incorrectly. CAUTION: The fuser can be hot while the product is in use. Wait for the fuser to cool before handling it. 1. Open right door. 2. Turn blue levers to unlock position. 3. Install or adjust fuser. 4. Turn blue levers to lock position. 5. Close the right door. INSTALL ROLLER UNIT For help press (Help button) The roller unit has been removed or installed 1. incorrectly. 2. Open right door. Open transfer access panel. ENWW Control-panel messages 189
-
 1
1 -
2
-
3
-
4
-
5
-
6
-
7
-
8
-
9
-
10
-
11
-
12
-
13
-
14
-
15
-
16
-
17
-
18
-
19
-
20
-
21
-
22
-
23
-
24
-
25
-
26
-
27
-
28
-
29
-
30
-
31
-
32
-
33
-
34
-
35
-
36
-
37
-
38
-
39
-
40
-
41
-
42
-
43
-
44
-
45
-
46
-
47
-
48
-
49
-
50
-
51
-
52
-
53
-
54
-
55
-
56
-
57
-
58
-
59
-
60
-
61
-
62
-
63
-
64
-
65
-
66
-
67
-
68
-
69
-
70
-
71
-
72
-
73
-
74
-
75
-
76
-
77
-
78
-
79
-
80
-
81
-
82
-
83
-
84
-
85
-
86
-
87
-
88
-
89
-
90
-
91
-
92
-
93
-
94
-
95
-
96
-
97
-
98
-
99
-
100
-
101
-
102
-
103
-
104
-
105
-
106
-
107
-
108
-
109
-
110
-
111
-
112
-
113
-
114
-
115
-
116
-
117
-
118
-
119
-
120
-
121
-
122
-
123
-
124
-
125
-
126
-
127
-
128
-
129
-
130
-
131
-
132
-
133
-
134
-
135
-
136
-
137
-
138
-
139
-
140
-
141
-
142
-
143
-
144
-
145
-
146
-
147
-
148
-
149
-
150
-
151
-
152
-
153
-
154
-
155
-
156
-
157
-
158
-
159
-
160
-
161
-
162
-
163
-
164
-
165
-
166
-
167
-
168
-
169
-
170
-
171
-
172
-
173
-
174
-
175
-
176
-
177
-
178
-
179
-
180
-
181
-
182
-
183
-
184
-
185
-
186
-
187
-
188
-
189
-
190
-
191
-
192
-
193
-
194
-
195
-
196
-
197
-
 198
198 -
 199
199 -
 200
200 -
 201
201 -
 202
202 -
 203
203 -
 204
204 -
 205
205 -
 206
206 -
 207
207 -
 208
208 -
209
-
210
-
211
-
212
-
213
-
214
-
215
-
216
-
217
-
218
-
219
-
220
-
221
-
222
-
223
-
224
-
225
-
226
-
227
-
228
-
229
-
230
-
231
-
232
-
233
-
234
-
235
-
236
-
237
-
238
-
239
-
240
-
241
-
242
-
243
-
244
-
245
-
246
-
247
-
248
-
249
-
250
-
251
-
252
-
253
-
254
-
255
-
256
-
257
-
258
-
259
-
260
-
261
-
262
-
263
-
264
-
265
-
266
-
267
-
268
-
269
-
270
-
271
-
272
-
273
-
274
-
275
-
276
-
277
-
278
-
279
-
280
-
281
-
282
-
283
-
284
-
285
-
286
-
287
-
288
-
289
-
290
-
291
-
292
-
293
-
294
-
295
-
296
-
297
-
298
-
299
-
300
-
301
-
302
-
303
-
304
-
305
-
306
-
307
-
308
 |
 |