HP CP6015dn HP Color LaserJet CP6015 Series - User Guide - Page 209
Replace <color> Cartridge, Replace Roller Kit
 |
UPC - 883585363018
View all HP CP6015dn manuals
Add to My Manuals
Save this manual to your list of manuals |
Page 209 highlights
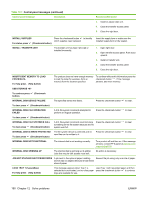
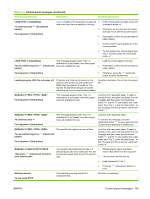
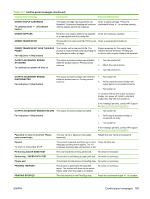
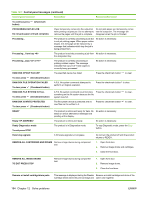
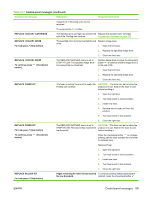
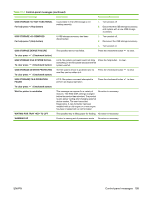
Table 12-1 Control-panel messages (continued) Control panel message Description Recommended action image drum of the same color are not removed. To exit press the Stop button. REPLACE CARTRIDGE The identified print cartridge has reached the Replace the specified color cartridge. end of life. Printing can continue. Change print cartridges on page 152 REPLACE DRUM For help press (Help button) The specified color drum has reached the end Replace image drum. of life. 1. Open the front door. 2. Replace the specified image drum. 3. Close the front door. REPLACE DRUM To continue press button). (Checkmark The REPLACE SUPPLIES menu is set to STOP AT LOW. The specified image drum has passed the low threshold. Replace image drum or press the checkmark button to continue until the image drum is at the end of life. 1. Open the front door. 2. Replace the specified image drum. 3. Close the front door. REPLACE FUSER KIT The fuser is nearing the end of its useful life. CAUTION: The fuser can be hot while the Printing can continue. product is in use. Wait for the fuser to cool before handling it. 1. Open the right door. 2. Turn blue levers to unlock position. 3. Install new fuser. 4. Remove the old fuser unit from the product. 5. Turn blue levers to lock position. 6. Close the right door. REPLACE FUSER KIT For help press (Help button) The REPLACE SUPPLIES menu is set to CAUTION: The fuser can be hot while the STOP AT LOW. The fuser kit has reached the product is in use. Wait for the fuser to cool low threshold. before handling it. To continue press button). (Checkmark Press the checkmark button to continue printing until the fuser reached the end of life or replaced fuser. Replaced fuser 1. Open the right door. 2. Turn blue levers to unlock position. 3. Install new fuser. 4. Turn blue levers to lock position. 5. Close the right door. REPLACE ROLLER KIT For help press (Help button) Pages remaining for roller kit has reached To continue printing without replacing the the low threshold. roller kit, press the checkmark button . ENWW Control-panel messages 195
-
 1
1 -
2
-
3
-
4
-
5
-
6
-
7
-
8
-
9
-
10
-
11
-
12
-
13
-
14
-
15
-
16
-
17
-
18
-
19
-
20
-
21
-
22
-
23
-
24
-
25
-
26
-
27
-
28
-
29
-
30
-
31
-
32
-
33
-
34
-
35
-
36
-
37
-
38
-
39
-
40
-
41
-
42
-
43
-
44
-
45
-
46
-
47
-
48
-
49
-
50
-
51
-
52
-
53
-
54
-
55
-
56
-
57
-
58
-
59
-
60
-
61
-
62
-
63
-
64
-
65
-
66
-
67
-
68
-
69
-
70
-
71
-
72
-
73
-
74
-
75
-
76
-
77
-
78
-
79
-
80
-
81
-
82
-
83
-
84
-
85
-
86
-
87
-
88
-
89
-
90
-
91
-
92
-
93
-
94
-
95
-
96
-
97
-
98
-
99
-
100
-
101
-
102
-
103
-
104
-
105
-
106
-
107
-
108
-
109
-
110
-
111
-
112
-
113
-
114
-
115
-
116
-
117
-
118
-
119
-
120
-
121
-
122
-
123
-
124
-
125
-
126
-
127
-
128
-
129
-
130
-
131
-
132
-
133
-
134
-
135
-
136
-
137
-
138
-
139
-
140
-
141
-
142
-
143
-
144
-
145
-
146
-
147
-
148
-
149
-
150
-
151
-
152
-
153
-
154
-
155
-
156
-
157
-
158
-
159
-
160
-
161
-
162
-
163
-
164
-
165
-
166
-
167
-
168
-
169
-
170
-
171
-
172
-
173
-
174
-
175
-
176
-
177
-
178
-
179
-
180
-
181
-
182
-
183
-
184
-
185
-
186
-
187
-
188
-
189
-
190
-
191
-
192
-
193
-
194
-
195
-
196
-
197
-
198
-
199
-
200
-
201
-
202
-
203
-
 204
204 -
 205
205 -
 206
206 -
 207
207 -
 208
208 -
 209
209 -
 210
210 -
 211
211 -
 212
212 -
 213
213 -
 214
214 -
215
-
216
-
217
-
218
-
219
-
220
-
221
-
222
-
223
-
224
-
225
-
226
-
227
-
228
-
229
-
230
-
231
-
232
-
233
-
234
-
235
-
236
-
237
-
238
-
239
-
240
-
241
-
242
-
243
-
244
-
245
-
246
-
247
-
248
-
249
-
250
-
251
-
252
-
253
-
254
-
255
-
256
-
257
-
258
-
259
-
260
-
261
-
262
-
263
-
264
-
265
-
266
-
267
-
268
-
269
-
270
-
271
-
272
-
273
-
274
-
275
-
276
-
277
-
278
-
279
-
280
-
281
-
282
-
283
-
284
-
285
-
286
-
287
-
288
-
289
-
290
-
291
-
292
-
293
-
294
-
295
-
296
-
297
-
298
-
299
-
300
-
301
-
302
-
303
-
304
-
305
-
306
-
307
-
308
 |
 |