HP CP6015dn HP Color LaserJet CP6015 Series - User Guide - Page 251
Solve image quality problems, Example print quality problems, Repetitive defects ruler - color laserjet toner
 |
UPC - 883585363018
View all HP CP6015dn manuals
Add to My Manuals
Save this manual to your list of manuals |
Page 251 highlights
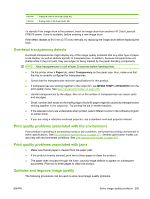
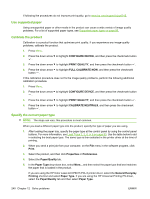
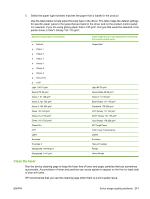
Solve image quality problems This section helps you define print quality problems and what to do to correct them. Often print quality problems can be handled easily by making sure that the product is properly maintained, using paper that meets HP specifications, or running a cleaning page. Example print quality problems Some print quality problems arise from use of inappropriate paper. ● Use paper that meets HP paper specifications. ● The surface of the paper is too rough. Use paper that meets HP paper specifications. ● The printer driver setting or paper tray setting might be incorrect. Be sure that you have configured the paper tray at the product control panel and have also selected the correct driver setting for the paper that you are using. ● The print mode might be set incorrectly, or the paper might not meet recommended specifications. ● The transparencies you are using are not designed for proper toner adhesion. Use only transparencies designed for HP Color LaserJet products. ● The moisture content of the paper is uneven, too high, or too low. Use paper from a different source or from an unopened ream of paper. ● Some areas of the paper reject toner. Use paper from a different source or from an unopened ream of paper. ● The letterhead you are using is printed on rough paper. Use a smoother, xerographic paper. If this solves your problem, consult with the printer of your letterhead to verify that the paper used meets the specifications for this product. ● Several optimize print modes can be used to address print quality issues. See Print Quality menu on page 22. Repetitive defects ruler If defects repeat at regular intervals on the page, use this ruler to identify the cause of the defect. Place the top of the ruler at the first defect. The marking that is beside the next occurrence of the defect indicates which component needs to be replaced. ENWW Solve image quality problems 237
-
 1
1 -
2
-
3
-
4
-
5
-
6
-
7
-
8
-
9
-
10
-
11
-
12
-
13
-
14
-
15
-
16
-
17
-
18
-
19
-
20
-
21
-
22
-
23
-
24
-
25
-
26
-
27
-
28
-
29
-
30
-
31
-
32
-
33
-
34
-
35
-
36
-
37
-
38
-
39
-
40
-
41
-
42
-
43
-
44
-
45
-
46
-
47
-
48
-
49
-
50
-
51
-
52
-
53
-
54
-
55
-
56
-
57
-
58
-
59
-
60
-
61
-
62
-
63
-
64
-
65
-
66
-
67
-
68
-
69
-
70
-
71
-
72
-
73
-
74
-
75
-
76
-
77
-
78
-
79
-
80
-
81
-
82
-
83
-
84
-
85
-
86
-
87
-
88
-
89
-
90
-
91
-
92
-
93
-
94
-
95
-
96
-
97
-
98
-
99
-
100
-
101
-
102
-
103
-
104
-
105
-
106
-
107
-
108
-
109
-
110
-
111
-
112
-
113
-
114
-
115
-
116
-
117
-
118
-
119
-
120
-
121
-
122
-
123
-
124
-
125
-
126
-
127
-
128
-
129
-
130
-
131
-
132
-
133
-
134
-
135
-
136
-
137
-
138
-
139
-
140
-
141
-
142
-
143
-
144
-
145
-
146
-
147
-
148
-
149
-
150
-
151
-
152
-
153
-
154
-
155
-
156
-
157
-
158
-
159
-
160
-
161
-
162
-
163
-
164
-
165
-
166
-
167
-
168
-
169
-
170
-
171
-
172
-
173
-
174
-
175
-
176
-
177
-
178
-
179
-
180
-
181
-
182
-
183
-
184
-
185
-
186
-
187
-
188
-
189
-
190
-
191
-
192
-
193
-
194
-
195
-
196
-
197
-
198
-
199
-
200
-
201
-
202
-
203
-
204
-
205
-
206
-
207
-
208
-
209
-
210
-
211
-
212
-
213
-
214
-
215
-
216
-
217
-
218
-
219
-
220
-
221
-
222
-
223
-
224
-
225
-
226
-
227
-
228
-
229
-
230
-
231
-
232
-
233
-
234
-
235
-
236
-
237
-
238
-
239
-
240
-
241
-
242
-
243
-
244
-
245
-
 246
246 -
 247
247 -
 248
248 -
 249
249 -
 250
250 -
 251
251 -
 252
252 -
 253
253 -
 254
254 -
 255
255 -
 256
256 -
257
-
258
-
259
-
260
-
261
-
262
-
263
-
264
-
265
-
266
-
267
-
268
-
269
-
270
-
271
-
272
-
273
-
274
-
275
-
276
-
277
-
278
-
279
-
280
-
281
-
282
-
283
-
284
-
285
-
286
-
287
-
288
-
289
-
290
-
291
-
292
-
293
-
294
-
295
-
296
-
297
-
298
-
299
-
300
-
301
-
302
-
303
-
304
-
305
-
306
-
307
-
308
 |
 |