HP Cc3310 Processor Installation and Replacement Procedure For the HP cc3310 C
HP Cc3310 - Server - AC Option Manual
 |
View all HP Cc3310 manuals
Add to My Manuals
Save this manual to your list of manuals |
HP Cc3310 manual content summary:
- HP Cc3310 | Processor Installation and Replacement Procedure For the HP cc3310 C - Page 1
Processor Installation and Replacement Procedure For the HP cc3310 Carrier Grade Server Manufacturing Part Number: A9870-90001 August 2003 Edition 2 E0803 - HP Cc3310 | Processor Installation and Replacement Procedure For the HP cc3310 C - Page 2
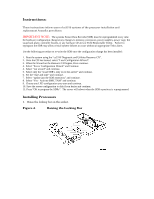
instructions inform users of cc3310 systems of the processor installation and replacement /transfer procedures. IMPORTANT NOTE: The systems Sensor Data Records (SDR) must be reprogrammed every time the hardware configuration changes (any changes to memory, processors, power supplies, power server" - HP Cc3310 | Processor Installation and Replacement Procedure For the HP cc3310 C - Page 3
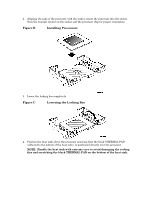
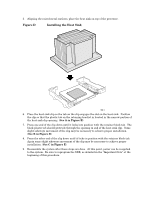
2. Aligning the pins of the processor with the socket, insert the processor into the socket. Note the triangle locator on the socket and the processor chip for proper orientation. Figure B Installing Processors 3. Lower the locking bar completely. Figure C Lowering the Locking Bar 4. Position - HP Cc3310 | Processor Installation and Replacement Procedure For the HP cc3310 C - Page 4
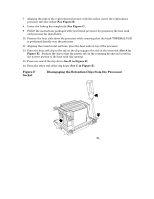
movement of the clip may be necessary to achieve proper installation. (See C in Figure E) 9. Reassemble the system after these steps are done. At this point, power can be reapplied to the system. Be sure to reprogram the SDR, as detailed in the "Important Note" at the beginning of this procedure. - HP Cc3310 | Processor Installation and Replacement Procedure For the HP cc3310 C - Page 5
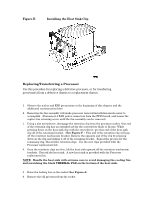
to a replacement chassis. 1. Observe the safety and ESD precautions at the beginning of this chapter and the additional cautions given here. 2. Removing the fan assembly will make processor removal/installation much easier to accomplish. (Disconnect 4 FAN power connectors from the FPIO board, and - HP Cc3310 | Processor Installation and Replacement Procedure For the HP cc3310 C - Page 6
with the socket, insert the replacement processor into the socket (See Figure B). 8. Lower the locking bar completely (See Figure C). 9. Follow the instructions packaged with your boxed processor for preparing the heat sink and processor for installation. 10. Position the heat sink above the
-
 1
1 -
 2
2 -
 3
3 -
 4
4 -
 5
5 -
 6
6
 |
 |

Processor Installation and Replacement
Procedure
For the HP cc3310 Carrier Grade Server
Manufacturing Part Number:
A9870-90001
August 2003
Edition 2
E0803