HP D2D .D2D NAS Integration with HP Data Protector 6.11 (EH985-90933, March 20
HP D2D Manual
 |
View all HP D2D manuals
Add to My Manuals
Save this manual to your list of manuals |
HP D2D manual content summary:
- HP D2D | .D2D NAS Integration with HP Data Protector 6.11 (EH985-90933, March 20 - Page 1
HP D2D NAS Integration with HP Data Protector 6.11 Abstract This guide provides step by step instructions on how to configure and optimize HP Data Protector 6.11 in order to back up to HP D2D Backup Systems using a CIFS backup target. HP Part Number: EH985-90933 Published: February 2011 Edition: 1 - HP D2D | .D2D NAS Integration with HP Data Protector 6.11 (EH985-90933, March 20 - Page 2
Computer Software, Computer Software Documentation, and Technical Data for Commercial Items are licensed to the U.S. Government under vendor's standard commercial license. The information contained herein is subject to change without notice. The only warranties for HP products and services are - HP D2D | .D2D NAS Integration with HP Data Protector 6.11 (EH985-90933, March 20 - Page 3
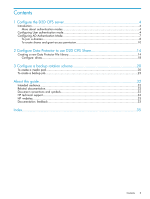
File Library 14 Configure drives...18 3 Configure a backup rotation scheme 20 To create a media pool...20 To create a backup job...23 About this guide 32 Intended audience...32 Related documentation...32 Document conventions and symbols 32 HP technical support...33 HP websites...33 Documentation - HP D2D | .D2D NAS Integration with HP Data Protector 6.11 (EH985-90933, March 20 - Page 4
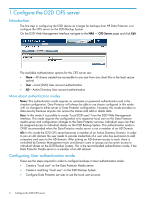
server Introduction The first step in configuring the D2D device as a target for backups from HP Data Protector is to configure the CIFS server on the D2D Backup System. On the D2D Web Management Interface navigate to the NAS - CIFS Server page and click Edit. The available Authentication options - HP D2D | .D2D NAS Integration with HP Data Protector 6.11 (EH985-90933, March 20 - Page 5
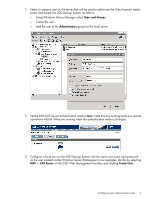
Authentication mode to User. Note that any existing backup or restore operations will fail if they are running when the authentication mode is changed. 3. Configure a local user on the D2D Backup System with the same user name and password as the user created on the Windows Server (Backupuser in - HP D2D | .D2D NAS Integration with HP Data Protector 6.11 (EH985-90933, March 20 - Page 6
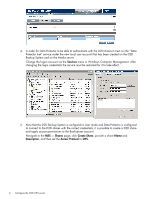
created on the D2D Backup System and on the Media server. Change the logon account via the Services menu in Windows Computer Management. After changing the login credentials the service must be restarted for it to take effect. 5. Now that the D2D Backup System is configured in User mode and Data - HP D2D | .D2D NAS Integration with HP Data Protector 6.11 (EH985-90933, March 20 - Page 7
the steps required in order to configure backups in AD authentication mode: • Join the D2D CIFS server to the AD Domain and configure DNS. • Create or specify a user to be used for backups. • Apply user permissions to D2D shares. • Configure Data Protector services to use the correct Domain account - HP D2D | .D2D NAS Integration with HP Data Protector 6.11 (EH985-90933, March 20 - Page 8
domain. (Note that joining or leaving the domain will result in failure of any backup or restore operations that are currently running.) Provide credentials (username and password) of a domain user that has permission to add computers to the domain and click Register. 8 Configure the D2D CIFS server - HP D2D | .D2D NAS Integration with HP Data Protector 6.11 (EH985-90933, March 20 - Page 9
on the network, the user must also configure the domain's DNS server to be able to correctly manage the D2D shares, as follows: To configure entries manually if the DNS server does not update automatically From a Windows client server that has domain and DNS management tools installed launch the - HP D2D | .D2D NAS Integration with HP Data Protector 6.11 (EH985-90933, March 20 - Page 10
2. Now that the D2D Backup System is a member of the domain its shares can be managed from any computer on the domain by configuring a customized Microsoft Management Console (MMC) with the Shared Folders snap-in. To do this first open a new MMC window by typing mmc at the command prompt or from the - HP D2D | .D2D NAS Integration with HP Data Protector 6.11 (EH985-90933, March 20 - Page 11
3. To this empty MMC window add the Shared Folders snap-in. Select File -> Add/Remove Snap-in ..., then select Shared Folders from the left-hand pane. 4. Click Add > and in the dialog box choose the computer to be managed and select Shares from the View options. 5. Click Finish and OK to complete - HP D2D | .D2D NAS Integration with HP Data Protector 6.11 (EH985-90933, March 20 - Page 12
an internal path on the D2D Backup System. 6. Save this customized snap-in for future use. 7. Select the Share Permissions tab and Add a user or group of users from the domain. Specify the level of permission that the users will receive and click Apply. 8. Now, from any Windows server on the domain - HP D2D | .D2D NAS Integration with HP Data Protector 6.11 (EH985-90933, March 20 - Page 13
be able to authenticate with the D2D shares it must run the "Data Protector Inet" service under the new local user account that has been created on the D2D Backup System and on the Media server. Change the logon account via the Services menu in Windows Computer Management. After changing the login - HP D2D | .D2D NAS Integration with HP Data Protector 6.11 (EH985-90933, March 20 - Page 14
Protector it is good practice to check that the user authentication settings to be used by Data Protector are working. To do this: • Use Windows Explorer to navigate to the D2D CIFS share that is to be used for backup. • Log in with the previously configured username and password to make sure that - HP D2D | .D2D NAS Integration with HP Data Protector 6.11 (EH985-90933, March 20 - Page 15
only works for storage that is local on the media server so cannot be used to locate the D2D CIFS share. After adding the directory path, click Properties in order to specify the following parameters: • Maximum size of file depot: This is the size of each individual backup file. The default is 5 GB - HP D2D | .D2D NAS Integration with HP Data Protector 6.11 (EH985-90933, March 20 - Page 16
type should be set to File, which is the default, and the Distributed Media Format should not be selected. Distributed media format allows the creation of virtual full backups, however, this format is very inefficient when used with deduplication devices due to the creation of a large number of - HP D2D | .D2D NAS Integration with HP Data Protector 6.11 (EH985-90933, March 20 - Page 17
information about the disk space available on the D2D Backup System. If these values are 0, this is an indication that the Data Protector Inet service is not properly configured with the correct authentication settings and backups will fail. 6. After completing the Wizard, the Devices and Media - HP D2D | .D2D NAS Integration with HP Data Protector 6.11 (EH985-90933, March 20 - Page 18
KB for best performance • Segment Size: this is how often a catalog section is written; it can be left at the default of 10 GB • Disk Agent Buffers: this setting can be tuned to improve performance for slow client systems or media servers, the default of 8 is generally acceptable 18 Configure Data - HP D2D | .D2D NAS Integration with HP Data Protector 6.11 (EH985-90933, March 20 - Page 19
Advanced menu - Policies tab Lastly in the Policies tab of the drive properties enable the device for restore and as a source for object copies if required. Creating a new Data Protector File Library 19 - HP D2D | .D2D NAS Integration with HP Data Protector 6.11 (EH985-90933, March 20 - Page 20
and retention scheme configuration with Data Protector. This scheme observes the following best practices: • File Library files are never appended to. Appended backups reduce replication performance, prevent files from being overwritten until all sessions have expired and have no disk space benefit - HP D2D | .D2D NAS Integration with HP Data Protector 6.11 (EH985-90933, March 20 - Page 21
, separate media pools would be created for incremental and full backups from the same backup job, however Data Protector does not allow this configuration. 1. Select the Devices & Media context, and expand the Media - Pools branch. There will be default pool entry for use with the new File Library - HP D2D | .D2D NAS Integration with HP Data Protector 6.11 (EH985-90933, March 20 - Page 22
all backups start a new backup file rather than appending to a backup file from a previous backup. In turn, this prevents a large housekeeping overhead often results in backup failure. Do not select Allocate unformatted media first or Use Free Pool. Click Next. 22 Configure a backup rotation scheme - HP D2D | .D2D NAS Integration with HP Data Protector 6.11 (EH985-90933, March 20 - Page 23
relevance to file media but will result in media files being marked as "Poor" once their "Valid for" and "Maximum Overwrite" thresholds are exceeded. So, created. To create a backup job Now a backup job can be created. In this example a simple "Filesystem" backup is going to be created to back up - HP D2D | .D2D NAS Integration with HP Data Protector 6.11 (EH985-90933, March 20 - Page 24
. If other types of backup agents are to be used, e.g. VMWare backups then this Backup Specification should be selected instead. 2. The Create New Backup Wizard will now start, the first step is to choose from a default backup template or create a "Blank" template to configure manually. In this case - HP D2D | .D2D NAS Integration with HP Data Protector 6.11 (EH985-90933, March 20 - Page 25
device within it. If the Backup Specification were backing more than one object (i.e. filesystem or mount point) and had more than one writer device in the file library then it would be necessary to specify each writer to use for the backup and the load balancing configuration. To create a backup - HP D2D | .D2D NAS Integration with HP Data Protector 6.11 (EH985-90933, March 20 - Page 26
pool to the newly created pool to be used for this backup. Concurrency will already be set to 1 as this was previously configured for the writer device. 6. The next page of the wizard provides options for specifying other backup options, in this case there are no changes required. The protection - HP D2D | .D2D NAS Integration with HP Data Protector 6.11 (EH985-90933, March 20 - Page 27
will be some "conflicts" where for example monthly backups occur on the same day and time as some daily backups. In order to ensure that these higher priority backups overrule schedules for those lower down the priority list, configure backups in the following priority order: 1. Yearly, 2. Monthly - HP D2D | .D2D NAS Integration with HP Data Protector 6.11 (EH985-90933, March 20 - Page 28
we will create an annual full backup to run on the 1st January at 21:00, the protection period for this backup is set to Permanent to ensure that it is never overwritten. Configure monthly full backups to be overwritten every 12 months (52 weeks). Configure weekly full backups to run at 21:00, which - HP D2D | .D2D NAS Integration with HP Data Protector 6.11 (EH985-90933, March 20 - Page 29
Lastly create a daily incremental backup to be overwritten every week. To create a backup job 29 - HP D2D | .D2D NAS Integration with HP Data Protector 6.11 (EH985-90933, March 20 - Page 30
week of incremental backups, the previous backup files will be overwritten. Overwriting of the backup files will result in housekeeping work being generated; this will run in parallel with the backup process and could cause a slight reduction in performance. During the backup Data Protector creates - HP D2D | .D2D NAS Integration with HP Data Protector 6.11 (EH985-90933, March 20 - Page 31
contains troubleshooting information, including details on replacing failed or failing hard disks. • D2D Best Practices for VTL, NAS and Replication implementations: This white paper advises how to plan the workload being placed on the HP StoreOnce Backup System in order to optimize performance and - HP D2D | .D2D NAS Integration with HP Data Protector 6.11 (EH985-90933, March 20 - Page 32
technical support information, see the HP support website: http://www.hp.com/support Before contacting HP, collect the following information: • Product model names and numbers • Technical support registration number (if applicable) • Product serial numbers • Error messages • Operating system - HP D2D | .D2D NAS Integration with HP Data Protector 6.11 (EH985-90933, March 20 - Page 33
To make comments and suggestions about product documentation, please send a message to [email protected]. All submissions become the property of HP. Documentation feedback 33 - HP D2D | .D2D NAS Integration with HP Data Protector 6.11 (EH985-90933, March 20 - Page 34
, 20 P performance, 18 Pointer(PTR) record, 9 R related documentation, 31 S schedule, 27 service , 17 share check accessible, 14 symbols in text, 32 T technical support HP, 32 service locator website, 32 text symbols, 32 U user authentication, 4 configuring, 4 W websites HP , 32 product manuals, 31
-
 1
1 -
 2
2 -
 3
3 -
 4
4 -
 5
5 -
 6
6 -
 7
7 -
8
-
9
-
10
-
11
-
12
-
13
-
14
-
15
-
16
-
17
-
18
-
19
-
20
-
21
-
22
-
23
-
24
-
25
-
26
-
27
-
28
-
29
-
30
-
31
-
32
-
33
-
34
 |
 |

HP D2D NAS
Integration with HP Data Protector 6.11
Abstract
This guide provides step by step instructions on how to configure and optimize HP Data Protector 6.11 in order to back up to
HP D2D Backup Systems using a CIFS backup target.
HP Part Number: EH985-909
33
Published: February 2011
Edition: 1