HP D2D4009i HP D2D Backup System Installation and Configuration guide (EH985-9
HP D2D4009i Manual
 |
View all HP D2D4009i manuals
Add to My Manuals
Save this manual to your list of manuals |
HP D2D4009i manual content summary:
- HP D2D4009i | HP D2D Backup System Installation and Configuration guide (EH985-9 - Page 1
how to install and configure the HP StoreOnce Backup System. IMPORTANT: The localized versions of this guide have been produced prior to launch. The English version that is available on the web at launch may have later updates. Always check http://www.hp.com/support/manuals for the most up-to-date - HP D2D4009i | HP D2D Backup System Installation and Configuration guide (EH985-9 - Page 2
to change without notice. The only warranties for HP products and services are set forth in the express warranty statements accompanying such products and services. Nothing herein should be construed as constituting an additional warranty. HP shall not be liable for technical or editorial errors - HP D2D4009i | HP D2D Backup System Installation and Configuration guide (EH985-9 - Page 3
is the HP StoreOnce Backup System 6 Software and hardware requirements 6 Supported Ethernet configurations 7 Supported Fibre Channel Using the system console (IPv4 and IPv6 30 Using the iLO2 port...31 HP Integrated Lights-Out 2 (iLO2) and HP StoreOnce Backup Systems 32 Manual driver installation - HP D2D4009i | HP D2D Backup System Installation and Configuration guide (EH985-9 - Page 4
D2D4100 Series 53 About this guide 54 Intended audience...54 Related documentation...54 Document conventions and symbols 54 HP technical support...55 Customer self repair...55 Registering your HP StoreOnce Backup System 55 Subscription service...55 HP websites...55 Documentation feedback...56 - HP D2D4009i | HP D2D Backup System Installation and Configuration guide (EH985-9 - Page 5
is required to connect to the Web Management Interface. If supported on your appliance, will you be using other interfaces for wish to use. If using 10Gb Ethernet (HP D2D4300 Series only), configure and enable the 10Gb on the rear of your StoreOnce Backup System is connected to the network and use the - HP D2D4009i | HP D2D Backup System Installation and Configuration guide (EH985-9 - Page 6
://www.hp.com/support/ manuals: • HP StoreOnce Backup System Concepts Guide: If you are new to the HP StoreOnce Backup System, it is a good idea to read this guide before you configure your system. It describes the StoreOnce technology. • HP StoreOnce Backup System User Guide: This guide contains - HP D2D4009i | HP D2D Backup System Installation and Configuration guide (EH985-9 - Page 7
host, not the HP StoreOnce Backup System. The device may be used with the major backup applications from HP, Symantec, EMC, Computer Associates and others. Supported Ethernet configurations The HP StoreOnce Backup System supports both IPv4 and IPv6. The HP StoreOnce Backup System should be connected - HP D2D4009i | HP D2D Backup System Installation and Configuration guide (EH985-9 - Page 8
Recommended web browser settings The web browser used to communicate with the HP StoreOnce Backup System must have Active Scripting or JavaScript enabled. If it does not, some of the browser buttons may not be displayed. Internet Explorer 8.X and 7.X 1. Click on - HP D2D4009i | HP D2D Backup System Installation and Configuration guide (EH985-9 - Page 9
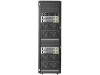
(page 11) Front and rear view of the HP D2D4324/4312 Backup System The HP D2D4300 Series is available in two models: • HP D2D4324 Backup System which has 12 x 2 TB disks • HP D2D4312 Backup System which has 12 x 1 TB disks Both models support connection of up to three expansion shelves (Capacity - HP D2D4009i | HP D2D Backup System Installation and Configuration guide (EH985-9 - Page 10
card Front and rear view of the HP D2D4106/4112 Backup System The HP D2D4100 Series is available in two models: • HP D2D4112 Backup System which has 12 x 1 TB disks • HP D2D4106 Backup System which has 12 x 500 GB disks Both models support connection of a single expansion shelf (Capacity Upgrade - HP D2D4009i | HP D2D Backup System Installation and Configuration guide (EH985-9 - Page 11
Fibre Channel card (not HP D2D4106i) Front and rear view of the HP D2D2502/2504 Backup System The HP D2D2500 Series is available in two models: • HP D2D2504 Backup System which has 4 x 1 TB disks • HP D2D2502 Backup System which has 4 x 750 GB disks Neither model supports connection of an expansion - HP D2D4009i | HP D2D Backup System Installation and Configuration guide (EH985-9 - Page 12
2 4. iLO2 Management port (Do not use for data) 5. PCIe slots (one full and one low profile) 6. VGA port for system console monitor 7. Ports for system console keyboard and mouse NOTE: The full PCIe slot has a SmartArray RAID controller card pre-installed. 12 The HP StoreOnce D2D Backup System - HP D2D4009i | HP D2D Backup System Installation and Configuration guide (EH985-9 - Page 13
the HP StoreOnce Backup System WARNING! Ensure that sufficient personnel are on hand to support the product(s) during the installation process. Use of the appropriate lifting device is recommended as an installation aid. 1. Install the rails in the rack, as required. Follow the instructions provided - HP D2D4009i | HP D2D Backup System Installation and Configuration guide (EH985-9 - Page 14
useful identity information, such as the MAC address and default network name. Make a note of this information before you install the HP StoreOnce Backup System in the rack. On HP D2D2500 Series products there is also a pull-out strip in the front panel with the serial number and port ID. Figure - HP D2D4009i | HP D2D Backup System Installation and Configuration guide (EH985-9 - Page 15
are connected. For detailed safety information, see the Safety Guide on the HP StoreOnce Backup System CD-ROM. 2. Use any CAT-5E network cable ( care if configuring with DHCP because Linux only supports one gateway address. • All other HP StoreOnce Backup System models must be connected to LAN Port - HP D2D4009i | HP D2D Backup System Installation and Configuration guide (EH985-9 - Page 16
port 3 connector, must be connected 4. Ethernet card with two 10Gb ports Connecting the HP D2D4100 Series Backup System Figure 12 Network and power connectors, HP D2D4100 Series Backup System 1. Power connectors 3. LAN port 2 connector 2. LAN port 1 connector, must be connected 4. Fibre Channel - HP D2D4009i | HP D2D Backup System Installation and Configuration guide (EH985-9 - Page 17
is followed. The user is advised to make a record of which shelf serial number is connected to which RAID card and its port for future reference. • HP D2D4100 Series Backup System: Only one expansion shelf may be connected. • HP D2D2500 Series Backup System: This model does not support connection of - HP D2D4009i | HP D2D Backup System Installation and Configuration guide (EH985-9 - Page 18
Figure 14 Cabling the Capacity Upgrade Kit to the HP D2D4324 Backup System 1. Power connectors 3. Power on/off button 2. P1 connector (on I/O-A) 4. Port connector on RAID card HP D2D4312 Backup System This product has two RAID cards and there are two connectors on each card. It does not matter - HP D2D4009i | HP D2D Backup System Installation and Configuration guide (EH985-9 - Page 19
P2 connector. 2. Connect the other end of the cable to the port labeled "Port 1E" on the RAID PCI-e card on the rear of the HP StoreOnce Backup System. 3. Use the supplied power cords to connect the Capacity Upgrade Kit to the mains power supply. Connecting to the Capacity Upgrade Kit (optional) 19 - HP D2D4009i | HP D2D Backup System Installation and Configuration guide (EH985-9 - Page 20
seconds. Press the Power on button on the front of your HP StoreOnce Backup System. The normal boot sequence takes approximately 2 minutes (5 minutes for the HP D2D4300 Series Backup System). On power up the HP StoreOnce Backup System runs its fans at high speed for approximately 10 seconds before - HP D2D4009i | HP D2D Backup System Installation and Configuration guide (EH985-9 - Page 21
Figure 19 Powering on the HP D2D2500 Series Backup System 1. Power On button Powering on the HP StoreOnce Backup System 21 - HP D2D4009i | HP D2D Backup System Installation and Configuration guide (EH985-9 - Page 22
Linux and UNIX Configuration Guideon the HP StoreOnce Backup System CD-ROM for configuration instructions. For Windows users, the recommended way to set up the HP StoreOnce Backup System network is to run the Installation wizard from the HP StoreOnce Backup System CD-ROM. Installation Wizard Even - HP D2D4009i | HP D2D Backup System Installation and Configuration guide (EH985-9 - Page 23
DHCP is enabled by default on the HP StoreOnce Backup System. You can use DHCP to automatically assign network settings to the device, or you can manually configure IP address and other parameters. If your network does not support DHCP and you plan to manually set network parameters, you should have - HP D2D4009i | HP D2D Backup System Installation and Configuration guide (EH985-9 - Page 24
must be assigned manually. NOTE: When installing the HP StoreOnce Backup System for the first time and DHCP is not supported on your Backup System. This will avoid any problems with the IP address of the device changing over reboots. The Installation Wizard connects to the StoreOnce Backup System - HP D2D4009i | HP D2D Backup System Installation and Configuration guide (EH985-9 - Page 25
2. The network supports IPv4, but there is a problem with the network setup. Check the following: • The HP StoreOnce Backup System is powered on. • The HP StoreOnce Backup System is connected to be found in the User Guide, if required. Step 1: Discovering your StoreOnce Backup System (mandatory) 25 - HP D2D4009i | HP D2D Backup System Installation and Configuration guide (EH985-9 - Page 26
the HP StoreOnce Backup System is booted up. If DHCP is supported, backup applications have their own drivers for both the Tape device and Changer. If it is required by the software to use their own drivers, these must be installed manually once the Installation Wizard has completed. Troubleshooting - HP D2D4009i | HP D2D Backup System Installation and Configuration guide (EH985-9 - Page 27
created on the HP StoreOnce Backup System. The iSCSI initiator ships with later versions of Microsoft Windows, but not with XP/2003 or earlier. NOTE: With some versions of Windows the iSCSI initiator service is not started by default. This component must be configured manually by the user to run on - HP D2D4009i | HP D2D Backup System Installation and Configuration guide (EH985-9 - Page 28
recommended way to install the HP StoreOnce Backup System, but it is possible to install it manually. You may also need to run phases independently when troubleshooting. This section describes: • Discovering the HP StoreOnce Backup System (mandatory) (page 28) • Manual driver installation (VTL only - HP D2D4009i | HP D2D Backup System Installation and Configuration guide (EH985-9 - Page 29
may need to temporarily disable the firewall or open UDP ports 8105 and 8106 and retry. Beacon mode The HP StoreOnce Backup System supports a Beacon LED sequence, which helps a user identify which unit is being configured, if several are connected to the network. See also Understanding LEDs (page 44 - HP D2D4009i | HP D2D Backup System Installation and Configuration guide (EH985-9 - Page 30
console connections on the HP D2D4106/4112 Backup System Figure 22 System console connections on the HP D2D2502/2504 Backup System 1 and 2. VGA port for system console monitorand mouse 2 and 3. Ports for system console keyboard 3. Power on the HP StoreOnce Backup System and allow it to boot - HP D2D4009i | HP D2D Backup System Installation and Configuration guide (EH985-9 - Page 31
in the IP address of the HP StoreOnce Backup System to connect to it. Using the iLO2 port This feature is supported on all HP StoreOnce Backup Systems, which are G2 products (it is not supported on older G1 HP StorageWorks products).The HP StoreOnce Backup System is supplied with the iLO2 Advanced - HP D2D4009i | HP D2D Backup System Installation and Configuration guide (EH985-9 - Page 32
to ensure that users and jobs are not interrupted. (The only instances where iLO2 should be used for power management is after a power outage, or if the Web Management Interface and system console fail to operate.) Table 1 Using iLO2 with the HP StoreOnce Backup System System Status - Summary page - HP D2D4009i | HP D2D Backup System Installation and Configuration guide (EH985-9 - Page 33
Interface and follow the instructions in the software release notes on how to upgrade using the software Management CD and USB Key media. Manual driver installation (optional, VTL only) If you intend to create Virtual Tape Devices on the HP StoreOnce Backup System, two drivers are required - HP D2D4009i | HP D2D Backup System Installation and Configuration guide (EH985-9 - Page 34
via the FC ports), it is not necessary; you must use the Web Management interface to create FC library devices, see the HP StoreOnce Backup System user guide. iSCSI is a protocol for sending SCSI commands via Ethernet. It defines how SCSI packets are translated to Ethernet packets and connects to - HP D2D4009i | HP D2D Backup System Installation and Configuration guide (EH985-9 - Page 35
versions of Windows the iSCSI initiator service is not started by default. This component must be configured manually by the user to run on startup. Do and Authentication Authentication is not required for the HP StoreOnce Backup System, but it is supported for those companies that have an IT policy - HP D2D4009i | HP D2D Backup System Installation and Configuration guide (EH985-9 - Page 36
the host to a device on the HP StoreOnce Backup System. It does not provide a comprehensive description of all the tabs; please download the "User Guide" from the Microsoft website for more information . NOTE: IPSec Tunnel Mode is not currently supported on HP D2D products. 36 Advanced installation - HP D2D4009i | HP D2D Backup System Installation and Configuration guide (EH985-9 - Page 37
on the Web Management interface in the Target CHAP Secret field on the Devices page on the Web Management Interface. See the HP StoreOnce Backup System user guide for more information. Discovery tab Figure 30 Discovery tab (iSCSI) Click Add to enter target portals that will enable discovery of the - HP D2D4009i | HP D2D Backup System Installation and Configuration guide (EH985-9 - Page 38
, they appear in the list; no more are created. When you run the iSCSI Initiator manually, new devices have a status of Inactive. You must log on to the appropriate targets for the Automatically restore this connection when the system boots option in the Log On... dialog. 38 Advanced installation - HP D2D4009i | HP D2D Backup System Installation and Configuration guide (EH985-9 - Page 39
the target must also log on to the Initiator, make sure that the Perform mutual authentication box is checked. You must also provide the Target User Name and Secret on the Devices page in the Web Management Interface. Persistent Targets tab The Persistent Targets tab shows the targets that have been - HP D2D4009i | HP D2D Backup System Installation and Configuration guide (EH985-9 - Page 40
the HP StoreOnce Backup System to the Fibre Channel Switch. 3. The switch must have a multi-mode transceiver that supports speeds of: • HP D2D4300 Series: 8Gbs (preferred), 4Gbs or 2Gbs • HP D2D4100 Series: 4Gbs (preferred) or 2Gbs 4. Run the Installation wizard , as described in this guide. 5. Run - HP D2D4009i | HP D2D Backup System Installation and Configuration guide (EH985-9 - Page 41
device discovery process. • Disk and tape on the same pair of HBAs is supported along with the coexistence of array multipath software (no multipath to tape or library devices on the HP StoreOnce Backup System, but coexistence of the multipath software and tape devices). • Large fabric (128 ports - HP D2D4009i | HP D2D Backup System Installation and Configuration guide (EH985-9 - Page 42
ports much be connected to the same switch, and the switch must support and be configured to use "Link Aggregation Control Protocol" (LACP). NOTE OK status for both ports.) If using a bonded network mode with the HP D2D4300 Backup System, be aware that the bonded ports must be of the same speed. To - HP D2D4009i | HP D2D Backup System Installation and Configuration guide (EH985-9 - Page 43
For Cisco switches: Switch Switch Switch#configure terminal Switch(config)#interface range fastEthernet < slot/port number > Switch(config-if-range)#channel-protocol lacp Switch(config-if-range)#channel-group mode active If there is a number of Vlans configured on the switch, - HP D2D4009i | HP D2D Backup System Installation and Configuration guide (EH985-9 - Page 44
Flashing red: critical condition, such as power supply or fan failure Steady blue: identifies the unit Amber: Power off or system hardware fault The HP Systems Insight Display LEDs represent the system board layout and may be useful for troubleshooting. See the "Maintenance and Service Guide - HP D2D4009i | HP D2D Backup System Installation and Configuration guide (EH985-9 - Page 45
. Off: No connection. Flashing green: Ongoing network data activity. Off: No network data activity or no connection. HP D2D4112/4106 Backup System Front view of the HP D2D4112/4106 Backup System Figure 37 Front view of the HP D2D4112/4106 Backup System 1. Beacon LED 2. System Health LED Steady - HP D2D4009i | HP D2D Backup System Installation and Configuration guide (EH985-9 - Page 46
Off: No connection. Flashing green: Ongoing network data activity. Off: No network data activity or no connection. HP D2D2502/2504 Backup System Front view of the HP D2D2502/2504 Backup System Figure 39 Front view of the HP D2D2502/2504 Backup System 1. HP D2D Beacon LED 2. System Health LED 46 - HP D2D4009i | HP D2D Backup System Installation and Configuration guide (EH985-9 - Page 47
/2504 Backup System Figure 40 HP D2D2502/2504 Backup System rear panel LEDs 1. LAN network speed LED indicator 2. LAN activity status LED indicator Steady green: The LAN connection is using 10 Mbps/100 Mbps link. Steady amber: The LAN connection is using a GbE link. Off: No connection. Flashing - HP D2D4009i | HP D2D Backup System Installation and Configuration guide (EH985-9 - Page 48
Off: The disk is not a part of RAID Steady blue: identifies a specific disk within the unit Beacon mode The HP StoreOnce Backup System supports a Beacon LED sequence, which helps a user identify which unit is being configured, if several are connected to the network. There is also a Beacon LED on - HP D2D4009i | HP D2D Backup System Installation and Configuration guide (EH985-9 - Page 49
Figure 42 Capacity Upgrade LEDs 1. Health LED 2. Fault LED 3. UID button/LED Green: System activity Off: No system activity Amber: Fault condition Off: No fault condition Blue: Identified Flashing blue: Active remote management Off: No remote management Capacity upgrade kit LEDs 49 - HP D2D4009i | HP D2D Backup System Installation and Configuration guide (EH985-9 - Page 50
in this chapter to troubleshoot problems. More detailed troubleshooting information can be found at http://www.hp.com/support. This chapter provides troubleshooting information on: • Connecting the hardware (page 50) • Connecting to the HP StoreOnce Backup System from the backup application (page 50 - HP D2D4009i | HP D2D Backup System Installation and Configuration guide (EH985-9 - Page 51
flashing, check that you have the correct IP address for your HP StoreOnce Backup System. Are you using DHCP or Static IP addressing for your HP StoreOnce Backup System the HP StoreOnce Backup System does not support DHCPv6. 4. Try to PING / PINGv6 the IP address of the HP StoreOnce Backup System. If - HP D2D4009i | HP D2D Backup System Installation and Configuration guide (EH985-9 - Page 52
LEDs will turn on. Please refer to SmartArray RAID information on http://www.hp.com/support. • If the System Console screen is not seen: ◦ The HP StoreOnce Backup System operating system may not be seen or recognized. Check the flash memory module inside the unit for correct seating. (To locate the - HP D2D4009i | HP D2D Backup System Installation and Configuration guide (EH985-9 - Page 53
this action. Cannot connect to a NAS share The following sequence will cause problems when connecting to a NAS share. 1. Create an NFS share and mount it on a Linux box. 2. Delete the share on the HP StoreOnce Backup System without unmounting it from the Linux box. 3. Recreate the share again with - HP D2D4009i | HP D2D Backup System Installation and Configuration guide (EH985-9 - Page 54
in English, French, German and Japanese) • HP StoreOnce Backup System Concepts guide • HP StoreOnce Backup System User guide You can find these documents from the Manuals page of the HP Business Support Center website: http://www.hp.com/support/manuals In the Storage section, click Storage - HP D2D4009i | HP D2D Backup System Installation and Configuration guide (EH985-9 - Page 55
more information about CSR, contact your local service provider. For North America, see the CSR website: http://www.hp.com/go/selfrepair Registering your HP StoreOnce Backup System Once you have installed and tested your HP StoreOnce Backup System please take a few minutes to register your product - HP D2D4009i | HP D2D Backup System Installation and Configuration guide (EH985-9 - Page 56
• http://www.hp.com/support/manuals • http://www.hp.com/support/downloads Documentation feedback HP welcomes your feedback. To make comments and suggestions about product documentation, please send a message to [email protected]. All submissions become the property of HP. 56 - HP D2D4009i | HP D2D Backup System Installation and Configuration guide (EH985-9 - Page 57
, 26 installing manually, 33 troubleshooting, 26 Dual Port configuration, 42 E ethernet configurations, 7 F Fibre Channel connection , 40 creating devices, 40 LEDs, 48 fibre channel and iSCSI, 34 topologies, 7 zoning, 41 Fibre Channel connections, 7 front view D2D2502/2504 Backup System, 11 D2D4106 - HP D2D4009i | HP D2D Backup System Installation and Configuration guide (EH985-9 - Page 58
, 46 HP D2D4112/4106 Backup System, 45 HP D2D4324/4312 Backup System, 44 Linux iSCSI initiator, 34 locating D2D, 24 logging on, 24 M MAC address, 25 manual installation information required, 23 mounting Backup System, 13 mutual CHAP authentication, 38 N NAS shares, 26, 27 network troubleshooting, 50 - HP D2D4009i | HP D2D Backup System Installation and Configuration guide (EH985-9 - Page 59
connect, 53 StoreOnce Backup System definition, 6 Subscriber's Choice, HP, 55 symbols in text, 54 system console, 30 System Health LED, 44 troubleshooting, 52 System Insight Display, 44 T target authentication, 36 Targets tab iSCSI initiator, 38 technical support HP, 55 service locator website, 55
-
 1
1 -
 2
2 -
 3
3 -
 4
4 -
 5
5 -
 6
6 -
 7
7 -
8
-
9
-
10
-
11
-
12
-
13
-
14
-
15
-
16
-
17
-
18
-
19
-
20
-
21
-
22
-
23
-
24
-
25
-
26
-
27
-
28
-
29
-
30
-
31
-
32
-
33
-
34
-
35
-
36
-
37
-
38
-
39
-
40
-
41
-
42
-
43
-
44
-
45
-
46
-
47
-
48
-
49
-
50
-
51
-
52
-
53
-
54
-
55
-
56
-
57
-
58
-
59
 |
 |

HP StoreOnce
Backup System
Installation and Configuration Guide
Abstract
This document describes how to install and configure the HP StoreOnce Backup System.
IMPORTANT:
The localized versions of this guide have been produced prior to launch. The English version that is available
on the web at launch may have later updates. Always check
h
t
tp://w
w
w
.hp
.co
m/su
ppo
r
t/man
uals
for the most up-to-date
documentation for your product.
HP Part Number: EH985-90923
Published: March 2012
Edition: Second