HP D6000 HP D6000 Disk Enclosure Installation Instructions
HP D6000 Manual
 |
View all HP D6000 manuals
Add to My Manuals
Save this manual to your list of manuals |
HP D6000 manual content summary:
- HP D6000 | HP D6000 Disk Enclosure Installation Instructions - Page 1
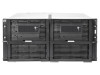
HP D6000 Disk Enclosure Installation Instructions Part Number: 682252-001 September 2012 Edition: 1 - HP D6000 | HP D6000 Disk Enclosure Installation Instructions - Page 2
rack rests on the leveling jacks. • The stabilizing feet are attached to the rack if it is a single-rack installation. • The racks are coupled together in multiple-rack installations. • Only one component is extended at a time. A rack may become unstable if more than one component is extended for - HP D6000 | HP D6000 Disk Enclosure Installation Instructions - Page 3
. • You must install a 1U tray beneath the D6000 to ensure proper support. • Be sure sufficient clearance exists for cabling, installation and removal of the enclosure, actuation of the rack doors, and full articulation of the drive drawers. IMPORTANT: Some racks other than the HP Rack 10000 Series - HP D6000 | HP D6000 Disk Enclosure Installation Instructions - Page 4
and guidelines for manual material handling. • Remove all installed enclosure components from their enclosures before installing or moving the enclosures. • Use caution and get help to lift and stabilize enclosures during installation or removal, especially when the enclosure is not fastened - HP D6000 | HP D6000 Disk Enclosure Installation Instructions - Page 5
bays are populated with a drive or a drive blank. Before installing the drives, confirm that they are supported for use in the enclosure. For more information, see the QuickSpecs on the HP website (http://www.hp.com/go/d6000/quickspecs). When adding hard drives to the hard drive drawer, observe the - HP D6000 | HP D6000 Disk Enclosure Installation Instructions - Page 6
equipment, do not extend the hard drive drawers beyond the supporting surface when the unit is not installed in a rack. WARNING: To reduce the risk of personal prevent improper cooling and thermal damage, do not operate the D6000 for an extended period of time with the drawer open. CAUTION: To - HP D6000 | HP D6000 Disk Enclosure Installation Instructions - Page 7
4. Remove the hard drive blank. 5. Prepare the hard drive. - HP D6000 | HP D6000 Disk Enclosure Installation Instructions - Page 8
close the hard drive drawer. 3 Installing optional I/O modules The D6000 ships with two I/O modules, one for each storage drawer. Installing additional I/O modules expands support from single-domain to dual-domain. CAUTION: If the I/O module is installed in an enclosure for which it was not designed - HP D6000 | HP D6000 Disk Enclosure Installation Instructions - Page 9
blank handle, pull the I/O blank handle down until it ejects the I/O blank, and then remove the I/O blank from the enclosure. 3. To install the I/O module, insert the I/O module into the enclosure and push the I/O module handle up. Be sure the I/O module is seated fully, and the I/O module handle is - HP D6000 | HP D6000 Disk Enclosure Installation Instructions - Page 10
domain is supported. When additional, optional I/O modules are installed, dual-domain is supported. Because each D6000 storage drawer is managed as a separate enclosure, the drawers can be connected to different servers or switches. To connect the mini-SAS I/O cables: 1. Connect a mini-SAS cable - HP D6000 | HP D6000 Disk Enclosure Installation Instructions - Page 11
• HP BladeSystem Deployment Guide for Solutions with 6Gb SAS BL Switches and External SAS Storage Enclosures Power cords The power cord should be approved for use in your country. The power cord must be rated for the product and for the voltage and current marked on the electrical ratings label of - HP D6000 | HP D6000 Disk Enclosure Installation Instructions - Page 12
them at power up. • Always power up the D6000 first, and then the server. To power up the D6000: 1. Complete server hardware installation and cabling. For more information, see the server documentation. 2. Connect the SAS cables and power cords to the D6000. 3. Press and hold the Power On/Standby - HP D6000 | HP D6000 Disk Enclosure Installation Instructions - Page 13
-
 1
1 -
 2
2 -
 3
3 -
 4
4 -
 5
5 -
 6
6 -
 7
7 -
8
-
9
-
10
-
11
-
12
-
13
 |
 |

HP D6000 Disk Enclosure
Installation Instructions
Part Number: 682252-001
September 2012
Edition: 1