HP Dc5750 RAID on HP Compaq dc5750 Business PCs
HP Dc5750 - Compaq Business Desktop Manual
 |
UPC - 883585056446
View all HP Dc5750 manuals
Add to My Manuals
Save this manual to your list of manuals |
HP Dc5750 manual content summary:
- HP Dc5750 | RAID on HP Compaq dc5750 Business PCs - Page 1
Array of Independent Disks (RAID) on HP Compaq dc5750 Business PCs Using ATI Array Management Software (WebPAM) Introduction 2 Mirroring and Parity 2 Disk Striping 2 Basics of RAID Technology 2 Definitions 2 Basic RAID Types 4 RAID 0 with two hard drives (Striped 4 RAID 1 with two hard - HP Dc5750 | RAID on HP Compaq dc5750 Business PCs - Page 2
system boards often have RAID controllers. RAID technology takes advantage of Serial Advanced Technology Attachment (SATA) and the integration of RAID into ATI's Radeon Xpress 1150 chipset with SB600 technology. The HP Compaq dc5750 Business PC products incorporate RAID drive support through factory - HP Dc5750 | RAID on HP Compaq dc5750 Business PCs - Page 3
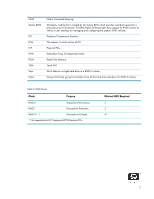
going horizontally across all the hard drive members of a RAID 0 volume. Table 2 RAID Drives Mode Purpose RAID 0 Striped for Performance. RAID 1 Mirrored for Protection. RAID 0 + 1 Mirrored and Striped. * Not supported on HP Compaq dc5750 Business PCs. Minimal HDD Required 2 2 4* 3 - HP Dc5750 | RAID on HP Compaq dc5750 Business PCs - Page 4
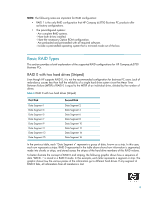
Types This section provides a brief explanation of the supported RAID configurations for HP Compaq dc5750 Business PCs. RAID 0 with two hard drives (Striped) Even though HP supports RAID 0, it is not the recommended configuration for business PC users. Lack of redundancy causes less than half the - HP Dc5750 | RAID on HP Compaq dc5750 Business PCs - Page 5
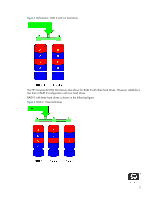
- RAID 0 with two hard drives The HP Compaq dc5750 Microtower also allows for RAID 0 with three hard drives. However, reliability is less than a RAID 0 configuration with two hard drives. RAID 0 with three hard drives is shown in the following figure: Figure 2 RAID 0 - Three hard drives 5 - HP Dc5750 | RAID on HP Compaq dc5750 Business PCs - Page 6
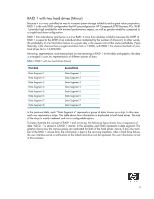
a great value proposition, RAID 1 is the only RAID configuration that HP preconfigures for HP Compaq dc5750 Business PCs. RAID 1 provides high availability with minimal performance impact, as well as greater reliability compared to a single hard drive configuration. RAID 1 has redundancy and hence - HP Dc5750 | RAID on HP Compaq dc5750 Business PCs - Page 7
support is present to take advantage of the future Microsoft Vista operating system. HP Compaq dc5750 Business PCs are based on the ATI Radeon Xpress 1150 chipset, which is a combined hardware and software RAID solution. The Radeon mass storage controller allows all drives to operate in IDE or RAID - HP Dc5750 | RAID on HP Compaq dc5750 Business PCs - Page 8
system on the hard drive is unaware of this new mass storage controller. If the operating system does not have the RAID drivers enumerated and PnP for the RAID controller, the operating system will fail to boot (blue screen) when Microsoft XP Professional (SP2) attempts to boot. HP Backup and - HP Dc5750 | RAID on HP Compaq dc5750 Business PCs - Page 9
SATA optical drives. • Three hard drive configuration (only on HP Compaq dc5750 Microtower). • Three equal size/type SATA hard drive RAID configurations in RAID 0. • Maximum of one SATA optical drive. Unsupported configurations The HP Compaq dc5750 Business Desktop PC products only support the best - HP Dc5750 | RAID on HP Compaq dc5750 Business PCs - Page 10
you will first need to update your system. 1. To download the latest BIOS softpaq go to the dc5750 software and drivers website at http:// h18007.www1.hp.com/support/files/hpcpqdt/us/locate/64_6313.html#0. To verify your system's version of BIOS: 1. Turn on or restart the computer by clicking Start - HP Dc5750 | RAID on HP Compaq dc5750 Business PCs - Page 11
following: • Microsoft Windows XP CD-ROM and Product Key. • RAID driver floppy. To create one, go to www.hp.com/support. Select your country and language, select Download drivers and software, enter the model number of the computer, and press Enter. Download SP33899 to create the driver floppy. You - HP Dc5750 | RAID on HP Compaq dc5750 Business PCs - Page 12
below displays briefly during boot up. The RAID configuration utility is English only. To configure RAID in other languages, use the Web-based RAID configuration utility. For more information refer to the comprehensive WebPAM User Manual. Configuring RAID Volume using the Option ROM Once you are - HP Dc5750 | RAID on HP Compaq dc5750 Business PCs - Page 13
or any other key to abort. Repeat until all drives are deleted. Press Esc to return to the main menu. 2. Press 1 to access the View Drive Assignments screen. The screen displays a detailed description of available physical drives, including channel, size and status. Press Esc to exit and return to - HP Dc5750 | RAID on HP Compaq dc5750 Business PCs - Page 14
and press Enter. The following screen appears. RAID 1 configurations should accept HP default settings. For all other configurations: • Use the drive(s). • Press Ctrl + Y to save your settings. • At the prompt, press Ctrl + Y to Modify Array Capacity or press any other key to use maximum capacity - HP Dc5750 | RAID on HP Compaq dc5750 Business PCs - Page 15
Windows XP CD-ROM and Product Key. • RAID driver floppy. To create one, go to www.hp.com/support. Select your country and lan- guage, select Download drivers and software, enter the model number of the computer, and press Enter. Download SP33899 to create the driver floppy. 1. Insert the Windows XP - HP Dc5750 | RAID on HP Compaq dc5750 Business PCs - Page 16
Press S at the prompt to Specify Additional Device. 4. Insert the RAID driver floppy and press ENTER to select the RAID driver. 5. Press ENTER to complete the Microsoft Windows installation. WARNING: Customer-created images MUST account for the RAID controller. Failure to install and enumerate the - HP Dc5750 | RAID on HP Compaq dc5750 Business PCs - Page 17
hard drive is unaware of this new mass storage controller. If the operating system does not have the RAID drivers enumerated and PnP for the RAID controller, the operating system will fail to boot (blue screen) when Microsoft XP Professional (SP2) attempts to boot. Additional technical information - HP Dc5750 | RAID on HP Compaq dc5750 Business PCs - Page 18
under Administrative Tools, click on the User Management icon. 2. In the Management Window, click on the admin link. 3. Click on the Settings tab. 4. If you want to change the default password, type the new password into the New Password field. Use up to 8 letters and numbers but no spaces or other - HP Dc5750 | RAID on HP Compaq dc5750 Business PCs - Page 19
events by their severity, check one of the four Select Events boxes at the top of the window. 10. Click the Submit button. For more information about Event Notification, see the WebPAM User Manual. Utility Configuration If you plan to set up Event Notification, you must make these settings. 1. In - HP Dc5750 | RAID on HP Compaq dc5750 Business PCs - Page 20
A comprehensive WebPAM User Manual is available at www.hp.com/support. Select your country and language, select See support and troubleshooting information, enter the model number of the computer, and press Enter. In the Resources category, click Manuals (guides, supplements, addendums, etc
-
 1
1 -
 2
2 -
 3
3 -
 4
4 -
 5
5 -
 6
6 -
 7
7 -
8
-
9
-
10
-
11
-
12
-
13
-
14
-
15
-
16
-
17
-
18
-
19
-
20
 |
 |

1
Redundant Array of Independent Disks (RAID) on HP Compaq
dc5750 Business PCs
Using ATI Array Management Software (WebPAM)
Introduction . . . . . . . . . . . . . . . . . . . . . . . . . . . . . . . . . . . . . . . . . . . . . . . . . . . . . . . . . . . . 2
Mirroring and Parity . . . . . . . . . . . . . . . . . . . . . . . . . . . . . . . . . . . . . . . . . . . . . . . . . . . 2
Disk Striping
. . . . . . . . . . . . . . . . . . . . . . . . . . . . . . . . . . . . . . . . . . . . . . . . . . . . . . . . 2
Basics of RAID Technology
. . . . . . . . . . . . . . . . . . . . . . . . . . . . . . . . . . . . . . . . . . . . . . . . . 2
Definitions . . . . . . . . . . . . . . . . . . . . . . . . . . . . . . . . . . . . . . . . . . . . . . . . . . . . . . . . . . 2
Basic RAID Types . . . . . . . . . . . . . . . . . . . . . . . . . . . . . . . . . . . . . . . . . . . . . . . . . . . . . . . . 4
RAID 0 with two hard drives (Striped) . . . . . . . . . . . . . . . . . . . . . . . . . . . . . . . . . . . . . . . 4
RAID 1 with two hard drives (Mirror)
. . . . . . . . . . . . . . . . . . . . . . . . . . . . . . . . . . . . . . . 6
Configurations . . . . . . . . . . . . . . . . . . . . . . . . . . . . . . . . . . . . . . . . . . . . . . . . . . . . . . . . . . 7
Recommended configurations
. . . . . . . . . . . . . . . . . . . . . . . . . . . . . . . . . . . . . . . . . . . . 7
HP Backup and Recovery interactions . . . . . . . . . . . . . . . . . . . . . . . . . . . . . . . . . . . . . . . 8
Other supported configurations
. . . . . . . . . . . . . . . . . . . . . . . . . . . . . . . . . . . . . . . . . . . 9
Unsupported configurations . . . . . . . . . . . . . . . . . . . . . . . . . . . . . . . . . . . . . . . . . . . . . . 9
Configuring RAID on non-factory preinstalled configurations
. . . . . . . . . . . . . . . . . . . . . . . . . 10
Required BIOS Version
. . . . . . . . . . . . . . . . . . . . . . . . . . . . . . . . . . . . . . . . . . . . . . . . 10
Enabling RAID through F10 System BIOS
. . . . . . . . . . . . . . . . . . . . . . . . . . . . . . . . . . . 10
Configuring RAID Option ROM
. . . . . . . . . . . . . . . . . . . . . . . . . . . . . . . . . . . . . . . . . . 11
Configuring RAID Volume using the Option ROM . . . . . . . . . . . . . . . . . . . . . . . . . . . . . . 12
Select boot order
. . . . . . . . . . . . . . . . . . . . . . . . . . . . . . . . . . . . . . . . . . . . . . . . . . . . 15
Notes for operating system installation
. . . . . . . . . . . . . . . . . . . . . . . . . . . . . . . . . . . . . 15
ATI Array Management Software (WebPAM)
. . . . . . . . . . . . . . . . . . . . . . . . . . . . . . . . . . . 17
Java Runtime Environment . . . . . . . . . . . . . . . . . . . . . . . . . . . . . . . . . . . . . . . . . . . . . . 17
Console Software Installation . . . . . . . . . . . . . . . . . . . . . . . . . . . . . . . . . . . . . . . . . . . . 17
Log-in to WebPAM . . . . . . . . . . . . . . . . . . . . . . . . . . . . . . . . . . . . . . . . . . . . . . . . . . . 17
Recommended Initial Settings . . . . . . . . . . . . . . . . . . . . . . . . . . . . . . . . . . . . . . . . . . . . 18
Degradation
. . . . . . . . . . . . . . . . . . . . . . . . . . . . . . . . . . . . . . . . . . . . . . . . . . . . . . . 20
For More Information
. . . . . . . . . . . . . . . . . . . . . . . . . . . . . . . . . . . . . . . . . . . . . . . . . . . . 20