HP Designjet 4000 Service Manual - Page 13
Banding due to Ink Cartridge replacement while printing - user manual
 |
View all HP Designjet 4000 manuals
Add to My Manuals
Save this manual to your list of manuals |
Page 13 highlights
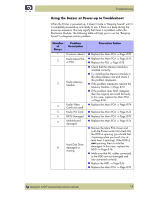
Troubleshooting Banding due to Ink Cartridge replacement while printing A user has removed the Ink Cartridge while the printer was printing, which has caused the printer to stop. If the user does not replace the Ink Cartridge immediately, when the printer starts to print again, a band will appear in the position where the printing restarted. This is because the wet ink interacts with the dried ink on the media causing the band to appear. To solve the problem, try the following: „ Do NOT remove the Ink Cartridge while the Printer is Printing. Only replace/remove Ink Cartridges in between Prints. „ If the Ink Cartridge was replaced due to the "Empty" status on the Front Panel, then advise the customer to replace the Ink Cartridge when the "Very Low" status is showing on the Front Panel. „ Reprint the file (without remove the Ink Cartridge). 34" Rice Paper not supported Roll length is 34" (Non-standard) and the pinch wheels can't control edge of media causing ink smears and Printhead crashes in middle of prints with or without area fills. PRINTER LIMITATION - NO SOLUTION AVAILABLE. Cut Sheet rice paper loading failure Thin rice paper is sucked into the Center Platen grooves and Linear Blade Ridge. This implies that the friction between the Center Platen and the rice paper becomes higher than between the Overdrive wheels and the paper. This effect make it almost impossible to load the rice paper correctly because the Vacuum is too high. PRINTER LIMITATION - NO SOLUTION AVAILABLE. Worm marks on HP Coated media with light area fills Light bands (S-shaped) in Paper axis direction where light area fills are printed, causing unacceptable Image Quality defect. „ Print the Service Configuration Print and check if the level of Humidity is very low (below 30%). Increasing humidity may help in reducing the severity of the problem. The media is causing the problem and NOT the Printer. Do not attempt to try and replace Printer parts to solve this problem. hp designjet 4000 series printer service manual 1-7
-
 1
1 -
2
-
3
-
4
-
5
-
6
-
7
-
 8
8 -
 9
9 -
 10
10 -
 11
11 -
 12
12 -
 13
13 -
 14
14 -
 15
15 -
 16
16 -
 17
17 -
 18
18 -
19
-
20
-
21
-
22
-
23
-
24
-
25
-
26
-
27
-
28
-
29
-
30
-
31
-
32
-
33
-
34
-
35
-
36
-
37
-
38
-
39
-
40
-
41
-
42
-
43
-
44
-
45
-
46
-
47
-
48
-
49
-
50
-
51
-
52
-
53
-
54
-
55
-
56
-
57
-
58
-
59
-
60
-
61
-
62
-
63
-
64
-
65
-
66
-
67
-
68
-
69
-
70
-
71
-
72
-
73
-
74
-
75
-
76
-
77
-
78
-
79
-
80
-
81
-
82
-
83
-
84
-
85
-
86
-
87
-
88
-
89
-
90
-
91
-
92
-
93
-
94
-
95
-
96
-
97
-
98
-
99
-
100
-
101
-
102
-
103
-
104
-
105
-
106
-
107
-
108
-
109
-
110
-
111
-
112
-
113
-
114
-
115
-
116
-
117
-
118
-
119
-
120
-
121
-
122
-
123
-
124
-
125
-
126
-
127
-
128
-
129
-
130
-
131
-
132
-
133
-
134
-
135
-
136
-
137
-
138
-
139
-
140
-
141
-
142
-
143
-
144
-
145
-
146
-
147
-
148
-
149
-
150
-
151
-
152
-
153
-
154
-
155
-
156
-
157
-
158
-
159
-
160
-
161
-
162
-
163
-
164
-
165
-
166
-
167
-
168
-
169
-
170
-
171
-
172
-
173
-
174
-
175
-
176
-
177
-
178
-
179
-
180
-
181
-
182
-
183
-
184
-
185
-
186
-
187
-
188
-
189
-
190
-
191
-
192
-
193
-
194
-
195
-
196
-
197
-
198
-
199
-
200
-
201
-
202
-
203
-
204
-
205
-
206
-
207
-
208
-
209
-
210
-
211
-
212
-
213
-
214
-
215
-
216
-
217
-
218
-
219
-
220
-
221
-
222
-
223
-
224
-
225
-
226
-
227
-
228
-
229
-
230
-
231
-
232
-
233
-
234
-
235
-
236
-
237
-
238
-
239
-
240
-
241
-
242
-
243
-
244
-
245
-
246
-
247
-
248
-
249
-
250
-
251
-
252
-
253
-
254
-
255
-
256
-
257
-
258
-
259
-
260
-
261
-
262
-
263
-
264
-
265
-
266
-
267
-
268
-
269
-
270
-
271
-
272
-
273
-
274
-
275
-
276
-
277
-
278
-
279
-
280
-
281
-
282
-
283
-
284
-
285
-
286
-
287
-
288
-
289
-
290
-
291
-
292
-
293
-
294
-
295
-
296
-
297
-
298
-
299
-
300
-
301
-
302
-
303
-
304
-
305
-
306
-
307
-
308
-
309
-
310
-
311
-
312
-
313
-
314
-
315
-
316
-
317
-
318
-
319
-
320
-
321
-
322
-
323
-
324
-
325
-
326
-
327
-
328
-
329
-
330
-
331
-
332
-
333
-
334
-
335
-
336
-
337
-
338
-
339
-
340
-
341
-
342
-
343
-
344
-
345
-
346
-
347
-
348
-
349
-
350
-
351
-
352
-
353
-
354
-
355
-
356
-
357
-
358
-
359
-
360
-
361
-
362
-
363
-
364
-
365
-
366
-
367
-
368
-
369
-
370
-
371
-
372
 |
 |