HP Designjet 4000 Service Manual - Page 155
Perform a Line Sensor Calibration
 |
View all HP Designjet 4000 manuals
Add to My Manuals
Save this manual to your list of manuals |
Page 155 highlights
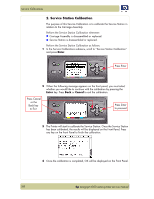
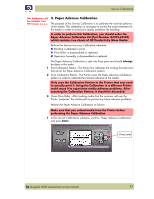
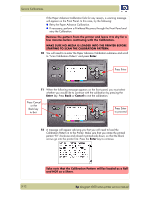
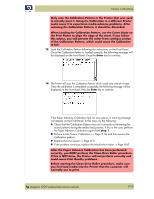
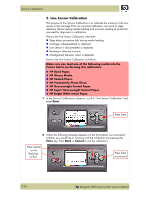
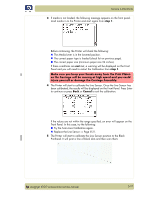
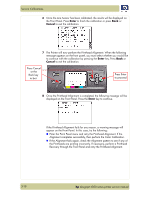
Service Calibrations Only scan the Calibration Pattern in the Printer that was used to actually print it. Using the Calibration in a different Printer could cause it to experience media advance problems. After scanning the Calibration Pattern, it should be discarded. When Loading the Calibration Pattern, use the Cutter blade on the Print Platen to align the edge of the sheet. If you follow this advise, you will prevent the cutter from cutting a section of the Calibration Pattern, which could cause the Calibration to fail. 13 Load the Calibration Pattern following the instructions on the Front Panel. Once the Calibration Pattern is loaded correctly, the following message will be displayed on the Front Panel. Press the Enter key to continue. SCAN AXIS FORWARD Avg PWM: XXX Max PWM: XXX Stabilizat Dist: XXX Avg speed offset: XXX STD speed offset: XXX 14 The Printer will scan the Calibration Pattern which could take several minutes. Once the calibration is completed successfully, the following message will be displayed on the Front Panel. Press the Enter key to continue. If the Paper Advance Calibration fails for any reason, a warning message will appear on the Front Panel. In this case, try the following: „ Check that the Calibration Pattern was not incorrectly cut (trimming the actual pattern) during the media load process. If this is the case, perform the Paper Advance Calibration again from step 1. „ Perform a Line Sensor Calibration (⇒ Page 5-16) and then rescan the Calibration pattern. „ Replace the Line Sensor ⇒ Page 8-31. „ If the problem continues, replace the Media-Axis Motor ⇒ Page 8-62. After the Paper Advance Calibration has been performed correctly, you MUST perform the Clean Drive Roller procedure. If this is NOT done, the Printer will not perform correctly and could cause Print Quality problems. Before starting the Clean Drive Roller procedure, make sure you first load media into the Printer that the customer will normally use to print. hp designjet 4000 series printer service manual 5-13
-
 1
1 -
2
-
3
-
4
-
5
-
6
-
7
-
8
-
9
-
10
-
11
-
12
-
13
-
14
-
15
-
16
-
17
-
18
-
19
-
20
-
21
-
22
-
23
-
24
-
25
-
26
-
27
-
28
-
29
-
30
-
31
-
32
-
33
-
34
-
35
-
36
-
37
-
38
-
39
-
40
-
41
-
42
-
43
-
44
-
45
-
46
-
47
-
48
-
49
-
50
-
51
-
52
-
53
-
54
-
55
-
56
-
57
-
58
-
59
-
60
-
61
-
62
-
63
-
64
-
65
-
66
-
67
-
68
-
69
-
70
-
71
-
72
-
73
-
74
-
75
-
76
-
77
-
78
-
79
-
80
-
81
-
82
-
83
-
84
-
85
-
86
-
87
-
88
-
89
-
90
-
91
-
92
-
93
-
94
-
95
-
96
-
97
-
98
-
99
-
100
-
101
-
102
-
103
-
104
-
105
-
106
-
107
-
108
-
109
-
110
-
111
-
112
-
113
-
114
-
115
-
116
-
117
-
118
-
119
-
120
-
121
-
122
-
123
-
124
-
125
-
126
-
127
-
128
-
129
-
130
-
131
-
132
-
133
-
134
-
135
-
136
-
137
-
138
-
139
-
140
-
141
-
142
-
143
-
144
-
145
-
146
-
147
-
148
-
149
-
 150
150 -
 151
151 -
 152
152 -
 153
153 -
 154
154 -
 155
155 -
 156
156 -
 157
157 -
 158
158 -
 159
159 -
 160
160 -
161
-
162
-
163
-
164
-
165
-
166
-
167
-
168
-
169
-
170
-
171
-
172
-
173
-
174
-
175
-
176
-
177
-
178
-
179
-
180
-
181
-
182
-
183
-
184
-
185
-
186
-
187
-
188
-
189
-
190
-
191
-
192
-
193
-
194
-
195
-
196
-
197
-
198
-
199
-
200
-
201
-
202
-
203
-
204
-
205
-
206
-
207
-
208
-
209
-
210
-
211
-
212
-
213
-
214
-
215
-
216
-
217
-
218
-
219
-
220
-
221
-
222
-
223
-
224
-
225
-
226
-
227
-
228
-
229
-
230
-
231
-
232
-
233
-
234
-
235
-
236
-
237
-
238
-
239
-
240
-
241
-
242
-
243
-
244
-
245
-
246
-
247
-
248
-
249
-
250
-
251
-
252
-
253
-
254
-
255
-
256
-
257
-
258
-
259
-
260
-
261
-
262
-
263
-
264
-
265
-
266
-
267
-
268
-
269
-
270
-
271
-
272
-
273
-
274
-
275
-
276
-
277
-
278
-
279
-
280
-
281
-
282
-
283
-
284
-
285
-
286
-
287
-
288
-
289
-
290
-
291
-
292
-
293
-
294
-
295
-
296
-
297
-
298
-
299
-
300
-
301
-
302
-
303
-
304
-
305
-
306
-
307
-
308
-
309
-
310
-
311
-
312
-
313
-
314
-
315
-
316
-
317
-
318
-
319
-
320
-
321
-
322
-
323
-
324
-
325
-
326
-
327
-
328
-
329
-
330
-
331
-
332
-
333
-
334
-
335
-
336
-
337
-
338
-
339
-
340
-
341
-
342
-
343
-
344
-
345
-
346
-
347
-
348
-
349
-
350
-
351
-
352
-
353
-
354
-
355
-
356
-
357
-
358
-
359
-
360
-
361
-
362
-
363
-
364
-
365
-
366
-
367
-
368
-
369
-
370
-
371
-
372
 |
 |