HP Designjet 510 HP Designjet 510 Printer series - User's Guide: English
HP Designjet 510 Manual
 |
View all HP Designjet 510 manuals
Add to My Manuals
Save this manual to your list of manuals |
HP Designjet 510 manual content summary:
- HP Designjet 510 | HP Designjet 510 Printer series - User's Guide: English - Page 1
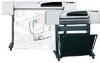
Introduction This User's Reference Guide explains how to use your HP Designjet 510 or 510ps printer. The contents of this guide are valid for both the HP Designjet 510 and the HP Designjet 510ps except where otherwise indicated. This chapter contains the following topics: • Introducing the - HP Designjet 510 | HP Designjet 510 Printer series - User's Guide: English - Page 2
more day-to-day guidance you can refer to the Pocket Guide. • The Pocket Guide gives information that you are most likely to need for printer operation on a daily basis, such as loading paper or replacing ink supplies. • You can also visit us on our Web page: http://www.hp.com/go/graphic-arts/. - HP Designjet 510 | HP Designjet 510 Printer series - User's Guide: English - Page 3
Specifications of the print resolution for your printer. • Paper A description of the different types of paper available for your printer. • User interface A description of the printer's user interface. • Memory Details of internal memory and memory options available with your printer. • Drivers - HP Designjet 510 | HP Designjet 510 Printer series - User's Guide: English - Page 4
's main features The HP Designjet 510 printer is designed for individuals or small work-groups in architecture, engineering and construction (AEC), and mechanical CAD design. The HP Designjet 510ps printer is designed for individuals or small work-groups in advertising agencies, in-house graphic - HP Designjet 510 | HP Designjet 510 Printer series - User's Guide: English - Page 5
addition, the printer includes smart chips that are embedded into each individual printhead and ink HP Designjet 510ps printer also includes easy-to-install RIP software. • HP Premium Printing Material: The A0+/E+ size and D/A1 size printers accept a wide range of roll and sheet paper from 24 - HP Designjet 510 | HP Designjet 510 Printer series - User's Guide: English - Page 6
. They are available in 28 and 69 ml sizes. • All printheads are HP No 11 supplies. Each 600-dpi thermal inkjet printhead applies thousands of ink droplets onto the paper. The printer automatically refills the printhead as it prints, enabling continuous uninterrupted printing. The ink is supplied - HP Designjet 510 | HP Designjet 510 Printer series - User's Guide: English - Page 7
can then choose between three levels of print quality for each of the print modes: Best, Normal or Fast, from your software or from the printer's front panel. With the Best mode selected, you have an additional selection available to provide maximum detail for your printed image by increasing the - HP Designjet 510 | HP Designjet 510 Printer series - User's Guide: English - Page 8
Paper You can print on roll or sheet paper up to 42 in (1066.8 mm) wide with the A0+/E+ size printer and up to 24 in (609.6 mm) with the D/A1 size printer. For a list of the supported paper types, see Physical characteristics of paper types. - HP Designjet 510 | HP Designjet 510 Printer series - User's Guide: English - Page 9
User interface The printer's front panel includes an easy-to-use interface with a display, giving you access to a comprehensive set of printer functions. See Navigating the menu system for a short tutorial to teach you how to navigate through the menus and for a description of internal prints. - HP Designjet 510 | HP Designjet 510 Printer series - User's Guide: English - Page 10
Memory The printer comes with 160 MB of internal Random Access Memory (RAM). Additional memory can be added to the HP-GL/2 Accessory card that came with the printer. You can add 256 MB (part number CH654A) of memory for large-file processing and improved printing. - HP Designjet 510 | HP Designjet 510 Printer series - User's Guide: English - Page 11
that your printer prints exactly what you were expecting in terms of: size, position, orientation, color and quality. NOTE: Many software applications include their own drivers. Your printer comes supplied with: • Windows drivers • Mac OS X drivers • RIP software, for the HP Designjet 510ps only - HP Designjet 510 | HP Designjet 510 Printer series - User's Guide: English - Page 12
Front view of printer Power switch/indicator Printhead Ink cartridge Front panel - HP Designjet 510 | HP Designjet 510 Printer series - User's Guide: English - Page 13
parallel interface or through the Universal Serial Bus (USB) port. For Local Area Network (LAN) connection your printer can be fitted with an optional HP Jetdirect Print Server Fast Ethernet 10/100 base TX network interface card. See the Assembly and Set-up Poster for information on connecting your - HP Designjet 510 | HP Designjet 510 Printer series - User's Guide: English - Page 14
your sheet paper. • Ink system gives you an overview of the printer's ink system, with some warnings and precautions for its optimum use. • Ink cartridges details the procedures used for: obtaining information, interpreting errors, checking levels and replacing ink cartridges. • Printheads details - HP Designjet 510 | HP Designjet 510 Printer series - User's Guide: English - Page 15
printing task. • Paper types Detailed information concerning the different types of paper available for your printer. This includes information on: the types of paper supported, their physical characteristics, quality selection, handling and how to obtain information. • Print times for a selected - HP Designjet 510 | HP Designjet 510 Printer series - User's Guide: English - Page 16
Paper. On HP Coated paper, the same images might cause the paper to wrinkle and then come into contact with the printheads, smearing your print and risking damage to the printhead. See Combinations of paper type and print quality selection. • Whenever you load a roll or a sheet, the printer's front - HP Designjet 510 | HP Designjet 510 Printer series - User's Guide: English - Page 17
them. • Physical characteristics of paper types Details the physical characteristics of each of the supported paper types. • Combinations of paper type and print quality selection Gives guidelines for Explains the precautions to take when handling paper. • Obtaining roll or sheet paper information - HP Designjet 510 | HP Designjet 510 Printer series - User's Guide: English - Page 18
the paper is supported for line drawings only. If the part number is not HP Coated Paper 26 lb. (90 g/m²) - 150 ft (45.7 m) HP Inkjet Coated Paper 26 lb. (90 g/m²) - 150 ft (45.7 m) roll / 100 sheets HP Universal Coated Paper 26 lb. (95 g/m²) - 150 ft (45.7 m) HP Bright White Inkjet Paper 24 - HP Designjet 510 | HP Designjet 510 Printer series - User's Guide: English - Page 19
HP Universal Instant-dry Semi-gloss Photo Paper 190 g/m² - 100 ft (30.5 m) High-Gloss Photo High-Gloss Photo High-Gloss Photo High-Gloss Photo Q1396A Q1397A Q1398A Q1757A (e) Q1760A (en) 18 in 458 mm 24 (aejn) 51642B Q1736A (aen) 18 in 458 mm 24 in 610 mm C6025A (ln) C6033A (aj) Q6574A - HP Designjet 510 | HP Designjet 510 Printer series - User's Guide: English - Page 20
sheets HP Matte Proofing Paper 146 g/m² - 100 ft (30.5 m) / 100 sheets HP Premium Semi-gloss Proofing Paper 240 g/m² - 100 ft (30.5 m) / 13 × 19 in, 50 sheets HP Self-adhesive Material HP ) C3860A (ajn*) C3859A (ln*) 18 in 458 mm Q8049A (en) 24 in 610 mm Q7971A (en) 36 in 914 mm Q8909A (en) 42 - HP Designjet 510 | HP Designjet 510 Printer series - User's Guide: English - Page 21
- 100 ft (30.5 m) HP Fine Art Printing Material HP Canvas Paper 180 g/m² - 35 ft (10.7 m) Metric sizes HP Natural Tracing Paper 90 g/m² - 150 ft (45.7 m) HP Coated Paper 26 lb. (90 g/m²) - 150 ft (45.7 m) HP Bright White Inkjet Paper 24 lb. (90 g/m²) - 150 ft (45.7 m) HP Universal Bond Paper 21 lb - HP Designjet 510 | HP Designjet 510 Printer series - User's Guide: English - Page 22
any of the HP Premium Printing Material, see the pamphlet Hewlett-Packard Printing Materials. From time to time, new paper types may become available. For up-to-date information, please contact your Hewlett-Packard dealer, local Hewlett-Packard Sales and Support Office or the Designjet Online Web - HP Designjet 510 | HP Designjet 510 Printer series - User's Guide: English - Page 23
). • CAD drawings-mono • CAD drawings and GIS-color (lines and low density) • CAD rendering, GIS and images-color and CAD (high ink density). As a general guide: • Fast is best for draft copies of your prints at maximum throughput. • Normal is optimized so that you get the best line quality with the - HP Designjet 510 | HP Designjet 510 Printer series - User's Guide: English - Page 24
CAD drawings-mono The following table lists the recommended print quality settings for specific usage with typical paper. Supported paper types-mono Usage Drafts Final versions Archives Diazo Typical paper selection Plain Paper Bright Inkjet Paper Natural Tracing Paper Translucent Bond Plain Paper - HP Designjet 510 | HP Designjet 510 Printer series - User's Guide: English - Page 25
CAD drawings and GIS-color (lines and low density) The following table lists the recommended print quality settings for specific usage with typical paper. Supported paper types-color Usage Drafts Final versions Archives Transparencies Typical paper selection Plain Paper Bright Inkjet Paper Natural - HP Designjet 510 | HP Designjet 510 Printer series - User's Guide: English - Page 26
, GIS and images-color and CAD (high ink density) The following table lists the recommended print quality settings for specific usage with typical paper. Supported paper types-color and CAD Usage Matte Paper Glossy Transparencies Typical paper selection Heavy Coated Paper High Gloss Photo Paper - HP Designjet 510 | HP Designjet 510 Printer series - User's Guide: English - Page 27
the edges or wear cotton gloves. Skin oils can interact with the ink and cause it to smear. • Although the ink systems supplied with this printer have good light fastness, colors will eventually fade or change if exposed to sunlight over a long period of time. • Rewrap partially used rolls if they - HP Designjet 510 | HP Designjet 510 Printer series - User's Guide: English - Page 28
paper information If roll or sheet paper is loaded, the type of paper is displayed when you select Film Matte Film Coated Paper Heavy Coated Paper High-Gloss Photo Canvas Poster Paper Roll or Sheet If there is no paper loaded, the front-panel display shows the following message and you will need - HP Designjet 510 | HP Designjet 510 Printer series - User's Guide: English - Page 29
Print times for a selected print quality The following table lists some typical printing times for D/A1 size paper. Typical printing times Time (in seconds) Print quality Fast Normal Best Mono lines on Bond 69 216 360 Color lines on Coated Paper 96 216 285 Images on Coated Paper 234 550 940 - HP Designjet 510 | HP Designjet 510 Printer series - User's Guide: English - Page 30
Printable area The following topics detail the printable areas for each of the different paper size systems: • ANSI paper The American National Standards Institute imperial paper sizing system. • Architectural paper The Architectural paper sizing system. • ISO paper The International Standards - HP Designjet 510 | HP Designjet 510 Printer series - User's Guide: English - Page 31
in (17 mm). Where: Printable area = Paper Size - Margins Printable areas for ANSI paper Paper size A B C D E Orientation of paper in printer Portrait Landscape Portrait Landscape Portrait Landscape Portrait Landscape Portrait Landscape Printable area (width × height) by image orientation Inches - HP Designjet 510 | HP Designjet 510 Printer series - User's Guide: English - Page 32
: Printable area = Paper Size - Margins . Printable areas for Architectural paper Paper size C D E1 E Orientation of paper in printer Portrait Landscape Portrait Landscape Portrait Landscape Portrait Landscape Printable area (width × height) by image orientation Inches Millimeters Landscape - HP Designjet 510 | HP Designjet 510 Printer series - User's Guide: English - Page 33
area = Paper Size - Margins Printable areas for ISO paper Paper size A4 A3 A2 A1 A0 Orientation of paper in printer Portrait Landscape Portrait Landscape Portrait Landscape Portrait Landscape Portrait Printable area (width × height) by image orientation Inches Millimeters Landscape Portrait - HP Designjet 510 | HP Designjet 510 Printer series - User's Guide: English - Page 34
Roll paper The following procedures are described in detail, with animations where appropriate: • Installing a new roll on the printer • Loading roll paper • Unloading roll paper • Removing roll paper from the spindle • Cutter replacement - HP Designjet 510 | HP Designjet 510 Printer series - User's Guide: English - Page 35
The graphical sequence shows how to install a new roll of paper on the printer. CAUTION: Make sure the printer wheels are locked (the brake lever on each wheel is pressed Down) to prevent the printer from moving. If you are a regular user of different types of roll paper, you can change the paper - HP Designjet 510 | HP Designjet 510 Printer series - User's Guide: English - Page 36
Loading roll paper The graphical sequence shows how to load a new roll of paper on the printer. NOTE: You must have installed a new roll of paper on the printer before you can load it. The front-panel menu items are: Select (using the keys) Then press: 1. Paper 2. Load Roll 3. Select Roll Type - HP Designjet 510 | HP Designjet 510 Printer series - User's Guide: English - Page 37
Unloading roll paper The graphical sequence shows how to unload a roll of paper from the printer. - HP Designjet 510 | HP Designjet 510 Printer series - User's Guide: English - Page 38
Removing roll paper from the printer The graphical sequence shows how to remove a roll of paper from the printer. NOTE: You must have unloaded the roll of paper from the printer before you can remove it. - HP Designjet 510 | HP Designjet 510 Printer series - User's Guide: English - Page 39
Removing roll paper from the spindle The graphical sequence shows how to remove a roll of paper from the roll spindle. NOTE: You must have removed the roll of paper from the printer before you can remove it from the spindle. - HP Designjet 510 | HP Designjet 510 Printer series - User's Guide: English - Page 40
must contact your local HP Customer Care center to: • Order the replacement cutter. • Receive instructions on how to access the front panel Service menu. Important information • The cutter unit is attached to the printer by a black cutter holder that runs along the metal guide rail, and is hooked - HP Designjet 510 | HP Designjet 510 Printer series - User's Guide: English - Page 41
up? Explains how to identify which side of the sheet should be printed on. • Which edge first? Explains which edge of the sheet should be loaded first (short edge or long edge). • Loading sheet paper Details the sheet loading procedure. • Unloading sheet paper Details the sheet unloading procedure. - HP Designjet 510 | HP Designjet 510 Printer series - User's Guide: English - Page 42
Which side up? The printer prints on the side of the paper that faces up. It may be important to load the sheet with the correct side facing up. See the table below. Print side for paper types Paper type HP Bright White Inkjet Paper (Bond) HP Vellum Natural Tracing Paper Coated Paper Heavy Coated - HP Designjet 510 | HP Designjet 510 Printer series - User's Guide: English - Page 43
Which edge first? You can load sheet paper in either portrait or landscape orientation. Unless you are using the Rotate option, always load the sheet in the same orientation as you have specified in your software. Portrait (short edge first) Landscape (long edge first) - HP Designjet 510 | HP Designjet 510 Printer series - User's Guide: English - Page 44
paper The graphical sequence shows how to load a new sheet of paper on the printer. Important • If you have a roll of paper loaded on the printer you must first unload it from the printer. • Make sure the correct side of the sheet is facing up when you load it. The front panel menu selections are - HP Designjet 510 | HP Designjet 510 Printer series - User's Guide: English - Page 45
Unloading sheet paper The graphical sequence shows how to unload a sheet of paper from the printer. Important • To give the ink time to dry the printer holds the paper for some time. - HP Designjet 510 | HP Designjet 510 Printer series - User's Guide: English - Page 46
? Details the elements of the HP ink supplies. • Component identification Shows you where to find the various elements of the ink system. • Ink supply guidelines Explains how to obtain the best results from your ink system. • Precautions Details the specific precautions you must take to avoid - HP Designjet 510 | HP Designjet 510 Printer series - User's Guide: English - Page 47
help you reorder the correct replacement. Your printer uses the following HP ink supplies: • Black ink cartridges are HP No 82 supplies. • Cyan, magenta and yellow cartridges are HP No 82 supplies. They are available in 28 and 69 ml sizes. • All printheads are HP No 11 supplies. Ink cartridges The - HP Designjet 510 | HP Designjet 510 Printer series - User's Guide: English - Page 48
Ink cartridges The Hewlett-Packard selection number on the ink cartridges and printheads makes it easy for you to find the correct HP ink supplies for your printer. Determine the color of the printhead or ink cartridge you need, then make sure you purchase or order the correct Hewlett-Packard - HP Designjet 510 | HP Designjet 510 Printer series - User's Guide: English - Page 49
. The front panel will guide you through the removal and installation procedure. See When to Replace HP ink supplies. CAUTION: When you first received your printer it was supplied with a set of four setup printheads installed in the printhead carriage. These setup printheads are used for the priming - HP Designjet 510 | HP Designjet 510 Printer series - User's Guide: English - Page 50
. • Do not drop the printheads. Proper handling will assure optimum performance throughout the printhead life. • Do not touch the end of the ink cartridge that is inserted into the printer as there may be a small amount of ink on the connection. • Avoid storing partly used ink cartridges on their - HP Designjet 510 | HP Designjet 510 Printer series - User's Guide: English - Page 51
Color calibration You can calibrate the ink system for the specific paper loaded in your printer. Doing this ensures the printed output matches the colors of the original image as closely as possible. The printer stores the calibration data for each type of paper you have calibrated it for since it - HP Designjet 510 | HP Designjet 510 Printer series - User's Guide: English - Page 52
Drying time The following topics detail the drying time function and how to use it to ensure you obtain the highest quality print under all conditions. • Drying time settings Describes how to set the required drying times from the front panel. • Typical drying times Lists typical drying times for - HP Designjet 510 | HP Designjet 510 Printer series - User's Guide: English - Page 53
has three settings which you can choose through the front panel. See Navigation example for more help. Manual: The printer holds in place paper which has a specific drying time, and displays a "drying time to go" countdown on the front panel. You can change this time from one minute to 99 minutes - HP Designjet 510 | HP Designjet 510 Printer series - User's Guide: English - Page 54
tested paper type HP Bright White Inkjet Paper (Bond) HP Vellum HP Natural Tracing Paper HP Coated Paper HP Heavyweight Coated Paper HP Matte Film HP High-Gloss Photo Paper HP Semi-Gloss Photo Paper HP Paper-Based Semi-Gloss HP Clear Film HP Translucent Bond HP Studio Canvas HP Satin Poster Paper - HP Designjet 510 | HP Designjet 510 Printer series - User's Guide: English - Page 55
to cancel the drying time and release the paper. 4. After the drying time has elapsed: • For roll paper the printer cuts the paper and turns off the vacuum so the printed image can drop into the printer bin. • For sheet paper the vacuum is turned off and the printed image drops into the - HP Designjet 510 | HP Designjet 510 Printer series - User's Guide: English - Page 56
Ink cartridges • Ink cartridge errors Details the error messages that could be displayed on the front panel for the ink cartridges. • Ink cartridge levels Details the information about levels that can be displayed on the front panel for the ink cartridges. • Ink cartridge information Shows you how - HP Designjet 510 | HP Designjet 510 Printer series - User's Guide: English - Page 57
Ink cartridge errors The front panel can display the following error messages for the ink cartridges: Cartridge missing Cartridge nearly reached end of life Faulty cartridge The printer will also display the Ink cartridge levels. Cartridge empty - HP Designjet 510 | HP Designjet 510 Printer series - User's Guide: English - Page 58
front panel will tell you when your ink supply is low, very low or empty. This means that you know the current status of your HP ink supplies at all times. Cartridges full Low ink warning Cartridge empty NOTE: NOTE: Depending on type of print jobs, a cartridge with a low ink warning - HP Designjet 510 | HP Designjet 510 Printer series - User's Guide: English - Page 59
Ink cartridge information Use the following procedure to display the ink cartridge information screen on the front panel. The front-panel menu items are: Select (using the keys) Then press: 1. Ink 2. Information 3. Ink Cartridges 4. Cyan, Magenta, Yellow or Black Ink cartridge Enter Enter - HP Designjet 510 | HP Designjet 510 Printer series - User's Guide: English - Page 60
doing this will cancel the current print job. You need to change cartridges either if prompted to do so on the front panel because the printer has detected a cartridge is out of ink, or if the cartridge is low and you want to replace it before it runs out. - HP Designjet 510 | HP Designjet 510 Printer series - User's Guide: English - Page 61
be displayed on the front panel for the printheads. • Printhead information Shows you how to display the current status of the printheads on the front panel display. • Printhead replacement Details the printhead replacement procedure. • Printhead alignment Details the printhead alignment procedure. - HP Designjet 510 | HP Designjet 510 Printer series - User's Guide: English - Page 62
errors The front panel can display the following error messages for the printheads: Printhead missing Printhead worn out Faulty printhead Unknown error NOTE: An unknown error is displayed when one of the printheads is causing a problem but the system cannot detect which one it is. Refer to - HP Designjet 510 | HP Designjet 510 Printer series - User's Guide: English - Page 63
, missing, faulty worn-out and unknown. If there is a problem the system displays an action: missing -> insert, unknown -> troubleshoot, faulty, worn out -> replace. • Expiration date • Serial number • Ink used: in cc and % used • Paper jams • If the printheads are aligned and color-calibrated - HP Designjet 510 | HP Designjet 510 Printer series - User's Guide: English - Page 64
: Select (using the keys) Then press: 1. Ink 2. Replace Printheads Enter Enter Once you have replaced the printhead, if you have paper loaded, the printer prompts you to start the Printhead alignment procedure. If no paper is loaded the printer prompts you to load paper and then automatically - HP Designjet 510 | HP Designjet 510 Printer series - User's Guide: English - Page 65
, the printer will prompt you to load a different type of paper before letting you align the printheads. From time to time you may be required to align the printheads to ensure maximum print quality. To select Printhead Alignment manually, make sure you have the correct type of roll or sheet paper - HP Designjet 510 | HP Designjet 510 Printer series - User's Guide: English - Page 66
you could encounter while using your printer. This chapter contains the following topics: • Solving problems helps you to quickly troubleshoot your specific problem; it also contains instructions on where you can get further information. • Print quality problems helps you to solve any print quality - HP Designjet 510 | HP Designjet 510 Printer series - User's Guide: English - Page 67
• Refer to the appropriate topic: - Ink supply problems - Paper problems - Communication problems - Image error - Other problems • If the problem could be related to your software driver, and you are using an HP driver, refer to the driver's troubleshooting documentation and the on-line help in your - HP Designjet 510 | HP Designjet 510 Printer series - User's Guide: English - Page 68
source of your problem 1. Look at the front-panel display for messages. See Message descriptions for a full explanation of front-panel messages. 2. Test the printer. - Switch the printer off on the front of the printer. Make sure that the power cord is firmly inserted in the printer and plugged in - HP Designjet 510 | HP Designjet 510 Printer series - User's Guide: English - Page 69
. Always check Configuration correction as your first diagnostic task to find the cause of your problem. If a message, such as "PRINTHEADS not functional" appears on the front panel of your printer, follow the instructions given for the particular message (see Message descriptions). The types of - HP Designjet 510 | HP Designjet 510 Printer series - User's Guide: English - Page 70
Many problems concerned with print quality can be solved by correcting the way the printer is configured. 1. To achieve the best performance from your printer, only use genuine HP accessories and supplies, whose reliability and performance have been thoroughly tested to give trouble-free performance - HP Designjet 510 | HP Designjet 510 Printer series - User's Guide: English - Page 71
size, you stand less likelihood of resolving the problem. Running the Troubleshooting Utility 1. From the main front-panel menu, select the Ink menu ( ) and press Enter. 2. Select Troubleshooting and press Enter. 3. The printer first checks to see whether the printheads are aligned. Misalignment - HP Designjet 510 | HP Designjet 510 Printer series - User's Guide: English - Page 72
Print A, for example white streaks or bands, the printer will try to clean the printheads that have the problem. A printhead can be cleaned up to three times this way; after that it cannot be cleaned and you will be told; the Troubleshooting routine will finish. In that case we recommend that - HP Designjet 510 | HP Designjet 510 Printer series - User's Guide: English - Page 73
is defective, the printer tries to clean that printhead. If the printhead cleaning process completes, Diagnostic Print B is printed again and you are asked the same questions again. Diagnostic Print B 2. Afterwards, if problems with images remain, use the Troubleshooting procedure again. Ignore - HP Designjet 510 | HP Designjet 510 Printer series - User's Guide: English - Page 74
further procedures are required to solve the problem Indicates that troubleshooting has completed successfully and there no problems Yes Printheads are OK after first printing of Diagnostic Print A No Printer prints Diagnostic Print B without black lines Printer asks if Cyan, Magenta, Yellow and - HP Designjet 510 | HP Designjet 510 Printer series - User's Guide: English - Page 75
the pattern, and make whatever adjustments are appropriate to the amount it advances between printing swaths of data. (See Loading sheet paper) The pattern printed is solely for the use of the printer; you are not expected to relate any of its characteristics to the quality of your images. 1. From - HP Designjet 510 | HP Designjet 510 Printer series - User's Guide: English - Page 76
a set of default values for your paper. The Restore factory option of the Advance calibration menu erases any stored advance calibration values from the printer memory. This means that until you run the advance calibration again the printer will use the factory default values for all types of paper. - HP Designjet 510 | HP Designjet 510 Printer series - User's Guide: English - Page 77
. The following is an example of what you might see if you have problems with stepped lines. To solve this problem: 1. Increase the dpi setting by changing the print quality to Best in the front panel and driver software. 2. The problems may be inherent in the image you are trying to print. Try to - HP Designjet 510 | HP Designjet 510 Printer series - User's Guide: English - Page 78
printed there are: • Missing or faint lines. • Printed characters with missing parts. The following is an example of what you might see if you have problems with incomplete lines. TEST Missing parts of text; this should say TEST See the Troubleshooting procedure for instructions on how to solve this - HP Designjet 510 | HP Designjet 510 Printer series - User's Guide: English - Page 79
lines are misaligned or fuzzy (not smooth) The borders of colored blocks are overlapped and the overlapping areas have different colors in them. See the Troubleshooting procedure for instructions on how to solve this problem. - HP Designjet 510 | HP Designjet 510 Printer series - User's Guide: English - Page 80
see if you have problems with banding. 80 80 Expanding Possibilities 80 Ironk Pojfdjop ernk Pojfdjop ernk aure Chorme Pojfdjop ernk aure Expanding Possibilities 80 80 kheuhg kheuhg sfrfefg sfrfefg IInnkkercovarCtraipdsge See the Troubleshooting procedure for instructions on how to solve - HP Designjet 510 | HP Designjet 510 Printer series - User's Guide: English - Page 81
These are the areas you should review when troubleshooting a color accuracy problem: Paper Ensure that the paper loaded is genuine HP paper and that the correct paper type is selected on the front panel and in the driver. Related Topics • Color consistency problems • Long-term color bleeding (glossy - HP Designjet 510 | HP Designjet 510 Printer series - User's Guide: English - Page 82
especially very high humidity) you can reduce the color consistency problems. • There may be color changes between images printed on your printer and other types of HP Designjet printers. This is quite normal because the other printers use different inks. Long-term color bleeding (glossy paper) High - HP Designjet 510 | HP Designjet 510 Printer series - User's Guide: English - Page 83
defines how ink is applied to each type of paper. Use the information in the following table to configure your printer and software for best color accuracy. Location of setting Ink menu Setting description Color Calibration > Calibrate Paper Selection Set to match the paper type loaded - HP Designjet 510 | HP Designjet 510 Printer series - User's Guide: English - Page 84
The means of accurately managing the colors printed by your printer vary with the software application and driver being used. Refer to the following documentation: • On-line documentation in the drivers shipped with your printer. • If you cannot find any reason for the discrepancy, before - HP Designjet 510 | HP Designjet 510 Printer series - User's Guide: English - Page 85
descriptions. Printhead problems after replacement If, after replacing the printheads, the printer complains about wrong or missing printheads, perform the following steps: • Check that you have removed the protective tape from the printhead. • Insert the printhead into the carriage assembly, but - HP Designjet 510 | HP Designjet 510 Printer series - User's Guide: English - Page 86
be all the color printheads or all the printheads. Use the following procedure to isolate the faulty printhead. 1. Select Replace Printheads from the front panel. 2. Open the carriage cover and remove all the printheads. 3. Reinsert the Cyan printhead only and close the carriage cover and the window - HP Designjet 510 | HP Designjet 510 Printer series - User's Guide: English - Page 87
how to clear a paper jam. • Ink marks on the paper Details the way to solve ink mark problems: warped lines, blurred lines, marks or scratches on glossy paper. • Paper loading problems Explains what to do when the front panel keeps indicating that paper is misaligned or incorrectly positioned - HP Designjet 510 | HP Designjet 510 Printer series - User's Guide: English - Page 88
your software application. To ensure color accuracy and print-quality performance of the printer, use only paper types that have been certified for your printer. Use of non-HP paper or HP paper not certified for your printer may significantly reduce the color and print quality of your images. For - HP Designjet 510 | HP Designjet 510 Printer series - User's Guide: English - Page 89
probably paper jammed in the printer. Paper jams can have various causes: • The paper is too thick or too thin for the printer, or is otherwise not supported. • The paper is up the cutter guide or other moving parts. See Removing jammed paper for full instructions on how to clear jammed paper. - HP Designjet 510 | HP Designjet 510 Printer series - User's Guide: English - Page 90
: When moving the printhead carriage, touch only the black plastic parts. 4. If necessary sheet down and out of the printer. You may need to cut the edge of the roll with scissors. 8. Check that the printing zone, including the cutter guide, the paper path, and the area where the printhead carriage - HP Designjet 510 | HP Designjet 510 Printer series - User's Guide: English - Page 91
12. Reload the paper as normal (see Loading roll paper or Loading sheet paper). If you are using roll paper you may need to trim the If the cutter seems to be causing the problem, check in Paper types that the type of paper is supported by the printer. Try disabling the cutter from the front panel - HP Designjet 510 | HP Designjet 510 Printer series - User's Guide: English - Page 92
Ink marks on the paper • Warped lines • Blurred lines (ink "bleeds" from lines) • Marks or scratches on glossy paper after printing • Smears or scratching on your printed paper - HP Designjet 510 | HP Designjet 510 Printer series - User's Guide: English - Page 93
been stored in the correct environmental conditions. • For all environmental specifications, see Environmental specifications. Blurred lines (ink "bleeds" from lines) • Perhaps you NOTE: Included with HP papers is a book "Printer Tips" that includes a section on troubleshooting paper problems. - HP Designjet 510 | HP Designjet 510 Printer series - User's Guide: English - Page 94
problem can appear on paper-based coated paper if a lot of ink is printed quickly. The paper cannot absorb the ink quickly enough and becomes distorted. As the printheads move over the paper, the printheads Use HP recommended paper. If the image you are printing has intense color, use HP Heavy - HP Designjet 510 | HP Designjet 510 Printer series - User's Guide: English - Page 95
Paper loading problems The front panel keeps indicating that paper is misaligned or onto the spindle, see Installing a new roll on the printer. Sheet paper • The sheet must be loaded with the right-hand edge against the blue line on the printer platen and the front edge against the blue line just - HP Designjet 510 | HP Designjet 510 Printer series - User's Guide: English - Page 96
floor. Prints do not stack properly in the paper bin • The printer may be too close to the end of the roll. The natural curl near the end of the roll can cause stacking problems. Load a new roll or remove prints manually as they are completed. • If you are mixing prints or nesting - HP Designjet 510 | HP Designjet 510 Printer series - User's Guide: English - Page 97
or unintelligible - Overlaid with another image - Does not obey Page Format and Rotate commands • Other sources of information Lists others sources of information for image problems. - HP Designjet 510 | HP Designjet 510 Printer series - User's Guide: English - Page 98
large for the printer's memory. Select Send Job as a Bitmap in the driver's Troubleshooting menu (Services tab). This may slow down print speed. Alternatively, you can install extra memory on the HP-GL/2 Accessory Card in your printer, see Memory. • There may be a communications problem between your - HP Designjet 510 | HP Designjet 510 Printer series - User's Guide: English - Page 99
the printer's memory. Select Send Job as a Bitmap in the driver's Troubleshooting menu (Services tab). This may slow down print speed. Alternatively, you can install extra memory on the HP-GL/2 Accessory Card in your printer, see Memory. Long-axis print is clipped • Does your software support long - HP Designjet 510 | HP Designjet 510 Printer series - User's Guide: English - Page 100
Printed image incorrect • Image is in one portion of the printing area • Print is distorted or unintelligible • One image overlays another on the same sheet - HP Designjet 510 | HP Designjet 510 Printer series - User's Guide: English - Page 101
you are using a genuine HP parallel interface cable. • Depending on the software, drivers and RIPs you are using with your printer, there will be different solutions to this problem. Refer to the Vendor's User Documentation for details. One image overlays another on the same sheet • The I/O Setup - HP Designjet 510 | HP Designjet 510 Printer series - User's Guide: English - Page 102
Other sources of information If you don't find the solution to the problem here, other sources of help are: • The documentation supplied with the driver that you are using to manage the output from your software application to the printer. - HP Designjet 510 | HP Designjet 510 Printer series - User's Guide: English - Page 103
Other problems • Communication problems Describes typical problems you could encounter with communications between your computer and the printer. • Printer does not print Details common causes for the printer failing to print. • Printer seems too slow Lists the reasons why printing may slow down. - HP Designjet 510 | HP Designjet 510 Printer series - User's Guide: English - Page 104
fine, but some smaller prints may not. To handle a job that will not print, you can select Send Job as a Bitmap in the driver's Troubleshooting menu (Services tab). This may slow down print speed. Alternatively, you can install extra memory on the HP-GL/2 Accessory Card in your printer, see Memory. - HP Designjet 510 | HP Designjet 510 Printer series - User's Guide: English - Page 105
the file again. If necessary, select Send Job as a Bitmap in the driver's Troubleshooting menu (Services tab). This may slow down print speed. Alternatively, you can install extra memory on the HP-GL/2 Accessory Card in your printer, see Memory. • If you continue to have problems, see Getting help. - HP Designjet 510 | HP Designjet 510 Printer series - User's Guide: English - Page 106
replacing; see Printhead replacement • Did you specify a Manual Dry Time in the front panel? Change the dry time to Automatic see Ink system. • Did you select Send Job as a Bitmap in the driver's Troubleshooting menu (Services tab)? If so, try turning that option off. • If the printer is in Fast - HP Designjet 510 | HP Designjet 510 Printer series - User's Guide: English - Page 107
Getting help • HP Customer Care Details about the HP Customer Care program. • What to do before you call Information on what you should do before you contact your local HP Customer Care Center. • HP Designjet Online How to get help and much more via the World Wide Web. - HP Designjet 510 | HP Designjet 510 Printer series - User's Guide: English - Page 108
supplied with your printer. HP Customer Care provides comprehensive, proven support expertise and leverages new technologies to give customers unique end-to-end support. Services include setup and installation, troubleshooting tools, warranty upgrades, repair and exchange services, phone and Web - HP Designjet 510 | HP Designjet 510 Printer series - User's Guide: English - Page 109
third party software drivers and RIPs refer to that user documentation. 2. If the problem appears to be related to your software application, first contact your software vendor. 3. If you still have difficulty, refer to the HP Support Services booklet shipped with this printer. This document - HP Designjet 510 | HP Designjet 510 Printer series - User's Guide: English - Page 110
focusing on usage tips, technical briefings and examples of HP Designjet applications around the world • Full information on worldwide HP Customer Care contacts • An on-line HP Designjet Diagnosis troubleshooting tool • A calendar of HP Designjet-related events and programs • On-line access to - HP Designjet 510 | HP Designjet 510 Printer series - User's Guide: English - Page 111
- HP Designjet 510 | HP Designjet 510 Printer series - User's Guide: English - Page 112
Front panel The printer's front panel is a user-friendly interface that gives you access to a comprehensive set of printer functions. There is also information on your ink consumable items which is continually updated. • The front panel • Menu structure • Navigating the menu system • Message - HP Designjet 510 | HP Designjet 510 Printer series - User's Guide: English - Page 113
that may be provided through the application in use. The front panel of the printer contains the following functional areas: Display screen Navigation keys Action keys Depending on your country and printer model, your front panel may include a localization label with text as shown above or - HP Designjet 510 | HP Designjet 510 Printer series - User's Guide: English - Page 114
Navigation keys The display section of the front panel consists of an LCD display and the following five navigation keys, provided to navigate through the menus displayed on the screen: • The Up and Down keys let you scroll through the various items in a menu list. • The Menu key takes you to the - HP Designjet 510 | HP Designjet 510 Printer series - User's Guide: English - Page 115
Display screen The display screen of the front panel shows the main menu (the words displayed may vary). NOTE: You can always reach the main menu by pressing the Menu key. After a short time-out, the display will always revert to the main menu with the Job Management menu active. Active menu - HP Designjet 510 | HP Designjet 510 Printer series - User's Guide: English - Page 116
Action keys The Cancel key cancels the current printer operation (printing or preparing for printing). It will also cancel the current menu selection and return to the main menu if a menu option is highlighted. The Form Feed and Cut key causes a sheet to be ejected or the roll to be advanced and cut - HP Designjet 510 | HP Designjet 510 Printer series - User's Guide: English - Page 117
Menu structure The front panel display area screen shows the four classes of menu options available represented with specific icons. Click on the icon to display its menu structure. • Paper menu • Ink Menu • Job Management Menu • Set-up menu - HP Designjet 510 | HP Designjet 510 Printer series - User's Guide: English - Page 118
Paper menu Paper Load/Unload Roll Load/Unload Sheet Select paper type Cutter Page Format Advance Calibration Menu item depends on the type of paper loaded On/off Size Rotate Mirroring Small margins Automatic - HP Designjet 510 | HP Designjet 510 Printer series - User's Guide: English - Page 119
Color calibration Troubleshooting Align Printheads Replace Printheads Replace Ink Cartridges Color settings Drying time Ink Cartridges Printheads Status Calibrate Paper Reset Standard (4.5 min.) Special (11 min.) Cyan Printhead Magenta Printhead Yellow Printhead Black Printhead Color/monochrome - HP Designjet 510 | HP Designjet 510 Printer series - User's Guide: English - Page 120
Job Management menu The HP-GL/2 Accessory Card provides a Reprint menu. - HP Designjet 510 | HP Designjet 510 Printer series - User's Guide: English - Page 121
Help Print quality Advanced Options Printer Information Best Normal Fast Optimize for Best Quality Settings Fast Quality Settings Line drawings / text Images Default Maximum detail Default Increased speed View Print Model number, Serial number, Service ID, Firmware rev, Accessory rev, Paper used - HP Designjet 510 | HP Designjet 510 Printer series - User's Guide: English - Page 122
Front Panel Altitude Log Service tools Card ID Card setup I/O Timeout Language Buzzer Contrast Printheads Errors Service tests Service calibrations Service utilities No I/O Cards present / Contents provided by card No I/O Cards present Configuration Advanced Reset Card 30 sec, ... , 30 min - HP Designjet 510 | HP Designjet 510 Printer series - User's Guide: English - Page 123
Navigating the menu system From the top level of the menu system, you can navigate through the menus using the display keys. Any menu item followed by a greater-than symbol (>), indicates that a further level of menu items is available. Press Back to return to the previous menu level without - HP Designjet 510 | HP Designjet 510 Printer series - User's Guide: English - Page 124
a typical example of how to navigate through the menus to configure a specific print option. How to set the ink-drying time to two minutes The menu options. 2. Press the Enter key to enter the printer Ink menu. The display shows the Ink menu to allow you to select drying time. Continued ... - HP Designjet 510 | HP Designjet 510 Printer series - User's Guide: English - Page 125
time you require. 5. Use the Up and Down keys to highlight the Manual menu option. 6. Press the Enter key to enter the Manual drying time setting menu. The display shows the Manual option highlighted. The display shows the Manual drying time setting menu to allow you to select the drying time you - HP Designjet 510 | HP Designjet 510 Printer series - User's Guide: English - Page 126
Setting drying time navigation example Key action 7. Press the Up key once to select two minutes. Display Result The display shows the Manual drying time setting menu with two minutes selected. 8. Press the Enter key to set the drying time to two minutes. 9. Press the Top key to - HP Designjet 510 | HP Designjet 510 Printer series - User's Guide: English - Page 127
Color calibration error Press ENTER to continue The printer was aligning its printheads, but encountered an error due to some printheads not printing properly. Alignment has stopped. Press the Enter key. The printer was aligning its printheads, but encountered an error. Alignment has stopped. Press - HP Designjet 510 | HP Designjet 510 Printer series - User's Guide: English - Page 128
product. Your product warranty applies only when you use HP printheads. Any damage caused to your printer resulting from the use of non-HP printheads is not the responsibility of HewlettPackard. If you want to replace the non-HP printheads, select Replace and press the Enter key. Otherwise, select - HP Designjet 510 | HP Designjet 510 Printer series - User's Guide: English - Page 129
details of the replacement procedure, see Ink cartridges. INK CARTRIDGES need to be functional. Replace before replacing printheads You have attempted to replace printheads, but the printer has detected that there are ink cartridges that are wrong. The ink cartridges must be replaced before the - HP Designjet 510 | HP Designjet 510 Printer series - User's Guide: English - Page 130
be used when the printer has been powered off. The printer has detected that the setup printheads have not been installed correctly. Open the window and follow subsequent instructions to reinstall or relocate the setup printheads. Contact HP for advice if the setup printheads are missing or cannot - HP Designjet 510 | HP Designjet 510 Printer series - User's Guide: English - Page 131
moved too much from its previous position. Reload the paper following the normal procedure, to solve this problem. See Loading roll paper and Loading sheet paper. During the loading of paper, the printer has detected that no paper has been loaded. Either: Press the Enter key to restart the loading - HP Designjet 510 | HP Designjet 510 Printer series - User's Guide: English - Page 132
Paper too small for a diagnostic print Paper too small to align printheads Load bigger size to align Press ENTER to continue The paper . The Troubleshooting utility has found that the single sheet loaded in the printer is too small for a Diagnostic Print. Load a roll of paper, or a sheet that is - HP Designjet 510 | HP Designjet 510 Printer series - User's Guide: English - Page 133
from the Paper menu) and then load paper that is the right type for the alignment. See Printhead alignment. The printer is trying to perform a scan of the calibration pattern, but the pattern was not found. Reload the sheet that was printed by the Create pattern part of the calibration routine. - HP Designjet 510 | HP Designjet 510 Printer series - User's Guide: English - Page 134
have requested the printer to replace one or more printheads, but the printer is busy Printheads (from the Ink system menu). A problem has occurred with one or more printheads. The printheads are still functional. The problem was detected either during printhead alignment or during troubleshooting - HP Designjet 510 | HP Designjet 510 Printer series - User's Guide: English - Page 135
the Enter key to load larger paper, or the Cancel key to stop the load process. The printer is attempting to print a job, but finds that there is a problem with the printheads. You may either replace the printheads at this stage or cancel the print. Select the required option and press the Enter key - HP Designjet 510 | HP Designjet 510 Printer series - User's Guide: English - Page 136
Enter key and then follow the instructions to replace the faulty ink cartridges. There is an error in the paper, as shown in another message. Use the normal procedure to reload the paper. You have requested the printer to permit printhead replacement, but the printer has detected that one or more - HP Designjet 510 | HP Designjet 510 Printer series - User's Guide: English - Page 137
paper types are supported. Either: Press the Enter key to restart the loading procedure; Or: Press the Cancel key to cancel paper loading. The printer is trying to perform a scan of the calibration pattern, but no sheet was found. Load the sheet that was printed by the Create pattern part of the - HP Designjet 510 | HP Designjet 510 Printer series - User's Guide: English - Page 138
follow the instructions in Loading roll paper. Troubleshooting finished Resume normal printing If problem persists select Troubleshooting again Press ENTER to continue The printer has finished the Troubleshooting routine and will not at this stage perform further cleaning on the printheads because - HP Designjet 510 | HP Designjet 510 Printer series - User's Guide: English - Page 139
, to solve this problem. See Loading roll paper or Loading sheet paper. The type of the paper loaded in the printer is unknown to the printer. Select a known paper type from the printer menu. The printheads are not recognized by the printer as HP-approved, although the printer can still use them - HP Designjet 510 | HP Designjet 510 Printer series - User's Guide: English - Page 140
be performed. Refer to guide for instructions. Warning: color calibration not done on this paper type Warning: printheads not aligned Explanation and Color calibration → Calibrate paper. The printer has detected that the printheads have not been aligned since the last replacement. You should align - HP Designjet 510 | HP Designjet 510 Printer series - User's Guide: English - Page 141
appearance you want. You can select printer settings either from the front panel or from the printer driver. In most cases the driver settings override the front panel settings. to manage your printing efficiently. • Printer configuration details how to set specific configuration parameters of your - HP Designjet 510 | HP Designjet 510 Printer series - User's Guide: English - Page 142
Page format • Page description explains how to make sure the you obtain the prints from your printer in the format you want. • Rotating an image details on how to rotate the image. • Printing a mirror image explains how to print a mirror image of your print. - HP Designjet 510 | HP Designjet 510 Printer series - User's Guide: English - Page 143
Page description This section explains how to make sure that the printer produces your print in the page format you want. Leading edge 17 mm (0.7 in) Margins 5 mm (0.2 in) Page size Direction of paper leaving the printer Printing area 5 mm (0.2 in) Inked area Trailing edge 17 mm (0.7 in) - HP Designjet 510 | HP Designjet 510 Printer series - User's Guide: English - Page 144
Page size Page size can be specified from the front panel or in the software, where it may be called "Page Size", "Media Size", "Paper Size", etc., and where the options include, for example, ISO A3, ANSI Letter, Custom. If your software does not define the page size in the print file, the front- - HP Designjet 510 | HP Designjet 510 Printer series - User's Guide: English - Page 145
Rotating an image These topics detail all aspects of job rotation: • Job rotation (HP-GL/2) • Page size and rotation • What is rotated? Job rotation (HP-GL/2) If the software in the driver does not specify the rotation setting, it can be specified in the front panel (Paper > Page Format > Rotate). - HP Designjet 510 | HP Designjet 510 Printer series - User's Guide: English - Page 146
are always at the left and right sides, regardless of the orientation. The page size is adjusted to maintain the printing area, preventing clipping. With sheet paper, the image is rotated, but the page orientation specified in your software is retained. (You should always load - HP Designjet 510 | HP Designjet 510 Printer series - User's Guide: English - Page 147
Printing a mirror image If you are using clear imaging paper, sometimes called 'backlit', you may want to print a mirror image of your print, so that when the paper is lit from behind it is in the correct orientation. This can be done from the front panel, without changing the image in your software - HP Designjet 510 | HP Designjet 510 Printer series - User's Guide: English - Page 148
controlling the page size. • Page size and clipped images Explains what happens if you choose a larger page size than the current paper loaded in your printer. - HP Designjet 510 | HP Designjet 510 Printer series - User's Guide: English - Page 149
because the page size you have selected in your HP driver overrides the page size selected in the printer. However, some of the circumstances in which you be overridden by the settings in the driver. • When the prints you are creating need to be of a specific standard (for example, ISO or ANSI), - HP Designjet 510 | HP Designjet 510 Printer series - User's Guide: English - Page 150
overridden by your driver or application. Page format Available sizes Inked Area Automatic ISO ANSI JIS ARCH Oversize Extra The printed page size is the Inked area plus margins. The printer looks to the print you have sent for a page size instruction. If it is present the printer uses this. If - HP Designjet 510 | HP Designjet 510 Printer series - User's Guide: English - Page 151
Page size and clipped images If you specify in your software a page size that is larger than the paper size loaded in the printer, the printer will still print what it can, but may clip your image. A2 paper in printer Clipped area A1 page size in software or front panel - HP Designjet 510 | HP Designjet 510 Printer series - User's Guide: English - Page 152
of your prints. • Front panel image options explains how to change the HP-GL/2 color palettes. • Printing images in grayscale describes how to print color different print modes that are available with your printer. • Advanced options describes the various optimization and quality enhancement - HP Designjet 510 | HP Designjet 510 Printer series - User's Guide: English - Page 153
you send from your computer, not pages already in the printer's queue. If this is the case, it is stated the printer looks to your software to provide information on all the above attributes. However, your driver need to change your images or your driver settings. Some of these settings do not affect - HP Designjet 510 | HP Designjet 510 Printer series - User's Guide: English - Page 154
the internal palettes The "pens" discussed throughout these topics are the conceptual pens in a software palette, rather than the printer's physical printheads. The printer has three pen palettes: • Factory • Palette A • Palette B The factory palette cannot be changed. You can, however, change the - HP Designjet 510 | HP Designjet 510 Printer series - User's Guide: English - Page 155
front-panel menu, go to the Define Palette selection under HP-GL/2 Settings and choose the palette you want. See Set-up menu. The following table describes the palette choices. Palette Software Palette A Palette B Factory Comments The printer looks to your software for pen settings and ignores all - HP Designjet 510 | HP Designjet 510 Printer series - User's Guide: English - Page 156
Change the palette settings You cannot change the Factory palette, but you can define Palettes A and B to be whatever you choose. The defaults are Palette, width: Item Palettes Pens Widths (mm) Colors Available options Defaults Factory, A, B. Factory 0 through 15. 0.13, 0.18, 0.25, 0.35, 0.50 - HP Designjet 510 | HP Designjet 510 Printer series - User's Guide: English - Page 157
How to define Palette A The following steps explain how to define Palette A. Instructions Select (using the keys) 1. Set-up menu 2. Select Palette A 3. HP-GL/2 Define palette 4. Palette A 5. Select pen to change (in this example 3). Pen 3 6. The current width assigned to this pen is - HP Designjet 510 | HP Designjet 510 Printer series - User's Guide: English - Page 158
Changing the treatment of overlapping lines (merge) The Merge setting controls the overlapping lines in an image. There are two settings, Off and On. The following illustration shows the effect of each setting. Merge off (Default) A subsequent line hides a previous line where they overlap. Merge - HP Designjet 510 | HP Designjet 510 Printer series - User's Guide: English - Page 159
not going to be clipped. • You want a version for photocopying in black and white. When you choose the Ink menu Color settings > Grayscale option, the printer renders colors as gray scales. If you want to use only black ink to print in grayscale, you should select the Ink menu Color settings - HP Designjet 510 | HP Designjet 510 Printer series - User's Guide: English - Page 160
Print speeds and print quality The following table lists some typical printing times (line drawings @ 20-25ºC and 30-60% relative humidity). Typical printing times (continued) Paper Color/grayscale Bright White Color Grayscale Coated Paper Color Grayscale Quality Best Normal Draft Best - HP Designjet 510 | HP Designjet 510 Printer series - User's Guide: English - Page 161
Typical printing times (continued) Paper Heavy Coated Paper Color/grayscale Color Grayscale Glossy Paper Color Grayscale Quality Best Normal Draft Best Normal Draft Best Normal Draft Best Normal Draft ANSI-D size Time (s) 490 120 85 435 135 45 630 435 325 630 435 325 ANSI-E size Time (s) 980 - HP Designjet 510 | HP Designjet 510 Printer series - User's Guide: English - Page 162
Print quality You can set the overall print quality from the front panel (Set-Up > Print Quality). In general choose: • Fast for maximum productivity. Ideal for checking prints, when print quality is not very important. You can increase print speed further with the Fast quality settings. • Normal to - HP Designjet 510 | HP Designjet 510 Printer series - User's Guide: English - Page 163
Advanced options Your printer provides several advanced optimization and quality enhancement features to allow you to obtain the printed results you require. • Improving line quality and graphics details • Best quality settings • Fast quality settings - HP Designjet 510 | HP Designjet 510 Printer series - User's Guide: English - Page 164
Improving line quality and graphics details The Set-up menu Optimize for option allows you to select the correct mode for the type of job you are printing. Two modes are provided: Line drawings/text and Images. Selecting the Line drawings/text option smooths the fine graduations along the angles and - HP Designjet 510 | HP Designjet 510 Printer series - User's Guide: English - Page 165
2400×1200 dpi in maximum detail mode. NOTE: Using the maximum detail mode will improve resolution but will reduce printing speed and increase memory requirements. Use the following procedure to select maximum detail mode: Select (using the keys) Then press: 1. Set-up menu 2. Advanced options - HP Designjet 510 | HP Designjet 510 Printer series - User's Guide: English - Page 166
the increased speed mode. This can be done from the front panel only, because it is not available as an option in the printer driver. Use the following procedure to select increased speed mode: Select (using the keys) Then press: 1. Set-up menu 2. Advanced options 3. Fast Quality Settings - HP Designjet 510 | HP Designjet 510 Printer series - User's Guide: English - Page 167
These topics describe the best methods of managing the work that the printer is doing. • Cancelling a page that is printing Shows you how to cancel a page that is currently being printed. • Cancelling the drying time Shows you how release a page from the printer before the drying time has finished. - HP Designjet 510 | HP Designjet 510 Printer series - User's Guide: English - Page 168
is printing Use the following procedure to cancel a page that is currently being printed. 1. Press the Cancel key on the front panel. Cancel key The printer advances the paper as though the print were finished. A multi-page job or a big file may take longer to stop printing than other files. - HP Designjet 510 | HP Designjet 510 Printer series - User's Guide: English - Page 169
is waiting for the end of drying time. 1. Press Cancel or Form Feed & Cut on the front panel. Cancel key Form Feed & Cut key The printer will release the paper and it will fall into the paper bin. - HP Designjet 510 | HP Designjet 510 Printer series - User's Guide: English - Page 170
Printer configuration These topics explain how to change the configuration of your printer. • Printer information • Front panel setup • Altitude setting • Graphics language and networks • Setting up the I/O card • Controlling the cutter • Upgrading your printer • Color settings • Logs - HP Designjet 510 | HP Designjet 510 Printer series - User's Guide: English - Page 171
print out this information directly on your printer. Select Set-up > Printer information to view the information. The printer information screen shows the following information about your printer: • Model number • Serial number • Service ID • Firmware rev. • Accessory rev. • Paper used • Ink used - HP Designjet 510 | HP Designjet 510 Printer series - User's Guide: English - Page 172
Front panel setup You can configure the following parameters for the front panel: • Menu and message language • Alert buzzer • Screen contrast - HP Designjet 510 | HP Designjet 510 Printer series - User's Guide: English - Page 173
message language The following languages can be used for all menus and messages shown on the front panel of your printer: • English • German • Spanish • Catalan • French • Italian • Japanese • Portuguese • Korean • Simplified Chinese • Traditional Chinese To change the language: 1. Select the Front - HP Designjet 510 | HP Designjet 510 Printer series - User's Guide: English - Page 174
Alert buzzer Your printer is equipped with an alert buzzer that is used to warn you when: • A task has completed. • An error has been detected. • You change a parameter from - HP Designjet 510 | HP Designjet 510 Printer series - User's Guide: English - Page 175
Screen contrast You can adjust the screen contrast of the front panel to best suit the ambient lighting conditions at your location. The contrast can be varied from 0% to 100% in 5% increments. The default setting is 50% and is suitable for most situations. To adjust the screen contrast: 1. Select - HP Designjet 510 | HP Designjet 510 Printer series - User's Guide: English - Page 176
Altitude setting Your printer contains a vacuum pump which is used to hold the paper onto the platen. The altitude of your location affects the efficiency of this pump, so - HP Designjet 510 | HP Designjet 510 Printer series - User's Guide: English - Page 177
system administrators If you are using the printer with a network spooler, consider having your system administrator modify the spooler to insert the PJL language-switching commands automatically at the beginning and end of each file. This allows the printer to switch automatically into the correct - HP Designjet 510 | HP Designjet 510 Printer series - User's Guide: English - Page 178
Setting up the I/O card Network With a network interface (such as the HP Jetdirect Print Server), refer to your network interface documentation for advice on any front-panel configuration. The front-panel menu is I/O Setup > Card Set-up. To change the I/O time-out setting Some software applications - HP Designjet 510 | HP Designjet 510 Printer series - User's Guide: English - Page 179
job falls into the paper bin. There may be a delay before the roll is cut due to the drying time you have programmed or the printer has automatically selected. In some situations you may not wish to cut the roll after each print job. Use the following procedure to control the - HP Designjet 510 | HP Designjet 510 Printer series - User's Guide: English - Page 180
available from Hewlett-Packard. System software upgrades increase your printer's functionality and enhance the features that your printer already possesses. System software can be downloaded from the Internet. For the latest upgrades, go to http//www.hp.com/go/graphic-arts/. Follow the on-screen - HP Designjet 510 | HP Designjet 510 Printer series - User's Guide: English - Page 181
selections are: Color/monochrome Refer to Printing images in grayscale for further details. • Color-the printer prints in color. • Grayscale-the printer prints the color image in grey shades. • True black-the printer prints the color image in grey shades using black ink only. RGB • Native/Device RGB - HP Designjet 510 | HP Designjet 510 Printer series - User's Guide: English - Page 182
error log. These logs are normally used by service engineers. Printhead log The printhead log contains a list of the last five printheads of each color with information about the usage of each printhead. Error log Lists the last errors that the printer has detected with the date the error occurred - HP Designjet 510 | HP Designjet 510 Printer series - User's Guide: English - Page 183
This chapter provides miscellaneous procedures and information that may be required to ensure your printer remains in a fully operational condition at all times. It contains the following topics: • Care of the printer • Installing expansion cards • Specifications • Ordering accessories • Glossary - HP Designjet 510 | HP Designjet 510 Printer series - User's Guide: English - Page 184
Care of the printer This section contains information on general maintenance of the printer. • Cleaning the printer Instructions for cleaning the exterior of your printer. • Storing and moving your printer Instructions on how to move and store your printer. - HP Designjet 510 | HP Designjet 510 Printer series - User's Guide: English - Page 185
. NOTE: Any maintenance or repairs beyond those described in this chapter should be done by a qualified service technician. Cleaning the printer's exterior Clean the outside of the printer as required with a damp sponge or a soft cloth and a mild household cleaner such as non-abrasive liquid - HP Designjet 510 | HP Designjet 510 Printer series - User's Guide: English - Page 186
. Refer to Assembly/Repacking Instructions available on the HP Web site (http://www.hp.com/go/graphic-arts/) for details. 4. If you have to move your printer you will need the original packaging. If necessary you can order a kit of the packaging materials. Contact HP support and they will supply it - HP Designjet 510 | HP Designjet 510 Printer series - User's Guide: English - Page 187
Installing expansion cards The following options are available for your printer: • Network card installation - HP Designjet 510 | HP Designjet 510 Printer series - User's Guide: English - Page 188
Network card installation HP Jetdirect network card installation 1. Before installing a card, switch off the printer and unplug it from the mains electricity supply. 2. Carefully remove the plastic cover from the left-hand rear of the printer by unclipping it. This cover gives access to the two - HP Designjet 510 | HP Designjet 510 Printer series - User's Guide: English - Page 189
HP Jetdirect network card installation 3. Remove the cover completely. Inside the compartment there are two slots for a LAN card or an Accessory card. If you use an HP-GL/2 card, the LAN card should be in the right-hand slot (nearer the back of the printer), the accessory card on the left. 4. To - HP Designjet 510 | HP Designjet 510 Printer series - User's Guide: English - Page 190
HP Jetdirect network card installation 6. Insert the LAN cable into the LAN card. It is simply pushed into place and clicks when locked. 7. Carefully replace or roll. 8. Once you have completed the physical installation of the card, you will have to configure it for your LAN, see Setting up the - HP Designjet 510 | HP Designjet 510 Printer series - User's Guide: English - Page 191
Specifications • Functional specifications • Memory specifications • Printer power specifications • Ecological specifications • Environmental specifications • Acoustic specifications • Connection specifications - HP Designjet 510 | HP Designjet 510 Printer series - User's Guide: English - Page 192
Functional specifications HP Designjet 510 and 510ps functional specifications Functional specifications HP ink supplies Four colors: cyan, magenta, yellow and black. Printheads: 600 dpi, 36 kHz (cyan, magenta, yellow). 36 kHz (black). Cyan Ink cartridges: Magenta Yellow 28 or 69 ml - HP Designjet 510 | HP Designjet 510 Printer series - User's Guide: English - Page 193
HP Designjet 510 and 510ps functional specifications Functional specifications HP supported paper typesa HP Bright White Inkjet Paper (Bond) HP Vellum HP Natural Tracing Paper HP Coated Paper HP Heavyweight Coated Paper HP Matte Film HP High-Gloss Photo Paper HP Semi-Gloss Photo Paper HP Paper-Based - HP Designjet 510 | HP Designjet 510 Printer series - User's Guide: English - Page 194
HP Designjet 510 and 510ps functional specifications Functional specifications Resolution Print mode Fast Render Halftone Normal Render Halftone Best (default) Render Halftone Best Render (maximum detail) Halftone Previous ... Line drawing/text 300×300dpi 600× - HP Designjet 510 | HP Designjet 510 Printer series - User's Guide: English - Page 195
HP Designjet 510 and 510ps functional specifications Functional specifications Margins Roll and sheet (normal) Roll (small) Graphics languages supported Side margins 5 mm Leading edge margin 17 mm Trailing edge margin 17 mm HP-GL/2 HP-RTL CALRASTER All margins 5 mm Accuracy 0.2% of the - HP Designjet 510 | HP Designjet 510 Printer series - User's Guide: English - Page 196
Physical specifications Physical specifications Type Weight D/A1 size printer 38.5 kg 85 lb A0+/E+ size printer 45 kg 99 lb Width 1253 mm 49 in 1690 mm 67 in Depth 470 mm 19 in 674 mm 27 in Height 349 mm 14 in 1100 mm 43 in - HP Designjet 510 | HP Designjet 510 Printer series - User's Guide: English - Page 197
Memory specifications Memory specifications Internal RAM Can be upgraded to: 160 MB 416 MB - HP Designjet 510 | HP Designjet 510 Printer series - User's Guide: English - Page 198
Printer power specifications Printer power specifications Source 100-240 V AC ±10% auto-ranging Frequency 50/60 Hz Current 3 A maximum Consumption 150 W maximum - HP Designjet 510 | HP Designjet 510 Printer series - User's Guide: English - Page 199
. Parts marked according to ISO 11469 standard. Metals Packaging Enclosures made of electro-galvanized steel sheet. Cardboard (non-chlorine-bleached) and foam are 100% recyclable. Inks used for printing do not contain heavy metals. User documentation Majority provided in Adobe Acrobat PDF format - HP Designjet 510 | HP Designjet 510 Printer series - User's Guide: English - Page 200
to 86° F) RH 20% to glossy paper: 80%. Optimal print quality for other 15°C to 35°C (59° F to 95° F) RH 20% to HP papers: 70%. Non-operating ranges Printer: Packed consumable items and system: -40°C to 70°C (-40° F to 158° F) -40°C to 60°C (-40° F to 140° F) NOTE: At altitudes greater then - HP Designjet 510 | HP Designjet 510 Printer series - User's Guide: English - Page 201
Acoustic specifications Acoustic specifications Operating sound pressure Idle sound pressure Operating sound power Idle sound power 54 dB (from a one-meter bystander position) < 30 dB (A) (from a one-meter bystander position) 6.5 Bels (A) < 4.3 Bels (A) - HP Designjet 510 | HP Designjet 510 Printer series - User's Guide: English - Page 202
Connection specifications • Cable specification • Recommended cables - HP Designjet 510 | HP Designjet 510 Printer series - User's Guide: English - Page 203
is a 36-pin female connector. Most existing parallel cables support IEEE-1284 compatible communication, but for use with this printer, the cable must meet the specifications in the following table: Parallel (IEEE-1284 compatible/Centronics) Interface Pin Wire/Signal Name Source 1 Strobe - HP Designjet 510 | HP Designjet 510 Printer series - User's Guide: English - Page 204
Recommended cables The following cable is recommended for optimum performance and electromagnetic compatibility: Recommended cable Interface type (computer) HP part number IEEE compatible/Centronics Interface (All) USB C2951A C2392A Cable length 3.0 m Connector type at computer end of cable 25 - HP Designjet 510 | HP Designjet 510 Printer series - User's Guide: English - Page 205
accessories You can order supplies and accessories in any of the following ways: • Call your local authorized HP dealer. • Contact your local HP Sales and Support office. • Refer to the Hewlett-Packard Support / Services booklet that was supplied with your printer. • Hardware • Consumable items - HP Designjet 510 | HP Designjet 510 Printer series - User's Guide: English - Page 206
Gigabit Ethernet J7961A USB print servers HP Jetdirect ew2400 802.11g Wireless J7951G HP Jetdirect en1700 IPv6, Fast Ethernet J7988G Spindle 610 mm - 24 inch C2388A 1067 mm - 42 inch C2389A Stand 610 mm - 24 inch FL C7782A a. Supported for the HP Designjet 510 but not for the 510ps - HP Designjet 510 | HP Designjet 510 Printer series - User's Guide: English - Page 207
Cyan Magenta 82 28 ml Yellow Black Cyan 11 - Magenta Yellow HP part number CH565A C4911A C4912A C4913A CH566A CH567A CH568A C4810A C4811A C4812A C4813A To achieve the best performance from your printer, we recommend that you use only genuine Hewlett-Packard accessories and supplies - HP Designjet 510 | HP Designjet 510 Printer series - User's Guide: English - Page 208
CMP CMYK Coated paper default device dpi drivers front panel front panel menus Meaning An American part of a drawing at the edges. Complementary Media Program that helps HP customers grow their businesses by referencing third-party printing material choices to ensure maximum HP Designjet printer - HP Designjet 510 | HP Designjet 510 Printer series - User's Guide: English - Page 209
for Personal Computers The part of the HP ink supplies which contains all the ink used in the printer. It is installed into the printer on the right-hand side. The smallest rectangle that contains all the content of the drawing, while maintaining its relative dimensions. An international standard - HP Designjet 510 | HP Designjet 510 Printer series - User's Guide: English - Page 210
pens, the lines it draws match the attributes of a pen. The exterior part of the printer on which the paper rests before going into the printer. The printhead is installed into the carriage assembly. It is the part that prints the ink onto the paper. Page size minus margins. Adobe PostScript - HP Designjet 510 | HP Designjet 510 Printer series - User's Guide: English - Page 211
raster data. The rod that holds the roll of paper. The vertical axis in which the paper feed moves, as you look at the printer from the front. The horizontal axis in which the print carriage moves, as you look at the printer from the front. The part of the printer that services the printheads. It - HP Designjet 510 | HP Designjet 510 Printer series - User's Guide: English - Page 212
- HP Designjet 510 | HP Designjet 510 Printer series - User's Guide: English - Page 213
☞ colors internal palettes ☞ communications problems ☞ component identification ☞ connection specifications ☞ correcting the printer configuration ☞ cutter replacement ☞ D display screen ☞ Down key ☞ drivers ☞ drying time ☞ cancelling ☞ procedure ☞ settings automatic ☞ manual ☞ none ☞ typical ☞ - HP Designjet 510 | HP Designjet 510 Printer series - User's Guide: English - Page 214
structure ☞ navigation keys ☞ page size setting ☞ functional specifications ☞ G graphics language and networks ☞ H handling paper ☞ heavy coated paper ☞ high-gloss photo ☞ HP ink supplies ☞ HP No 11 ☞ HP No 82 ☞ ink cartridges ☞ printheads ☞ I I/O time-out setting changing ☞ identifying components - HP Designjet 510 | HP Designjet 510 Printer series - User's Guide: English - Page 215
drying time ☞ automatic ☞ manual ☞ none ☞ printhead alignment ☞ replacement ☞ sheet paper ☞ loading roll paper problems ☞ loading sheet paper problems ☞ long-axis image is clipped ☞ M margins ☞ margins specifications ☞ marks or scratches on glossy paper ☞ matte film ☞ memory ☞ memory specifications - HP Designjet 510 | HP Designjet 510 Printer series - User's Guide: English - Page 216
☞ heavy coated paper ☞ high-gloss photo ☞ matte film ☞ natural tracing paper ☞ plain paper ☞ poster paper ☞ print quality selection ☞ supported ☞ translucent bond ☞ vellum ☞ roll installing ☞ loading ☞ removing from printer ☞ removing from spindle ☞ unloading ☞ sheet loading ☞ unloading ☞ - HP Designjet 510 | HP Designjet 510 Printer series - User's Guide: English - Page 217
another on same sheet ☞ other sources of information ☞ print distorted or unintelligible ☞ printer does not print ☞ printer drivers ☞ printer seems too slow ☞ printhead alignment ☞ problem inserting ☞ problems after replacement ☞ replacement ☞ statistics ☞ printheads HP ink supplies ☞ printing - HP Designjet 510 | HP Designjet 510 Printer series - User's Guide: English - Page 218
☞ functional ☞ graphics languages supported ☞ margins ☞ memory ☞ paper sizes ☞ parallel interface ☞ physical ☞ power ☞ resolution ☞ speed and print quality ☞ stepped lines problems ☞ supported paper types ☞ system software upgrades ☞ T translucent bond ☞ troubleshooting procedure ☞ typical drying - HP Designjet 510 | HP Designjet 510 Printer series - User's Guide: English - Page 219
typical printing times ☞ U Universal Serial Bus ☞ unloading roll paper ☞ sheet paper ☞ Up key ☞ upgrading system software ☞ USB ☞ user interface ☞ User's Reference Guide ☞ V vellum ☞ W warped lines ☞ Web page ☞
-
 1
1 -
 2
2 -
 3
3 -
 4
4 -
 5
5 -
 6
6 -
 7
7 -
8
-
9
-
10
-
11
-
12
-
13
-
14
-
15
-
16
-
17
-
18
-
19
-
20
-
21
-
22
-
23
-
24
-
25
-
26
-
27
-
28
-
29
-
30
-
31
-
32
-
33
-
34
-
35
-
36
-
37
-
38
-
39
-
40
-
41
-
42
-
43
-
44
-
45
-
46
-
47
-
48
-
49
-
50
-
51
-
52
-
53
-
54
-
55
-
56
-
57
-
58
-
59
-
60
-
61
-
62
-
63
-
64
-
65
-
66
-
67
-
68
-
69
-
70
-
71
-
72
-
73
-
74
-
75
-
76
-
77
-
78
-
79
-
80
-
81
-
82
-
83
-
84
-
85
-
86
-
87
-
88
-
89
-
90
-
91
-
92
-
93
-
94
-
95
-
96
-
97
-
98
-
99
-
100
-
101
-
102
-
103
-
104
-
105
-
106
-
107
-
108
-
109
-
110
-
111
-
112
-
113
-
114
-
115
-
116
-
117
-
118
-
119
-
120
-
121
-
122
-
123
-
124
-
125
-
126
-
127
-
128
-
129
-
130
-
131
-
132
-
133
-
134
-
135
-
136
-
137
-
138
-
139
-
140
-
141
-
142
-
143
-
144
-
145
-
146
-
147
-
148
-
149
-
150
-
151
-
152
-
153
-
154
-
155
-
156
-
157
-
158
-
159
-
160
-
161
-
162
-
163
-
164
-
165
-
166
-
167
-
168
-
169
-
170
-
171
-
172
-
173
-
174
-
175
-
176
-
177
-
178
-
179
-
180
-
181
-
182
-
183
-
184
-
185
-
186
-
187
-
188
-
189
-
190
-
191
-
192
-
193
-
194
-
195
-
196
-
197
-
198
-
199
-
200
-
201
-
202
-
203
-
204
-
205
-
206
-
207
-
208
-
209
-
210
-
211
-
212
-
213
-
214
-
215
-
216
-
217
-
218
-
219
 |
 |

Introduction
This
User’s Reference Guide
explains how to use your HP Designjet 510 or 510ps printer. The contents of this
guide are valid for both the HP Designjet 510 and the HP Designjet 510ps except where otherwise indicated.
This chapter contains the following topics:
•
Introducing the documentation
Introduces your printer’s documentation.
•
Introducing your printer
Contains a brief overview of the printer. It contains information about the printer’s features and what is
included with the printer.
•
Front view of printer
Contains a view of the front of the printer showing the location of the printer’s consumable items.
•
Printer connections
Shows all the connections to the printer: power,
parallel interface
,
USB
and optional network interface.