HP Designjet L25500 HP Designjet L25500 Printer Series - User's guide (first e
HP Designjet L25500 Manual
 |
View all HP Designjet L25500 manuals
Add to My Manuals
Save this manual to your list of manuals |
HP Designjet L25500 manual content summary:
- HP Designjet L25500 | HP Designjet L25500 Printer Series - User's guide (first e - Page 1
HP Designjet L25500 Printer series User's guide (first edition) - HP Designjet L25500 | HP Designjet L25500 Printer Series - User's guide (first e - Page 2
forth in the express warranty statement accompanying such products and services. Nothing herein should be construed as constituting an additional warranty. HP shall not be liable for technical or editorial errors or omissions contained herein. Trademarks Microsoft® and Windows® are U.S. registered - HP Designjet L25500 | HP Designjet L25500 Printer Series - User's guide (first e - Page 3
presets ...32 Add a new substrate type ...32 Color calibration ...39 Color profiles ...39 5 Handle the ink system Ink system components ...40 Ink system tips ...43 Work with ink system components ...43 Order ink supplies ...58 6 Print options Printer states ...60 Change margins ...60 ENWW iii - HP Designjet L25500 | HP Designjet L25500 Printer Series - User's guide (first e - Page 4
Request the printer's internal prints ...61 7 Accessories Order accessories ...62 8 Printer specifications Functional specifications ...63 Physical specifications ...64 Memory specifications ...64 Power specifications ...64 Ecological specifications ...64 Environmental specifications ...65 Acoustic - HP Designjet L25500 | HP Designjet L25500 Printer Series - User's guide (first e - Page 5
safely. General safety guidelines ● Refer to installation instructions before connecting the printer to the supply. ● There are no operator-serviceable parts inside the printer. Refer servicing to qualified service personnel. ● Turn off the printer, unplug both power cords from the power outlets - HP Designjet L25500 | HP Designjet L25500 Printer Series - User's guide (first e - Page 6
Connect the power cords to dedicated lines, each protected by a branch circuit breaker according to the rating of the wall socket. Do not use a power strip (relocatable power tap) to connect both power cords. ● Use only the power cords supplied by HP with the printer. Do not use a damaged power cord - HP Designjet L25500 | HP Designjet L25500 Printer Series - User's guide (first e - Page 7
problems associated with them. However, HP recommends that you wear gloves when handling ink system components. Warnings and cautions The following symbols are used in this manual to ensure the proper use of the printer and to prevent the printer from being damaged. Follow the instructions - HP Designjet L25500 | HP Designjet L25500 Printer Series - User's guide (first e - Page 8
to wear gloves when handling ink cartridges, printhead cleaning cartridges and the printhead cleaning container. The printer's main features Your printer is a color inkjet printer designed for printing high-quality images on flexible substrates from 23 in (584 mm) to 42 or 60 in (1.07 or 1.52 - HP Designjet L25500 | HP Designjet L25500 Printer Series - User's guide (first e - Page 9
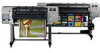
not provided with the printer. The printer's main components The following views of the printer illustrate its main components. Front view 60-in printer 1. Ink cartridge 2. Platen 3. Printhead 4. Printhead carriage 5. Ink funnel 6. Front panel 7. Printhead cleaning cartridge 8. Substrate-adjustment - HP Designjet L25500 | HP Designjet L25500 Printer Series - User's guide (first e - Page 10
Introduction 9. Spindle lock lever 10. Take-up reel motor 11. Take-up reel cable and sensor housing unit 12. Spindle 13. Loading table 14. Drying module 15. Take-up reel sensor 16. Take-up reel spindle stop 17. Curing module Rear view 60-in printer 1. Printhead cleaning container 2. Sockets for - HP Designjet L25500 | HP Designjet L25500 Printer Series - User's guide (first e - Page 11
functions: ● Assists you in troubleshooting issues ● Is used when performing certain physical operations, such as unloading substrate and maintaining the printer ● Displays information in brief about the status of the printer ● Displays warning and error messages, when appropriate, along with audio - HP Designjet L25500 | HP Designjet L25500 Printer Series - User's guide (first e - Page 12
printing. If it is flashing amber, your intervention is required. If it is solid amber, a serious error When this guide shows a series of front- printer. You can use it to obtain printer information, manage settings and presets, align printheads, upload new firmware and troubleshoot problems. Service - HP Designjet L25500 | HP Designjet L25500 Printer Series - User's guide (first e - Page 13
Update firmware ● Align printheads ● Upload substrate presets Support tab The Support tab contains options to complete these functions: ● Browse helpful information from a variety of sources ● Access HP Designjet links for technical support with your printer and accessories ● Access service support - HP Designjet L25500 | HP Designjet L25500 Printer Series - User's guide (first e - Page 14
connected to the network, or your network has no DHCP server. In the latter case, you will have to set the IP address manually: see the Maintenance and troubleshooting guide. Refer to the RIP instructions (not provided by HP) to install the software RIP. 10 Chapter 2 Connectivity and software - HP Designjet L25500 | HP Designjet L25500 Printer Series - User's guide (first e - Page 15
resume printing immediately. If you want to turn the printer on or off, the normal and recommended method is to use the Power button on the front panel. Basic setup options When you turn off the printer this way, the printheads are automatically stored with the printhead cleaning cartridge, which - HP Designjet L25500 | HP Designjet L25500 Printer Series - User's guide (first e - Page 16
from the power sockets. 5. Wait for 10 seconds. 6. Reinsert the power cords into the power sockets and turn on the printer by using the power switch. 7. Make to change the language that is used for the front-panel menus and messages. ● If you can understand the current front panel language, go to - HP Designjet L25500 | HP Designjet L25500 Printer Series - User's guide (first e - Page 17
return address. This address does not need to be a real, functional e-mail address, but it should be unique, so that recipients of the message can identify the printer that sent it 2. Go to the Notification page, which is also on the Setup tab. 3. Click the New icon to request new notifications, or - HP Designjet L25500 | HP Designjet L25500 Printer Series - User's guide (first e - Page 18
instructions but fail to open the Embedded Web Server, see the Maintenance and troubleshooting guide options. If you specify a language that it cannot support, it functions in English. To change the language, you want is at the top of the list in the dialog box. To complete the change, close - HP Designjet L25500 | HP Designjet L25500 Printer Series - User's guide (first e - Page 19
, use only recommended HP substrates (see Supported substrate families on page 16), which have been developed and thoroughly tested to ensure reliable performance. All printing components (printer, ink system, and substrate) have been designed to work together to offer trouble-free operation and - HP Designjet L25500 | HP Designjet L25500 Printer Series - User's guide (first e - Page 20
Mesh materials Papers compatible with water-based inks (otherwise known as offset) Papers compatible with solvent-based inks, cellulose coating (otherwise known as billboard) HP Photorealistic Poster Paper Load a roll onto the spindle 1. Make sure that the printer wheels are locked (the brake lever - HP Designjet L25500 | HP Designjet L25500 Printer Series - User's guide (first e - Page 21
3. Remove the first end of the spindle from the right side of the printer, and then move the spindle to the right in order to extract the other end. Do not insert your fingers into the spindle supports during the removal process. The spindle has a stop at each end to keep the roll in position. - HP Designjet L25500 | HP Designjet L25500 Printer Series - User's guide (first e - Page 22
. If the roll is long and heavy, you may need two people to handle it. 7. Slide the spindle into the roll. 8. The right stop of the spindle has two positions: one for rolls of the printer's maximum width, and another for narrower rolls. Handle the substrate 18 Chapter 4 Handle the substrate ENWW - HP Designjet L25500 | HP Designjet L25500 Printer Series - User's guide (first e - Page 23
9. Put the blue stop on to the upper end of the spindle, and push it towards the end of the roll. 10. Slide the lever-lock to the locked position. Handle the substrate 11. Lift the loading table to ease the spindle into the printer. CAUTION: To avoid trapping your fingers, do not push the - HP Designjet L25500 | HP Designjet L25500 Printer Series - User's guide (first e - Page 24
loading and before printing, go to the front panel and change to the correct category for the substrate you are loading: select the icon, then select View loaded substrate > Change loaded substrate. 4. The printer checks the substrate in various ways and may ask you to correct problems with skew or - HP Designjet L25500 | HP Designjet L25500 Printer Series - User's guide (first e - Page 25
unexpected problem at any stage of the substrate loading process, see the Maintenance and troubleshooting guide. 6. The printer calibrates the from the printer's side plate (as indicated by the ruler on the front of the curing module). 8. The printer indicates that it is ready for printing. Take - HP Designjet L25500 | HP Designjet L25500 Printer Series - User's guide (first e - Page 26
times as needed to rewind the substrate. 3. Lift the spindle lock lever. 4. Remove the roll from the printer, pulling out the right end on the right side of the printer first. Do not insert your fingers into the spindle supports during the removal process. Exceptional procedure (roll detached from - HP Designjet L25500 | HP Designjet L25500 Printer Series - User's guide (first e - Page 27
, pulling out the end on the right side of the printer first. Do not insert your fingers into the spindle supports during the removal process. 5. Lower the substrate-adjustment lever. 6. If the front panel shows a warning message, press the OK button to clear it. NOTE: If the end of the roll has - HP Designjet L25500 | HP Designjet L25500 Printer Series - User's guide (first e - Page 28
front panel. If you want to load the take-up reel during printing, select Load it during printing on the front panel. 3. Make sure that the loading table is in its upright position. 4. Unlock the take-up reel spindle by pushing the spindle lever to its uppermost position. 5. Remove the take-up reel - HP Designjet L25500 | HP Designjet L25500 Printer Series - User's guide (first e - Page 29
6. Remove the blue stop from the spindle. 7. Load the core onto the take-up reel spindle. 8. Replace the blue stop on the spindle. 9. Load the take-up reel spindle into the printer by pushing firmly on both ends of the spindle. Handle the substrate ENWW Use the take-up reel 25 - HP Designjet L25500 | HP Designjet L25500 Printer Series - User's guide (first e - Page 30
to support the weight of the loop-shaping core, which you insert in step 12. NOTE: If you are loading the take-up reel during printing you do not need to pull the substrate taut. Tape the substrate to the spindle core when an adequate length of substrate has fed from the printer after printing - HP Designjet L25500 | HP Designjet L25500 Printer Series - User's guide (first e - Page 31
12. Press the OK button on the front panel. The printer advances the substrate. 13. Assemble a loop-shaping core by matching the shape-coded and color-coded lengths of plastic tubing. The loop-shaping core must be the same width as the substrate that you are using. Make sure that both end - HP Designjet L25500 | HP Designjet L25500 Printer Series - User's guide (first e - Page 32
installed message appears. 18. The following image shows how the printer looks when it is operating. As substrate is fed from the printer, it drops down in a loop and then up into the take-up reel spindle. NOTE: While the take-up reel is operating, make sure that the take-up reel sensors are - HP Designjet L25500 | HP Designjet L25500 Printer Series - User's guide (first e - Page 33
and cable housing unit from the foot of the printer stand. Place the sensor and cable housing unit on the printer stand crossbar and use the blue plastic screw to affix the housing unit to the leg of the stand, as shown, while the printer is being moved. When reinstalling the housing unit, make - HP Designjet L25500 | HP Designjet L25500 Printer Series - User's guide (first e - Page 34
the take-up reel motor to wind the remainder of the substrate around the take-up reel spindle. Handle the substrate 8. Press the OK button on the front panel. The amount of printed substrate that is on the take-up reel spindle appears on the front panel. 30 Chapter 4 Handle the substrate ENWW - HP Designjet L25500 | HP Designjet L25500 Printer Series - User's guide (first e - Page 35
spindle by pushing the spindle lever to its uppermost position. 10. Remove the roll from the printer, pulling out the end on the right side of the printer first. Do not insert your fingers into the spindle supports (estimated by the printer) If no substrate is loaded, the message Out of substrate - HP Designjet L25500 | HP Designjet L25500 Printer Series - User's guide (first e - Page 36
under http://www.hp.com/go/l25500/ manuals/. 6. Select the number of print passes. See Select the number of passes on page 36. 7. Print the chart. 8. If you experience a substrate jam or noticed ink smears or substrate damage while printing, see the Maintenance and troubleshooting guide. Handle the - HP Designjet L25500 | HP Designjet L25500 Printer Series - User's guide (first e - Page 37
problem. 10. After a little time, the print should be completely dry. If the ink smudges when touched, see the Maintenance and troubleshooting guide. 11. If you notice any print quality problems, see the Maintenance and troubleshooting guide may need manual rather than automatic printhead alignment. - HP Designjet L25500 | HP Designjet L25500 Printer Series - User's guide (first e - Page 38
(also known as OMAS) is located under the print platen; it can track the substrate advance automatically. Disable the sensor in the following cases: ● The substrate is porous and allows ink to pass through to the platen. Clean the sensor after using this substrate. ● You are instructed to do so by - HP Designjet L25500 | HP Designjet L25500 Printer Series - User's guide (first e - Page 39
may be permanently deformed or damaged. Substrate advance problems may appear in extreme cases. The vacuum applied to the substrate at the printing zone helps to hold the substrate down on the print platen, keeping the distance to the printheads constant. The substrate may lift up off the - HP Designjet L25500 | HP Designjet L25500 Printer Series - User's guide (first e - Page 40
damaged in blank or lightly inked areas of the print, especially with a high number of passes. Select the number of passes Increasing the number of passes will tend to improve the print quality but reduce the speed of printing. Passes Uni/bidir Selfadhes. vinyl Ink limit setting in RIP Banner - HP Designjet L25500 | HP Designjet L25500 Printer Series - User's guide (first e - Page 41
Check the ink quantity Check the printed chart in the following ways. 1. Too much ink: There are several possible symptoms of this problem. ● The last two or three scales of the plot look the same. ● Vertical banding. ● Horizontal banding. Handle the substrate ENWW Add a new substrate type 37 - HP Designjet L25500 | HP Designjet L25500 Printer Series - User's guide (first e - Page 42
the substrate vendor's Web site and HP's Web site for the latest substrate presets and information. ● Consult your RIP documentation to make sure you are applying the right substrate ICC profile. ● Consult your RIP documentation on how to lower the total ink quantity of the preset. 2. Correct amount - HP Designjet L25500 | HP Designjet L25500 Printer Series - User's guide (first e - Page 43
time at the end of the printing process, but may cause slight substrate deformation, depending on the substrate. See also Printer states on page 60. Color calibration The purpose of color calibration is to produce consistent colors with the specific printheads, inks and substrate that you are using - HP Designjet L25500 | HP Designjet L25500 Printer Series - User's guide (first e - Page 44
ml. Ink cartridges require no maintenance or cleaning. When each ink cartridge is shaken vigorously before installation, and inserted correctly into its slot, the ink will flow to the printheads. Because the printheads control the amount of ink that is transferred to the page, high-quality printing - HP Designjet L25500 | HP Designjet L25500 Printer Series - User's guide (first e - Page 45
that are related to the cartridge, nor for any problems due to ink contamination. ● You will invalidate the warranty of all printheads of the same color used in the printer subsequently, unless and until the whole ink system (including ink tubes) is replaced. ● Print quality may be impaired. ● The - HP Designjet L25500 | HP Designjet L25500 Printer Series - User's guide (first e - Page 46
the roll has been used. The printer will refuse to start a print job if it detects the end of the cleaning roll. You should then replace the printhead cleaning cartridge with a new one. Ink funnel The ink funnel collects waste ink produced during printhead servicing. It is important that this funnel - HP Designjet L25500 | HP Designjet L25500 Printer Series - User's guide (first e - Page 47
the instructions on the front panel during installation. ● Allow the printer and the printhead cleaning cartridge to clean the printheads automatically. ● Avoid unnecessary removal of the ink cartridges and printheads. ● The ink cartridges should never be removed while the printer is printing. They - HP Designjet L25500 | HP Designjet L25500 Printer Series - User's guide (first e - Page 48
to continue printing. CAUTION: The procedure to remove an ink cartridge must be initiated from the front panel. Do not remove an ink cartridge until the front panel prompts you. CAUTION: Remove an ink cartridge only if you are ready to insert another one. WARNING! Make sure that the printer wheels - HP Designjet L25500 | HP Designjet L25500 Printer Series - User's guide (first e - Page 49
comes out, in its drawer. 5. Lift the cartridge out of its drawer. NOTE: Avoid touching the end of the cartridge that is inserted into the printer, because the connection might be coated with ink. NOTE: If necessary, store a partially-used ink cartridge in the same position as if it were inserted - HP Designjet L25500 | HP Designjet L25500 Printer Series - User's guide (first e - Page 50
ink cartridge. Insert an ink cartridge 1. Pick up the new ink cartridge and find the label that identifies the ink color. Hold the ink cartridge so that you can see the label at the top of the side that is facing you. 2. Check that the colored label above the empty slot in the printer matches - HP Designjet L25500 | HP Designjet L25500 Printer Series - User's guide (first e - Page 51
lock into position. If you have difficulty, see the Maintenance and troubleshooting guide. 6. The front-panel display confirms that all cartridges have been correctly inserted. Replace a printhead Printhead replacement must be performed after the printer has been turned on with the hard power switch - HP Designjet L25500 | HP Designjet L25500 Printer Series - User's guide (first e - Page 52
removing any printheads, it will attempt to return back to its home position to the right. 3. When the carriage has stopped moving, the front panel prompts you to open the printer window. Unlock the window and open it. 4. Locate the carriage on the right side of the printer. Handle the ink system - HP Designjet L25500 | HP Designjet L25500 Printer Series - User's guide (first e - Page 53
5. Pull up and release the latch on top of the carriage. 6. Lift up the cover. This provides access to the printheads. 7. To remove a printhead, lift up the blue handle. 8. Using the blue handle, gently disengage the printhead. Handle the ink system ENWW Work with ink system components 49 - HP Designjet L25500 | HP Designjet L25500 Printer Series - User's guide (first e - Page 54
Gently pull the blue handle upward until the printhead is released from the carriage. CAUTION: Do not pull abruptly. That action can damage the printhead. 10. The front-panel display identifies the missing printhead. Insert a printhead 1. If the printhead is new, shake it vigorously before removing - HP Designjet L25500 | HP Designjet L25500 Printer Series - User's guide (first e - Page 55
installing the new printhead, so you need to press it down firmly but smoothly. You should hear a beep and see confirmation on the front-panel display that the printhead has been inserted. If you have difficulty, See the Maintenance and troubleshooting guide. ENWW Work with ink system components - HP Designjet L25500 | HP Designjet L25500 Printer Series - User's guide (first e - Page 56
. 8. Lower the latch to rest on the carriage cover. When all of the printheads have been inserted correctly and the printer has accepted them, the printer beeps. NOTE: If the printer does not beep when you insert the printhead and the Replace message appears on the front-panel display, you might - HP Designjet L25500 | HP Designjet L25500 Printer Series - User's guide (first e - Page 57
Maintenance and troubleshooting guide. Replace the printhead cleaning kit When the front panel prompts you to replace the printhead cleaning kit, you should replace first the printhead cleaning cartridge, then the ink funnel, then the printhead cleaning container. Replace the printhead cleaning - HP Designjet L25500 | HP Designjet L25500 Printer Series - User's guide (first e - Page 58
panel, at the front of the printer. Open the door. 3. The printhead cleaning cartridge has a handle on the front. To remove the cartridge, press inward and upward as indicated by the arrow, until the cartridge is released. 4. Lift up the printhead cleaning cartridge to remove it from the slot - HP Designjet L25500 | HP Designjet L25500 Printer Series - User's guide (first e - Page 59
When the printhead cleaning cartridge has been pushed all the way in, press inwards and downwards as indicated, until it clicks into place. NOTE: The front panel will not show the new printhead cleaning cartridge until the door is closed. Handle the ink system ENWW Work with ink system components - HP Designjet L25500 | HP Designjet L25500 Printer Series - User's guide (first e - Page 60
, the front panel instructs you to load some. Make sure that the printer window and the printhead cleaning cartridge door are closed. The printer will not print while these are open. When you have replaced the printhead cleaning cartridge, the ink funnel and printhead cleaning container must also be - HP Designjet L25500 | HP Designjet L25500 Printer Series - User's guide (first e - Page 61
3. Grip the ink funnel. 4. Remove the ink funnel. 5. Insert the new ink funnel. 6. Press it into place. Handle the ink system ENWW Work with ink system components 57 - HP Designjet L25500 | HP Designjet L25500 Printer Series - User's guide (first e - Page 62
printhead cleaning container. 3. Ensure that the tube is pointing into the center of the container. Order ink supplies You can order the following ink supplies for your printer. Table 5-1 Ink cartridges Cartridge Capacity (ml) HP 789 Black Latex Designjet Ink Cartridge 775 HP 789 Cyan Latex - HP Designjet L25500 | HP Designjet L25500 Printer Series - User's guide (first e - Page 63
Printhead HP 789 Cyan/Light Cyan Printhead HP 789 Light Magenta/Magenta Printhead Table 5-3 Printhead cleaner Printhead cleaner HP 789 Printhead Cleaning Kit (contains a printhead cleaning cartridge and an ink funnel) HP 789 Printhead Cleaning Container Part number CH612A CH613A CH614A Part number - HP Designjet L25500 | HP Designjet L25500 Printer Series - User's guide (first e - Page 64
yet, and the heaters are not turned on. ● Preparing to print: The printer is warming up the heaters and preparing the printheads to print. This takes 1 to 8 min. ● Printing ● Curing: This takes 1.5 to 5 min. ● Finishing: The printer is cooling down and preparing for stand-by. This takes 0.5 to - HP Designjet L25500 | HP Designjet L25500 Printer Series - User's guide (first e - Page 65
prints, number of prints by substrate family, number of prints by print-quality option, and total amount of ink used per color. The accuracy of these estimates is not guaranteed. ● Service information: Provides information that service engineers require. ENWW Request the printer's internal prints - HP Designjet L25500 | HP Designjet L25500 Printer Series - User's guide (first e - Page 66
your printer. Name HP Designjet L25500 42-inch Spindle (spare spindles ease the process of switching between different substrates) HP Designjet L25500 60-inch Spindle (spare spindles ease the process of switching between different substrates) HP Designjet L25500 User Maintenance Kit Product number - HP Designjet L25500 | HP Designjet L25500 Printer Series - User's guide (first e - Page 67
cartridges contain 775 ml of ink. Table 8-2 Substrate sizes Minimum Width 584 mm (23 in) Narrow substrate: 254 mm (10 in) Length 420 mm (16.5 in) Maximum 1067 mm (42 in) or 1524 mm (60 in) Roll with maximum external diameter of 180 mm (7.1 in) Table 8-3 Print resolutions Ink level Number - HP Designjet L25500 | HP Designjet L25500 Printer Series - User's guide (first e - Page 68
by the customer, according to the National Electrotechnical Code (NEC). Table 8-8 Single phase line specifications 60-in printer 42-in printer Number of power cords 2 Input voltage 220-240 V~ (-10%+6%) Input frequency 50 / 60 Hz Power consumption 4.8 kW (overall consumption for both - HP Designjet L25500 | HP Designjet L25500 Printer Series - User's guide (first e - Page 69
on the printer parts and cartridges and can result in ink leaks and printer errors. In this case, HP recommends that you wait at least 3 hours before turning on the printer or installing the ink cartridges, to allow the condensate to evaporate. Acoustic specifications Table 8-10 Printer acoustic - HP Designjet L25500 | HP Designjet L25500 Printer Series - User's guide (first e - Page 70
is heated in the printing zone to dry the ink and fix the image to the substrate. Too high or too low a drying temperature may cause print quality defects. Firmware Software that controls your printer's functionality and is stored semi-permanently in the printer (it can be updated). Gamut The range - HP Designjet L25500 | HP Designjet L25500 Printer Series - User's guide (first e - Page 71
the substrate passes while it is being printed on. Printhead A removable printer component that takes ink of one or more colors from the corresponding ink cartridge(s) and deposits it on the substrate, through a cluster of nozzles. Spindle A rod that supports a roll of substrate while it is being - HP Designjet L25500 | HP Designjet L25500 Printer Series - User's guide (first e - Page 72
63 printhead cleaner specification 63 printhead cleaning cartridge about 42 replacing 53 printhead cleaning container about 42 replacing 58 printhead cleaning kit replacing 53 printing delays 39 printing faster 33 R rear view 6 refilling ink cartridges 40 resolution 63 restart the printer 12 - HP Designjet L25500 | HP Designjet L25500 Printer Series - User's guide (first e - Page 73
overview 15 storage 31 supported families 15 tips 15 substrate presets downloading 32 substrate sizes (max & min) 63 T take-up reel motor 7 using 21 turn the printer on/off 7 U unloading roll from printer 15 use the take-up reel 21 W warning 3 warning labels 3 ENWW Index 69
-
 1
1 -
 2
2 -
 3
3 -
 4
4 -
 5
5 -
 6
6 -
 7
7 -
8
-
9
-
10
-
11
-
12
-
13
-
14
-
15
-
16
-
17
-
18
-
19
-
20
-
21
-
22
-
23
-
24
-
25
-
26
-
27
-
28
-
29
-
30
-
31
-
32
-
33
-
34
-
35
-
36
-
37
-
38
-
39
-
40
-
41
-
42
-
43
-
44
-
45
-
46
-
47
-
48
-
49
-
50
-
51
-
52
-
53
-
54
-
55
-
56
-
57
-
58
-
59
-
60
-
61
-
62
-
63
-
64
-
65
-
66
-
67
-
68
-
69
-
70
-
71
-
72
-
73
 |
 |

HP Designjet L25500 Printer series
User’s guide (first edition)