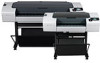
HP Designjet T790 HP Designjet T790 and T1300 - Setup Poster: English
HP Designjet T790 Manual
 |
View all HP Designjet T790 manuals
Add to My Manuals
Save this manual to your list of manuals |
HP Designjet T790 manual content summary:
- HP Designjet T790 | HP Designjet T790 and T1300 - Setup Poster: English - Page 1
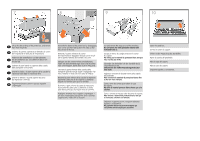
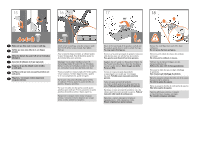
HP DESIGNJET T790 and T1300 ePrinter Series EN Product Assembly Instructions FR Instructions Printed in XXX 1 EN Read these instructions roll of 24 in (minimum) paper, in order to align the printheads 24 pouces) minimum, afin d'aligner les têtes d'impression. • Vous avez besoin d'un support recommended - HP Designjet T790 | HP Designjet T790 and T1300 - Setup Poster: English - Page 2
DESIGNJET T790 and T1300 ePrinter Series start-up © 2010 Hewlett-Packard Development Company, L.P. EN Remove the accessories from the printer el software de la impresora en la parte superior de la impresora. A documenta at each end. Retirez le carton du support, c'est-à-dire le grand carton. Pour - HP Designjet T790 | HP Designjet T790 and T1300 - Setup Poster: English - Page 3
Levante as laterais e a parte superior da caixa PT da impressora e retire-as. RU Dismantle the bottom of the printer box by disengaging each corner the white protective material until instructed to do so. Coupez et retirez les sangles entourant le carton du support. Ne retirez pas le mat - HP Designjet T790 | HP Designjet T790 and T1300 - Setup Poster: English - Page 4
11 12 13 14 Remove the cross-brace and the two pieces of EN packaging material from each end of the stand box. Retirez la traverse et les deux éléments d'emballage FR à chaque extrémité du carton du support Retire o suporte transversal e as duas partes de material PT da embalagem de cada - HP Designjet T790 | HP Designjet T790 and T1300 - Setup Poster: English - Page 5
ñas solapas de cada una de las piezas de espuma de los extremos. No retire las piezas de espuma. Retire as pequenas bordas de cada parte de espuma. Não retire as - HP Designjet T790 | HP Designjet T790 and T1300 - Setup Poster: English - Page 6
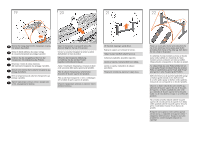
superior del producto. Abra a cobertura transparente e retire a embalagem anti-umidade da parte superior do produto. Lift the stand, keeping it upside down. Relevez le support, en le laissant à l'envers. Heben Sie den Standfuß verkehrt herum an. Sollevare il piedistallo, tenendolo capovolto - HP Designjet T790 | HP Designjet T790 and T1300 - Setup Poster: English - Page 7
ê terá dois parafusos de reposição. 20x Rotate the product 90 degrees. IMPORTANT:make sure that the roll feeds are facing downwards. Faites pivoter le produit à 90 degrés. IMPORTANT : vérifiez que les supports d'impression se trouvent face vers le bas. Drehen Sie das Gerät um 90 °. WICHTIG: Die - HP Designjet T790 | HP Designjet T790 and T1300 - Setup Poster: English - Page 8
ruote a contatto con il pavimento. Il prodotto pesa 101,2 kg (223 libbre). Sostenga el producto por las piezas de espuma de los extremos y por la parte posterior central, y gírelo ES hasta que se mantenga sobre sus pies, con las cuatro ruedas en contacto con el suelo. El producto pesa 101,2 kg - HP Designjet T790 | HP Designjet T790 and T1300 - Setup Poster: English - Page 9
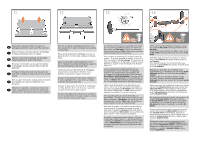
avant de chaque support. Vous devez entendre un clic lorsque le tube se met en place. Befestigen Sie jede der beiden kurzen Streben an der Vorderseite von jedem Fuss. Die Streben rasten ein, wenn sie richtig sitzen. Fissare i due tubi corti nei piedini del prodotto , nella parte anteriore di ciascun - HP Designjet T790 | HP Designjet T790 and T1300 - Setup Poster: English - Page 10
ère du bac de réception sur les FR supports que vous venez de fixer à chaque montant du support. Setzen Sie die hintere Stange der Ablage in The basket is now complete. L'installation du bac de réception est maintenant terminée. Die Ablage ist jetzt angebracht. L'assemblaggio del cesto è stato - HP Designjet T790 | HP Designjet T790 and T1300 - Setup Poster: English - Page 11
produto com fita. PT Remova a fita. RU ленту. Turn the cardboard support 90° to the right. Faites pivoter le support en carton à 90° sur la droite. Drehen Sie die Transportsicherung um derecha, verá un trozo de cartón. Na parte interna da lateral direita do produto, há um pedaço de papelão. - HP Designjet T790 | HP Designjet T790 and T1300 - Setup Poster: English - Page 12
parte posterior direita do produto e prenda o cabo com o clipe fornecido para evitar a desconexão acidental. USB 2.0 If you find a USB flash drive in a plastic bag inside the box, it contains the latest Firmware. Please follow the instructions the power cable to the product's power socket. - HP Designjet T790 | HP Designjet T790 and T1300 - Setup Poster: English - Page 13
above the power socket. o painel frontal (visor LCD). RU Look for a product number label and stick it at the back right-hand side of parte frontal del producto, a mano derecha. Procure a placa com o nome do produto e fixe-o na parte frontal direita do produto. On the front panel, the HP - HP Designjet T790 | HP Designjet T790 and T1300 - Setup Poster: English - Page 14
parte sinistra del prodotto . Abra la cubierta del lado izquierdo del producto. Abra a tampa no lado esquerdo da produto Insert the ink cartridges one by one. Each cartridge nell'alloggiamento dello stesso colore. Non toccare i pioli, le guide o i circuiti. Inserte los cartuchos de tinta uno por - HP Designjet T790 | HP Designjet T790 and T1300 - Setup Poster: English - Page 15
ink cartridges correctly, the product must prepare the ink system for its first use. It EN will do this immediately if you press the OK key, or after a 60-second pause if you do not press the OK key. When the ink . Lorsque le kit encreur est pr the blue handle of the printhead cover. Ouvrez la fen - HP Designjet T790 | HP Designjet T790 and T1300 - Setup Poster: English - Page 16
printheads exist only to prevent the escape of ink during ink cartridge installation. The front panel EN now prompts you to remove the setup printheads Non toccare i pioli, le guide o i circuiti. Extraiga y instalados. OK Unwrap each printhead and remove all orange parts. Déballez chaque tête - HP Designjet T790 | HP Designjet T790 and T1300 - Setup Poster: English - Page 17
printhead cover. The product checks and prepares the new printheads, which may take 30 to 40 minutes depending on the condition of the printheads cabezales y del entorno. Cierre la tapa. Empurre a alça para baixo na parte superior da tampa do cabeçote. O produto verifica e prepara os novos cabeç - HP Designjet T790 | HP Designjet T790 and T1300 - Setup Poster: English - Page 18
67 DESIGNJET T790 and T1300 ePrinter Series start-up 68 69 70 © 2010 Hewlett-Packard Development Company, L.P. While the product is preparing the printheads, you could spend the time installing the product software on your EN computer. Be sure to follow the software installation instructions. - HP Designjet T790 | HP Designjet T790 and T1300 - Setup Poster: English - Page 19
parte frontal, coloque o eixo no produto. Feed the leading edge of the paper into the product until the product takes hold of it. Do not insert the roll paper into the cutsheet slot. Note: do not close the roll frontal. Only for T1300: Media load for lower roll Go to the rear of the product - HP Designjet T790 | HP Designjet T790 and T1300 - Setup Poster: English - Page 20
correcto: el extremo del papel deberá introducirse en el producto desde la parte superior del rollo. Coloque el tope extraíble en el eje para mantener Push the removable stop towards the roll as far as it will go. No gap should be left between stop and paper. Uniquement pour T1300: Poussez au - HP Designjet T790 | HP Designjet T790 and T1300 - Setup Poster: English - Page 21
93 The product will proceed to align the printheads. This process involves printing, and therefore needs to use paper with a straight leading edge. Note: printhead alignment requires paper at least 24in (61cm) wide. Roll paper is recommended. Le produit va procéder à l'alignement des têtes - HP Designjet T790 | HP Designjet T790 and T1300 - Setup Poster: English - Page 22
83 84 85 86 You will be asked if you want to activate your printer´s web connectivity: we recommend that you do so EN now ('Continue'), and follow the screens displayed to upgrade your firmware and connect. Otherwise, you can choose to 'Do it later'. Un message vous invite à activer la - HP Designjet T790 | HP Designjet T790 and T1300 - Setup Poster: English - Page 23
verificar su conexión a Internet; una vez terminado, haga clic en "OK". A conexão com a Internet será verificada. Ao concluir, clique em "OK". The firmware update screen will now appear, click ´Continue´. L'écran de mise à jour du microprogramme s'affiche à présent. Cliquez sur ´Continuer´. Der - HP Designjet T790 | HP Designjet T790 and T1300 - Setup Poster: English - Page 24
final de confirmação o informará que o processo foi concluído, clique em "Continuar". RU Any firmware updates will automatically download and install on your system. Note: If during the verification process an error occurs you can always modify the settings and click continue to run the - HP Designjet T790 | HP Designjet T790 and T1300 - Setup Poster: English - Page 25
das Mac OS X HP Designjet-Installationsprogramm, und folgen Sie der Anleitung auf dem Bildschirm. Hinweis: Wenn bei der Installation Probleme auftreten, installieren Sie die neuesten Versionen von unserer Website: www.hp.com/go/t790/ www.hp.com/go/t790ps/ www.hp.com/go/t1300 www.hp.com/go/t1300ps - HP Designjet T790 | HP Designjet T790 and T1300 - Setup Poster: English - Page 26
.com/go/t790/ www.hp.com/go/t790ps/ www.hp.com/go/t1300 www.hp.com/go/t1300ps RU USB MAC и Windows: DVD HP Start-Up Kit. Для ОС Windows: autorun.exe DVD Express Network Install Custom Install Для ОС Macintosh: DVD Mac OS X HP Designjet www.hp.com/go/t790/ www.hp.com/go
-
 1
1 -
 2
2 -
 3
3 -
 4
4 -
 5
5 -
 6
6 -
 7
7 -
8
-
9
-
10
-
11
-
12
-
13
-
14
-
15
-
16
-
17
-
18
-
19
-
20
-
21
-
22
-
23
-
24
-
25
-
26
 |
 |
© 2011 Hewlett-Packard Company
Large Format Division
Camí de Can Graells 1-21 · 08174
Sant Cugat del Vallès
Barcelona · Spain
All rights reserved
Printed in XXX
3m
2m
HP DESIGNJET
T790 and T1300
ePrinter Series
Product Assembly
Instructions
Instructions d’assemblage
du produit
Anleitung zur
Produktmontage
Istruzioni per l’installazione
del prodotto
Instrucciones de montaje
del producto
Instruções de montagem
do produto
Инструкции по сборке
продуктов
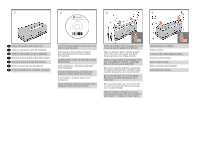
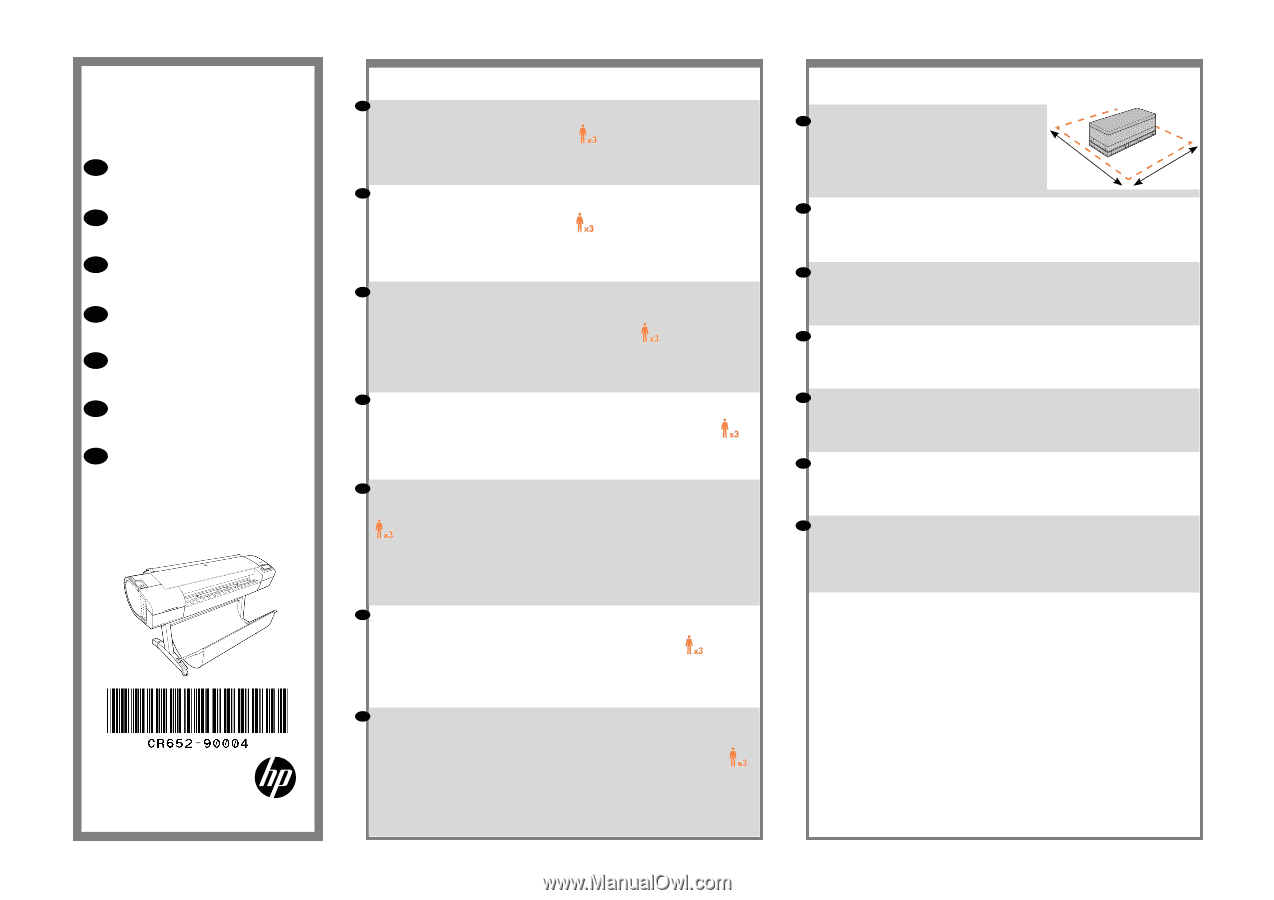
Read these instructions carefully...What you will need for this procedure
• Because the product is heavy, you may need three people to unpack it. When more than
one person is needed, this symbol is displayed.
• To assemble the product you will need at least 3 x 2 m of empty floor space.
• You will also need a roll of 24 in (minimum) paper, in order to align the printheads.
• Media and Connection Cables are needed to complete the installation.
Lisez ces consignes avec attention...Conditions requises pour cette procédure
• Trois personnes pour le déballage du produit, qui est lourde. Symbole indiquant
une opération nécessitant plusieurs personnes.
• Pour assembler le produit, vous devez disposer d’un espace libre d’au moins 3 x 2 m.
• Vous aurez également besoin d’un rouleau de papier de 60,96 cm (24 pouces) mini
-
mum, afin d’aligner les têtes d’impression.
• Vous avez besoin d’un support et de câbles de connexion pour compléter l’installation.
Lesen Sie diese Anleitung aufmerksam durch...Was Sie zum Aufstellen des Produkts
benötigen
• Das Produkt ist schwer, deshalb werden zum Auspacken drei Personen benötigt. Wenn
mehr als eine Person erforderlich ist, sehen Sie dieses Symbol.
• Zum Aufstellen des Produkts benötigen Sie eine freie Fläche von mindestens 3 x 2 m.
• Für die Ausrichtung der Druckköpfe ist auch eine Rolle mit 24 Zoll (Mindestgröße)
erforderlich.
• Medien und Verbindungskabel werden benötigt, um die Installation abzuschließen.
Leggere queste istruzioni attentamente...Cosa è necessario per questa procedura
• Dato il peso del prodotto, potrebbero essere necessarie tre persone per disimballarlo.
Quando è necessaria più di una persona, viene visualizzato il seguente simbolo.
• Per assemblare il prodotto è necessario uno spazio di almeno 3 × 2 metri.
• Per allineare le testine di stampa è inoltre necessario un rotolo di carta di almeno 610
mm (24 pollici).
• Per completare l’installazione, sono necessari i cavi di connessione e i supporti.
Lea atentamente estas instrucciones...Qué necesitará durante el proceso de instalación
• Debido al elevado peso del producto, es posible que se necesiten tres personas para
desembalarlo. Si se requiere la intervención de más de una persona, se muestra este símbolo.
• Para montar el producto necesitará al menos un espacio libre en el suelo de 3 x 2 m.
• Necesitará un rollo de papel de 24 pulgadas como mínimo para alinear los cabezales
de impresión
• Para completar la instalación se necesita el material de impresión y los cables de
conexión.
Leia estas instruções com atenção...O que será necessário para esse procedimento
• Como o produto é pesado, são necessárias três pessoas para retirá-lo da embalagem.
Quando mais de uma pessoa for necessária, esse símbolo será exibido.
• Para montar o produto, você precisará de um espaço de pelo menos 3 x 2 m no chão.
• Você também precisará de um rolo de 24 pol. (mínimo) de papel para alinhar os
cabeçotes de impressão.
• Cabos de mídia e conexão são necessários para concluir a instalação.
Внимательно прочтите эти инструкции...Что необходимо знать для выполнения этой
процедуры
• Ввиду большого веса принтера для его распаковки может потребоваться три
человека. Когда требуется более одного человека, отображается этот символ.
• Для сборки принтера потребуется свободное пространство на полу (не менее 3 на
2 м).
• Вам также потребуется рулон бумаги в 24 дюйма (минимум) для выравнивания
печатающих головок
• Для завершения установки требуются кабели мультимедиа и соединительные
кабели.
Product working area
Before you start unpacking, consider where you
are going to put the assembled product. You
should allow some clear space on all sides of the
product box. The recommended clearances are
shown in the illustration above.
Zone de travail du produit
Avant de commencer le déballage, pensez à l’emplacement où le produit sera
installée. Prévoir de l’espace autour de la boîte du produit, sur tout son périmètre.
L’espace recommandé est indiqué dans l’illustration ci-dessus.
Standort des Produkts
Bevor Sie mit dem Auspacken beginnen, überlegen Sie sich, wo das fertige
Produkt aufgestellt werden soll. Zu allen Seiten des Produktkartons sollte noch
freier Platz sein. Die empfohlenen Abstände sind in der Abbildung oben vermerkt.
Area operativa del prodotto
Prima di cominciare a disimballare il prodotto, considerare lo spazio in cui verrà
sistemata una volta assemblato. È necessario lasciare dello spazio su tutti i lati
della scatola del prodotto. Lo spazio consigliato è illustrato nella figura.
Área de trabajo del producto
Antes de comenzar el desembalaje, piense dónde va a colocar el producto una
vez montado. Deberá dejar un espacio libre en todos los lados de la caja del
producto. El espacio libre aconsejable se muestra en la ilustración anterior.
Área de trabalho do produto
Antes de começar a desembalar o produto, defina o local onde você colocará o
produto depois de montado. É necessário também deixar algum espaço livre nas
laterais do produto. Esses espaços são mostrados na ilustração acima.
Рабочая зона принтера.
Прежде чем начать распаковку, определите место для собранного принтера.
С каждой стороны от коробки с принтером должно оставаться свободное
пространство. Рекомендуемая величина свободного пространства приводится
на рисунке выше.
EN
EN
EN
FR
FR
FR
IT
IT
IT
ES
ES
ES
PT
PT
PT
RU
RU
RU
DE
DE
DE
1
2