HP Designjet Z5200 HP Designjet Z5200ps Printer - Introductory Information
HP Designjet Z5200 - PostScript Printer Manual
 |
View all HP Designjet Z5200 manuals
Add to My Manuals
Save this manual to your list of manuals |
HP Designjet Z5200 manual content summary:
- HP Designjet Z5200 | HP Designjet Z5200ps Printer - Introductory Information - Page 1
EN HP Designjet Z5200 Printer series Introductory Information TR HP Designjet Z5200 Yazıcı serisi Tanıtıcı Bilgiler FR Imprimantes HP Designjet série Z5200 Introduction CS Tiskárny HP Designjet Z5200 Úvodní informace DE HP Designjet Z5200 HU HP Designjet Z5200 Einführende Informationen - HP Designjet Z5200 | HP Designjet Z5200ps Printer - Introductory Information - Page 2
paper issues • Troubleshooting print-quality issues • Troubleshooting ink-cartridge and printhead issues • Troubleshooting general printer issues • Front-panel error messages • HP Customer Care • Printer specifications Further information is available at HP's support Web site (http://www.hp - HP Designjet Z5200 | HP Designjet Z5200ps Printer - Introductory Information - Page 3
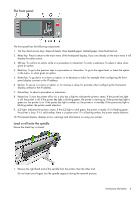
four direct-access keys: View ink levels, View loaded paper, Unload paper, Form feed and cut. printer. Load a roll onto the spindle Ensure the sheet tray is closed. 1. Remove the right-hand end of the spindle from the printer, then the other end. Do not insert your fingers into the spindle supports - HP Designjet Z5200 | HP Designjet Z5200ps Printer - Introductory Information - Page 4
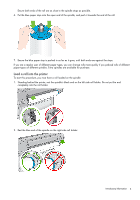
paper stop from the end of the spindle. 3. If your roll has a three-inch cardboard core, ensure that the core adaptors supplied with the printer have been installed. 4. If the roll is long, rest the spindle horizontally on a table and load the roll on - HP Designjet Z5200 | HP Designjet Z5200ps Printer - Introductory Information - Page 5
more quickly if you preload rolls of different paper types on different spindles. Extra spindles are available for purchase. Load a roll into the printer To start this procedure, you must have a roll loaded on the spindle. 1. Standing behind the printer, rest the spindle's black end on the left - HP Designjet Z5200 | HP Designjet Z5200ps Printer - Introductory Information - Page 6
, pull the paper slightly beyond the cutting groove and use a cutter to cut a straight edge. Cut the paper as straight as possible, as uneven paper does not load correctly. 5. Insert the edge of the paper into the feeder. Do not push your fingers inside the printer's paper path. 5 Introductory - HP Designjet Z5200 | HP Designjet Z5200ps Printer - Introductory Information - Page 7
printer detects the paper and feeds it automatically into the printer. 7. Once the paper is fed into the printer, the front-panel display asks whether you are loading the printer is ready to print. If the roll is not aligned, follow the instructions on the front-panel display. 13. If the paper is - HP Designjet Z5200 | HP Designjet Z5200ps Printer - Introductory Information - Page 8
display. Do not push your fingers inside the printer's paper path. 3. After the countdown, the paper feeds into the printer. Guide the sheet into the printer; this is especially important with thicker papers. 4. The front-panel display asks if you are loading a roll or a sheet. Select Sheet with the - HP Designjet Z5200 | HP Designjet Z5200ps Printer - Introductory Information - Page 9
ready to print. If the paper is not straight, follow the instructions on the front-panel display. When correctly loaded, the sheet is in the back of the printer. Color calibration Color calibration enables your printer to produce consistent colors with the particular printheads, inks and paper type - HP Designjet Z5200 | HP Designjet Z5200ps Printer - Introductory Information - Page 10
the correct response, contact HP Support. Message or code Recommendation [Color] cartridge has expired Replace the cartridge. [Color] cartridge is missing Insert a cartridge of the correct color. [Color] cartridge is out of ink Replace the cartridge. [Color] printhead #[n] error: not Insert - HP Designjet Z5200 | HP Designjet Z5200ps Printer - Introductory Information - Page 11
larger paper. Replace the cartridge. Remove and reinsert the same cartridge. Make sure that you have selected the correct firmware update file. Then try again to perform the update. The printer needs internal cleaning. Clean the printhead drop detector. If the problem persists, contact HP Support - HP Designjet Z5200 | HP Designjet Z5200ps Printer - Introductory Information - Page 12
guide hp.com/go/z5200/knowledge_center/). Informations légales © Copyright 2009 Hewlett-Packard Development Company, L.P. Les informations contenues dans ce document sont susceptibles d'être modifiées sans préavis. Les seules garanties couvrant les produits et les services HP jamais été perçu pendant - HP Designjet Z5200 | HP Designjet Z5200ps Printer - Introductory Information - Page 13
que le bac à feuilles est bien fermé. 1. Retirez la bobine de l'imprimante en commençant par l'extrémité droite. N'introduisez pas vos doigts dans les supports de bobine durant la procédure d'extraction. Introduction 2 - HP Designjet Z5200 | HP Designjet Z5200ps Printer - Introductory Information - Page 14
2. La bobine comporte une butée à chaque extrémité permettant de maintenir le rouleau en place. La butée de couleur bleue peut être retirée en vue d'installer un nouveau rouleau. Elle coulisse sur la bobine pour s'adapter aux différentes largeurs de rouleaux. Retirez la butée de couleur bleue de l' - HP Designjet Z5200 | HP Designjet Z5200ps Printer - Introductory Information - Page 15
procédure, vous devez avoir chargé un rouleau sur la bobine. 1. Tenez-vous derrière l'imprimante. Déposez l'extrémité noire de la bobine sur le support de rouleau de gauche. N'insérez pas complètement l'extrémité dans le - HP Designjet Z5200 | HP Designjet Z5200ps Printer - Introductory Information - Page 16
2. Déposez l'extrémité bleue de la bobine sur le côté droit du support de rouleau. 3. Utilisez vos deux mains pour enfoncer la bobine dans les deux supports de rouleau en même temps. La bobine se met alors en place. 4. Si le bord du rouleau n'est pas droit ou s'il est déchiré (cela - HP Designjet Z5200 | HP Designjet Z5200ps Printer - Introductory Information - Page 17
aligné, le panneau frontal affiche le message « Prêt », ce qui indique que l'imprimante est prête à l'emploi. Si le rouleau n'est pas aligné, suivez les instructions affichées sur le panneau frontal. Introduction 6 - HP Designjet Z5200 | HP Designjet Z5200ps Printer - Introductory Information - Page 18
13. Si le papier n'est pas tendu sur le rouleau, rembobinez depuis la fin de la bobine jusqu'à ce qu'il soit tendu. Les impressions qui arrivent dans le bac de réception peuvent être déchirées ou être souillées par l'encre d'autres impressions. Pour éviter que cela ne se produise, prenez les - HP Designjet Z5200 | HP Designjet Z5200ps Printer - Introductory Information - Page 19
avec succès, le panneau frontal affiche le message « Prêt » et l'imprimante est prête à l'emploi. Si le papier n'est pas droit, suivez les instructions affichées sur le panneau frontal. Lorsque la feuille est correctement chargée, elle se trouve à l'arrière de l'imprimante. Calibrage des couleurs Le - HP Designjet Z5200 | HP Designjet Z5200ps Printer - Introductory Information - Page 20
le papier ordinaire, les supports transparents et le papier glacé texturé (tel que le papier Canvas satiné collectionneur HP). Ils peuvent toutefois être est numérisée et mesurée à l'aide du spectrophotomètre intégré HP. 4. À partir des mesures effectuées par le spectrophotomètre, l'imprimante - HP Designjet Z5200 | HP Designjet Z5200ps Printer - Introductory Information - Page 21
:01 Un nettoyage interne de l'imprimante est nécessaire. Nettoyage du détecteur de gouttes de la tête d'impression. Si le problème persiste, contactez le support HP. 61:01 Le format de fichier est incorrect et l'imprimante ne peut pas traiter la tâche. Elle attend des travaux au format PCL3. 62 - HP Designjet Z5200 | HP Designjet Z5200ps Printer - Introductory Information - Page 22
recommencez l'opération via un réseau. N'utilisez pas votre ordinateur pendant l'opération de mise à jour. Si le problème persiste, contactez le support HP. Vous essayez peut-être d'imprimer sans bordures sur un type de papier qui ne prend pas en charge ce type d'impression. Redémarrez l'imprimante - HP Designjet Z5200 | HP Designjet Z5200ps Printer - Introductory Information - Page 23
- HP Designjet Z5200 | HP Designjet Z5200ps Printer - Introductory Information - Page 24
folgenden Themen behandelt: • Einführung in den Drucker • Installieren der Software • Konfigurieren des Druckers • Umgang mit Papier • Drucken • Farbverwaltung weitere Informationen benötigen, besuchen Sie die HP Support-Website (http://www.hp.com/go/knowledge_center/djz6100/). Rechtliche Hinweise © - HP Designjet Z5200 | HP Designjet Z5200ps Printer - Introductory Information - Page 25
Das Bedienfeld Auf dem Bedienfeld befinden sich folgende Elemente: 1. Vier Direktzugriffstasten: Tintenfüllstand anzeigen, Papierinformationen anzeigen, Papier entladen, Papiervorschub und Abschneiden. 2. Taste Menü: Mit dieser Taste gelangen Sie zum Hauptmenü der Bedienfeldanzeige zurück. Wenn Sie - HP Designjet Z5200 | HP Designjet Z5200ps Printer - Introductory Information - Page 26
1. Nehmen Sie zuerst das rechte Ende der Spindel und danach das linke Ende aus dem Drucker heraus. Achten Sie darauf, dass Sie Ihre Finger nicht in den Spindelhalterungen einklemmen. 2. Die Spindel verfügt an jedem Ende über einen Anschlag, damit die Papierrolle nicht verrutschen kann. Der blaue - HP Designjet Z5200 | HP Designjet Z5200ps Printer - Introductory Information - Page 27
Papiersorten verwenden, können Sie die Rollen schneller wechseln, indem Sie jede Sorte auf eine eigene Spindel aufbringen. Die zusätzlichen Spindeln sind von HP erhältlich. Laden einer Rolle in den Drucker Die Rolle muss sich bereits auf der Spindel befinden, damit Sie diese Schritte durchführen - HP Designjet Z5200 | HP Designjet Z5200ps Printer - Introductory Information - Page 28
2. Legen Sie das blaue Ende der Spindel auf die rechte Rollenhalterung. 3. Drücken Sie die Spindel mit beiden Händen gleichzeitig in die Rollenhalterungen. Die Spindel muss dann einrasten. 4. Wenn die Vorderkante der Papierrolle eingerissen (aufgrund des Klebebands, mit dem viele Rollen gesichert - HP Designjet Z5200 | HP Designjet Z5200ps Printer - Introductory Information - Page 29
5. Führen Sie die Papierkante in den Einzug ein. Achten Sie darauf, dass Sie nicht mit den Fingern in den Papierpfad geraten. 6. Schieben Sie das Papier in den Einzug, bis Sie einen Widerstand spüren. Der Drucker erkennt das Papier und zieht es automatisch ein. 7. Sobald der Drucker das Papier - HP Designjet Z5200 | HP Designjet Z5200ps Printer - Introductory Information - Page 30
13. Wenn das Papier nicht straff genug auf der Rolle liegt, wickeln Sie es durch Drehen der Spindel auf. Wenn die Drucke in die Ablage ausgegeben werden, besteht die Gefahr, dass sie einreißen oder durch noch nicht getrocknete Tinte vorhandener Drucke verunreinigt werden. Sie können dies vermeiden, - HP Designjet Z5200 | HP Designjet Z5200ps Printer - Introductory Information - Page 31
3. Wenn die Wartezeit abgelaufen ist, wird das Blatt in den Drucker eingezogen. Führen Sie das Blatt während des Einziehens mit der Hand. Dies ist vor allem bei dickerem Papier wichtig. 4. Sie werden auf dem Bedienfeld gefragt, ob Rollenpapier oder ein Einzelblatt zugeführt wird. Wählen Sie mit der - HP Designjet Z5200 | HP Designjet Z5200ps Printer - Introductory Information - Page 32
Druckmedium wurde noch nicht kalibriert. (Wenn Sie die Firmware des Druckers aktualisieren, wird der Farbkalibrierungsstatus sämtlicher Medientypen auf des Druckertreibers, in dem die Kalibrierung empfohlen wird. • In HP Color Center: Klicken Sie auf Medienprofilmanagement > Druckmedium kalibrieren - HP Designjet Z5200 | HP Designjet Z5200ps Printer - Introductory Information - Page 33
, das Sie die richtige Firmware-Aktualisierungsdatei ausgewählt haben. Führen Sie dann die Aktualisierung erneut durch. Das Innere des Druckers muss gereinigt werden. Reinigen Sie den Tropfendetektor. Wenn das Problem weiterhin auftritt, wenden Sie sich an den HP Support. Das Dateiformat ist falsch - HP Designjet Z5200 | HP Designjet Z5200ps Printer - Introductory Information - Page 34
zu drucken, der dies nicht unterstützt. Starten Sie den Drucker neu. Wenn das Problem weiterhin auftritt, aktualisieren Sie die Firmware des Druckers. Tritt das Problem immer noch auf, wenden Sie sich an den HP Support. Möglicherweise liegt ein Papierstau vor. Falls dies der Fall ist, beseitigen Sie - HP Designjet Z5200 | HP Designjet Z5200ps Printer - Introductory Information - Page 35
- HP Designjet Z5200 | HP Designjet Z5200ps Printer - Introductory Information - Page 36
al supporto (http://www.hp.com/go/z5200/knowledge_center/). Note legali © Copyright 2009 Hewlett-Packard Development Company, L.P. Le informazioni contenute in questo documento sono soggette a modifica senza preavviso. Le sole garanzie per prodotti e servizi HP sono esposte in modo esplicito - HP Designjet Z5200 | HP Designjet Z5200ps Printer - Introductory Information - Page 37
I quattro tasti di accesso diretto: Visualizza livelli inch., Visualizza info carta, Rimuovi carta, Avanzamento e taglio carta. 2. Tasto Menu: premere per tornare al menu principale del display del pannello frontale. Se il menu principale è già attivato, viene visualizzata la schermata dello stato - HP Designjet Z5200 | HP Designjet Z5200ps Printer - Introductory Information - Page 38
nei supporti del mandrino. 2. A ciascuna estremità del mandrino è presente un dispositivo di arresto per mantenere il rotolo di carta in posizione. È possibile rimuovere il dispositivo di arresto blu per applicare un nuovo rotolo, facendolo scivolare lungo il mandrino in modo da installare rotoli di - HP Designjet Z5200 | HP Designjet Z5200ps Printer - Introductory Information - Page 39
provvedendo a pre-caricare rotoli di tipi di carta diversi su mandrini diversi. Mandrini aggiuntivi sono disponibili per l'acquisto. Caricamento di un rotolo di carta nella stampante Per avviare la procedura, è necessario che sul mandrino sia caricato un rotolo di carta. 1. Posizionandosi dietro la - HP Designjet Z5200 | HP Designjet Z5200ps Printer - Introductory Information - Page 40
il mandrino nei due supporti del rotolo contemporaneamente. Il mandrino scatta in posizione. 4. Se il bordo del rotolo è strappato, talvolta a causa del nastro utilizzato per fissare l'estremità del rotolo, o non è diritto, tirare la carta leggermente oltre il taglio e utilizzare una taglierina - HP Designjet Z5200 | HP Designjet Z5200ps Printer - Introductory Information - Page 41
sul pannello frontale. 12. Una volta allineato il rotolo, sul pannello frontale viene visualizzato il messaggio "Pronto" indicante che la stampante è pronta per la stampa. Se il rotolo non è allineato, seguire le istruzioni visualizzate sul display del pannello frontale. Informazioni preliminari 6 - HP Designjet Z5200 | HP Designjet Z5200ps Printer - Introductory Information - Page 42
le stampe vengono lasciate cadere nel cesto, è possibile che si strappino o si macchino di inchiostro a contatto con le altre stampe. Per evitare questo inconveniente, prendere le stampe quando vengono tagliate dal rotolo e non lasciare che vengano impilate nel cesto. È inoltre possibile disattivare - HP Designjet Z5200 | HP Designjet Z5200ps Printer - Introductory Information - Page 43
frontale viene visualizzato il messaggio "Pronto" indicante che la stampante è pronta per la stampa. Se la carta non è diritta, seguire le istruzioni spenta per un periodo di tempo prolungato • Ogni volta che le condizioni ambientali (temperatura e umidità) cambiano considerevolmente Il driver della - HP Designjet Z5200 | HP Designjet Z5200ps Printer - Introductory Information - Page 44
• IN ATTESA: la carta non è stata calibrata. Ogni volta che si aggiorna il firmware della stampante, lo stato di calibrazione del colore di tutti i tipi di carta viene per iniziare la calibrazione del colore: • Tramite l'avviso del driver della stampante che consiglia la calibrazione. • Da HP - HP Designjet Z5200 | HP Designjet Z5200ps Printer - Introductory Information - Page 45
rilevamento gocce della testina di stampa. Se il problema persiste, contattare l'assistenza HP. 61:01 Il formato del file non è corretto e la stampante non il file. Assicurarsi di utilizzare il driver corretto per la stampante. Aggiornare il firmware della stampante. Informazioni preliminari 10 - HP Designjet Z5200 | HP Designjet Z5200ps Printer - Introductory Information - Page 46
di carta che non supporta tale operazione. Riavviare la stampante. Se il problema persiste, aggiornare il firmware della stampante. Se il problema persiste, contattare l'assistenza HP. Potrebbe essersi verificato un inceppamento della carta. In tal caso, cercare di rimuovere l'inceppamento. Se il - HP Designjet Z5200 | HP Designjet Z5200ps Printer - Introductory Information - Page 47
- HP Designjet Z5200 | HP Designjet Z5200ps Printer - Introductory Information - Page 48
información sobre los siguientes temas: • Introducción a la impresora • Instalación del software • Personalización de la impresora • Manejo del papel • Impresión • Gestión el sitio web de asistencia técnica de HP (http://www.hp.com/go/z5200/knowledge_center/). Avisos legales © Copyright 2009 Hewlett- - HP Designjet Z5200 | HP Designjet Z5200ps Printer - Introductory Information - Page 49
Panel frontal El panel frontal incluye los siguientes componentes: 1. Cuatro teclas de acceso directo: Ver niveles de tinta, Ver información de papel, Descargar papel, Avanza y corta hoja. 2. Tecla Menú: pulse esta tecla para volver al menú principal de la pantalla del panel frontal. Si ya se - HP Designjet Z5200 | HP Designjet Z5200ps Printer - Introductory Information - Page 50
1. Retire el extremo derecho del eje de la impresora y después el otro extremo. No introduzca los dedos en los soportes del eje durante el proceso de extracción. 2. El eje tiene un tope en cada extremo para evitar que el rollo se mueva. El tope azul se puede quitar para colocar un nuevo rollo y - HP Designjet Z5200 | HP Designjet Z5200ps Printer - Introductory Information - Page 51
5. Cargue el nuevo rollo en el eje. Compruebe que la orientación del papel coincide con la indicada en la figura. De lo contrario, saque el rollo, gírelo 180 grados y vuelva a cargarlo en el eje. Las etiquetas del eje muestran la orientación correcta. Desde la parte posterior de la impresora, el - HP Designjet Z5200 | HP Designjet Z5200ps Printer - Introductory Information - Page 52
2. Coloque el extremo azul del eje en el soporte del lado derecho. 3. Con ambas manos, empuje el eje dentro de ambos soportes del rollo al mismo tiempo. El eje queda ajustado en su sitio. 4. Si el borde del rollo no está recto o está rasgado (debido a veces a la cinta que se usa para sujetar el - HP Designjet Z5200 | HP Designjet Z5200ps Printer - Introductory Information - Page 53
5. Inserte el borde del papel en el cargador. Tenga cuidado de no poner los dedos en el recorrido del papel en la impresora. 6. Gire el eje en el cargador hasta que note resistencia. La impresora detecta el papel y lo carga automáticamente en la impresora. 7. Una vez que el papel avanza en la - HP Designjet Z5200 | HP Designjet Z5200ps Printer - Introductory Information - Page 54
13. Si el papel no está bien apretado en el rollo, rebobínelo ligeramente desde el extremo del eje hasta que quede tenso. Cuando las hojas impresas caen en la cesta, pueden rasgarse o mancharse con tinta de otras hojas. Para evitarlo, recoja las hojas impresas cuando se corten del rollo y no deje - HP Designjet Z5200 | HP Designjet Z5200ps Printer - Introductory Information - Page 55
3. Después de la cuenta regresiva, el papel entra en la impresora. Guíe la hoja hacia la impresora; esto es especialmente importante con los papeles gruesos. 4. La pantalla del panel frontal le pregunta si está cargando un rollo o una hoja. Seleccione Hoja con las teclas de flecha hacia arriba y - HP Designjet Z5200 | HP Designjet Z5200ps Printer - Introductory Information - Page 56
los siguientes: • PENDIENTE: el papel no se ha calibrado. (Cuando actualice el firmware de la impresora, el estado de calibración del color de todos los papeles se y papel satinado con textura (como el lienzo satinado para coleccionistas HP). No obstante, se puede crear un perfil para ellos. Puede - HP Designjet Z5200 | HP Designjet Z5200ps Printer - Introductory Information - Page 57
Asegúrese de que ha seleccionado el archivo de actualización de firmware correcto. Después, intente realizar de nuevo la actualización. 52:01 Si el problema persiste, póngase en contacto con los servicios de Soporte de HP. 61:01 El formato de archivos es incorrecto y la impresora no puede procesar - HP Designjet Z5200 | HP Designjet Z5200ps Printer - Introductory Information - Page 58
tipo de papel que no lo admite. Reinicie la impresora. Si el problema persiste, actualice el firmware de la impresora. Si el problema persiste, póngase en contacto con el servicio de asistencia técnica de HP. Puede haber atasco de papel. Si es así, intente eliminar el atasco. Si el problema persiste - HP Designjet Z5200 | HP Designjet Z5200ps Printer - Introductory Information - Page 59
- HP Designjet Z5200 | HP Designjet Z5200ps Printer - Introductory Information - Page 60
sobre os seguintes tópicos: • Introdução à impressora • Instalação do software • Personalização da impressora • Manuseio de papel • Impressão • Gerenciamento cliente HP • Especif. impressora Outras informações estão disponíveis no site de suporte da HP (http://www.hp.com/go/z5200/knowledge_center/). - HP Designjet Z5200 | HP Designjet Z5200ps Printer - Introductory Information - Page 61
O painel frontal O painel frontal inclui os seguintes componentes: 1. As quatro teclas de acesso direto: Exibir níveis de tinta, Exibir papel carregado, Descarregar papel, Alimentação e corte de formulário. 2. Tecla Menu: Pressione para retornar ao menu principal do visor do painel frontal. Caso voc - HP Designjet Z5200 | HP Designjet Z5200ps Printer - Introductory Information - Page 62
1. Remova a extremidade direita do eixo da impressora e depois a outra extremidade. Não coloque os dedos nos suportes do eixo durante o processo de remoção. 2. O eixo tem uma parada em cada extremidade para manter o rolo na posição. É possível remover a parada azul para montar um novo rolo; ele - HP Designjet Z5200 | HP Designjet Z5200ps Printer - Introductory Information - Page 63
5. Deslize o novo rolo para o eixo. Verifique se o tipo de papel segue a orientação mostrada. Caso contrário, remova o rolo, gire-o 180 graus e deslize-o de volta para o eixo. Há etiquetas no eixo que mostram a orientação correta. Na parte de trás da impressora, a parada azul é encaixada no lado - HP Designjet Z5200 | HP Designjet Z5200ps Printer - Introductory Information - Page 64
2. Coloque a extremidade azul do eixo no lado direito do suporte do rolo. 3. Com as duas mãos, empurre o eixo para os dois suportes de rolo ao mesmo tempo. O eixo é encaixado. 4. Se a borda do rolo estiver rasgada (às vezes devido à fita usada para prender a extremidade do rolo) ou se não estiver - HP Designjet Z5200 | HP Designjet Z5200ps Printer - Introductory Information - Page 65
5. Insira a borda do papel no alimentador. Não coloque os dedos no caminho do papel da impressora. 6. Role o eixo para o alimentador até sentir resistência. A impressora detecta o papel e o alimenta automaticamente. 7. Após a alimentação do papel na impressora, o visor do painel frontal pergunta se - HP Designjet Z5200 | HP Designjet Z5200ps Printer - Introductory Information - Page 66
13. Se o papel estiver frouxo no rolo, rebobine ligeiramente da extremidade do eixo até ajustá-lo. Quando as impressões caírem na cesta, elas poderão rasgar ou ser manchadas por outras impressões. Para evitar isso, pegue as impressões à medida que forem cortadas do rolo e não as empilhe na cesta. - HP Designjet Z5200 | HP Designjet Z5200ps Printer - Introductory Information - Page 67
desde a última calibração. • Sempre que a impressora tenha permanecido desligada por um longo período de tempo. • Sempre que as condições ambientais (temperatura e umidade) forem alteradas significativamente. Geralmente, o driver da impressora emite um alerta para lembrá-lo sempre que for necessário - HP Designjet Z5200 | HP Designjet Z5200ps Printer - Introductory Information - Page 68
não foi calibrado. (Sempre que você atualizar o firmware da impressora, o status de calibração de cores de • No alerta do driver da impressora que recomenda a calibração. • No HP Color Center: Selecione na impressora. 2. O gráfico deve secar por um período que depende do tipo de papel, para que as - HP Designjet Z5200 | HP Designjet Z5200ps Printer - Introductory Information - Page 69
e ficar na dúvida sobre a resposta correta, entre em contato com o Suporte HP. Mensagem ou código [Cor] cartuchos vencidos [Cor] cartuchos ausentes [Cor] cartuchos novamente. Verifique se está utilizando o driver de impressora correto. Atualize o firmware da impressora. Informações iniciais 10 - HP Designjet Z5200 | HP Designjet Z5200ps Printer - Introductory Information - Page 70
em um tipo de papel sem suporte para isso. Reinicie a impressora. Se o problema persistir, atualize o firmware da impressora. Se o problema ainda persistir, entre em contato com o Suporte HP. Pode ser um congestionamento de papel. Se esse for o caso, tente limpar o congestionamento. Se o problema - HP Designjet Z5200 | HP Designjet Z5200ps Printer - Introductory Information - Page 71
- HP Designjet Z5200 | HP Designjet Z5200ps Printer - Introductory Information - Page 72
EL CD HP Customer Care HP στο Web (http://www.hp.com/go/ z5200/knowledge_center/). Copyright 2009 Hewlett-Packard Development Company, L.P. HP HP HP HP HP 1 - HP Designjet Z5200 | HP Designjet Z5200ps Printer - Introductory Information - Page 73
1 2 3 OK 4 5 IP. 6 IP. 7 8 9 LED LED 10 2 - HP Designjet Z5200 | HP Designjet Z5200ps Printer - Introductory Information - Page 74
1 2 3 4 3 - HP Designjet Z5200 | HP Designjet Z5200ps Printer - Introductory Information - Page 75
5 180 6 7 1 4 - HP Designjet Z5200 | HP Designjet Z5200ps Printer - Introductory Information - Page 76
2 3 4 5 - HP Designjet Z5200 | HP Designjet Z5200ps Printer - Introductory Information - Page 77
5 6 7 Roll OK. 8 9 10 Yes No (Όχι). 11 12 Ready 6 - HP Designjet Z5200 | HP Designjet Z5200ps Printer - Introductory Information - Page 78
13 0,5 mm 1 2 7 - HP Designjet Z5200 | HP Designjet Z5200ps Printer - Introductory Information - Page 79
3 4 Sheet 5 6 Sheet Paper Load 7 Ready 8 - HP Designjet Z5200 | HP Designjet Z5200ps Printer - Introductory Information - Page 80
Image Quality Maintenance Enable color calibration OFF PENDING PENDING OBSOLETE OK N/A HP Collector Satin Canvas HP Color Center Paper Preset Management Calibrate Paper Image Quality Maintenance Calibrate color A4, Letter 8-10 1 2 9 - HP Designjet Z5200 | HP Designjet Z5200ps Printer - Introductory Information - Page 81
[Color] cartridge is out of ink [Color] printhead #[n] error not present [Color] printhead #[n] error please remove [Color] printhead #[n] error replace [Color] printhead #[n] error reseat [Color] printhead #[n] out of warranty [Color] printhead #[n] warranty warning Paper advance - HP Designjet Z5200 | HP Designjet Z5200ps Printer - Introductory Information - Page 82
too small to print paper advance calibration Paper too small to scan paper advance calibration Printhead alignment error paper too small Replace [color] cartridge Reseat [color] cartridge Update failed Invalid file 52:01 61:01 PCL3. 62, 63, 64 - HP Designjet Z5200 | HP Designjet Z5200ps Printer - Introductory Information - Page 83
- HP Designjet Z5200 | HP Designjet Z5200ps Printer - Introductory Information - Page 84
RU HP Web HP (http://www.hp.com/go/z5200/knowledge_center/). Hewlett-Packard Development Company, L.P., 2009 HP HP HP HP HP HP Cleaning Kits 1 - HP Designjet Z5200 | HP Designjet Z5200ps Printer - Introductory Information - Page 85
1 2 3 OK 4 5 IP 6 IP 7 8 9 10 2 - HP Designjet Z5200 | HP Designjet Z5200ps Printer - Introductory Information - Page 86
1 2 3 3 4 3 - HP Designjet Z5200 | HP Designjet Z5200ps Printer - Introductory Information - Page 87
5 180 6 7 1 4 - HP Designjet Z5200 | HP Designjet Z5200ps Printer - Introductory Information - Page 88
2 3 4 5 - HP Designjet Z5200 | HP Designjet Z5200ps Printer - Introductory Information - Page 89
5 6 7 OK. 8 9 10 11 12 6 - HP Designjet Z5200 | HP Designjet Z5200ps Printer - Introductory Information - Page 90
13 0,5 1 2 3 7 - HP Designjet Z5200 | HP Designjet Z5200ps Printer - Introductory Information - Page 91
4 5 6 7 8 - HP Designjet Z5200 | HP Designjet Z5200ps Printer - Introductory Information - Page 92
OK N/A HP HP Color Center A4, Letter 8 - 10 1 2 3 HP. 4 9 - HP Designjet Z5200 | HP Designjet Z5200ps Printer - Introductory Information - Page 93
HP. [Color] cartridge is missing n n n n n n 52:01 HP. 61:01 PCL3. 10 - HP Designjet Z5200 | HP Designjet Z5200ps Printer - Introductory Information - Page 94
62, 63, 64, 65, 67 74.1 78 79 81, 86, 87 94, 94.1 98 USB USB HP. HP. HP. HP. 11 - HP Designjet Z5200 | HP Designjet Z5200ps Printer - Introductory Information - Page 95
- HP Designjet Z5200 | HP Designjet Z5200ps Printer - Introductory Information - Page 96
sorunları giderme • Genel yazıcı sorunlarını giderme • Ön panel hata iletileri • HP Müşteri Hizmetleri • Yazıcı özellikleri Daha fazla bilgiyi HP'nin destek web sitesinden (http://www.hp.com/go/z5200/knowledge_center/) edinebilirsiniz. Yasal bildirimler © Copyright 2009 Hewlett-Packard Development - HP Designjet Z5200 | HP Designjet Z5200ps Printer - Introductory Information - Page 97
Ön panel Ön panelde aşağıdaki bileşenler bulunur: 1. Dört adet doğrudan erişim düğmesi: Mürekkep seviyelerini görüntüleme, Yerleştirilmiş kağıdı görüntüleme, Kağıdı çıkarma, İlerletme ve kesme. 2. Menü düğmesi: Ön panel ekranında ana menüye dönmek için basın. Zaten ana menüdeyseniz, durum ekranını - HP Designjet Z5200 | HP Designjet Z5200ps Printer - Introductory Information - Page 98
1. Yazıcıdan silindirin önce sağ ucunu, sonra da diğer ucunu çıkarın. Çıkarma işlemi sırasında parmaklarınızı silindir desteklerinin içine sokmayın. 2. Ruloyu yerinde tutmak için milin uçlarında birer durdurma yeri vardır. Yeni rulo takmak için mavi durdurucu çıkarılabilir; bu durdurucu farklı geniş - HP Designjet Z5200 | HP Designjet Z5200ps Printer - Introductory Information - Page 99
5. Yeni ruloyu silindire takın. Kağıt türünü aşağıda gösterilen yönde taktığınızdan emin olun. Değilse ruloyu çıkarın, 180 derece döndürün ve silindire yeniden takın. Silindirin üzerinde doğru yönü gösteren etiketler bulunur. Yazıcının arka tarafından, mavi durdurucu silindirin sağ taraftaki ucuna - HP Designjet Z5200 | HP Designjet Z5200ps Printer - Introductory Information - Page 100
2. Silindirin mavi ucunu rulo tutucunun sağ tarafına koyun. 3. Silindiri iki elinizle her iki silindir tutucunun içine aynı anda itin. Silindir yerine oturur. 4. Rulonun kenarı yırtılmışsa (bazen silindirin ucunu yapıştırmak için bant kullanıldığında oluşabilir) veya düzgün değilse, kağıdı kesme olu - HP Designjet Z5200 | HP Designjet Z5200ps Printer - Introductory Information - Page 101
5. Kağıdın ucunu besleyiciye sokun. Parmaklarınızı yazıcının kağıt yolunun içine sokmayın. 6. Dirençle karşılaştığınızı hissedene kadar silindiri besleyiciye doğru döndürün. Yazıcı kağıdı algılar ve kağıt yazıcıya otomatik olarak beslenir. 7. Yazıcıya kağıt beslendikten sonra ön panel ekranında ka - HP Designjet Z5200 | HP Designjet Z5200ps Printer - Introductory Information - Page 102
13. Rulo üzerindeki kağıt gevşekse, silindirin ucundan kağıt sıkışana kadar hafifçe ters yöne döndürün. Baskılar sepete düştüğünde yırtılabilir veya diğer baskılardan mürekkep işaretleri bulaşabilir. Bunu önlemek için, baskılarınızı rulodan kesilir kesilmez alın ve sepette üst üste bırakmayın. - HP Designjet Z5200 | HP Designjet Z5200ps Printer - Introductory Information - Page 103
ında rulo mu yoksa sayfa mı yüklediğiniz sorulur. Yukarı ve Aşağı düğmelerini kullanarak Sheet'i (Sayfa) seçin. 5. Kağıdınızın kategorisini ve türünü seçin. 6. Paper Load (Sayfa Yerleştir) menüsünde Sheet'i seçerseniz yazıcı hizalamayı kontrol eder ve sayfanın boyutunu ölçer. Sayfa, uzunluğuna ba - HP Designjet Z5200 | HP Designjet Z5200ps Printer - Introductory Information - Page 104
kağıdın renk kalibrasyon durumunu istediğiniz zaman ön paneldeki View loaded paper (Yerleştirilmiş kağıdı görüntüle) düğmesine basarak tablo kağıt türüne bağlı olarak bir süre kurumaya bırakılır. 3. Tablo HP Katıştırılmış Spektrofotometre ile taranır ve ölçülür. 4. Spektrofotometre ile yapılan ölçü - HP Designjet Z5200 | HP Designjet Z5200ps Printer - Introductory Information - Page 105
. calibration (Kağıt ilerleme ayarını taramak için kağıt çok küçük) Printhead alignment error: paper too small Kağıdı çıkarın ve daha büyük bir kağıt yerleştirin. (Yazıcı kafası hizalama hatası: kağıt çok küçük) Replace [color] cartridge ([Renk] kartuşunu değiştir) Kartuşu değiştirin. Reseat - HP Designjet Z5200 | HP Designjet Z5200ps Printer - Introductory Information - Page 106
başarısız olması durumunda ağ üzerinden güncelleştirmeyi deneyin. Güncelleştirme devam ederken bilgisayarınızı kullanmaya çalışmayın. Sorun devam ederse HP desteği arayın. Desteklemeyen bir kağıda kenarlıksız yazdırmayı deniyor olabilirsiniz. Yazıcıyı yeniden başlatın. Sorun devam ederse, yaz - HP Designjet Z5200 | HP Designjet Z5200ps Printer - Introductory Information - Page 107
- HP Designjet Z5200 | HP Designjet Z5200ps Printer - Introductory Information - Page 108
é zprávy na předním panelu • Oddělení péče o zákazníky společnosti HP • Specifikace tiskárny Další informace jsou k dispozici na webu podpory společnosti HP (http://www.hp.com/go/z5200/knowledge_center/). Právní informace © Copyright 2009 Hewlett-Packard Development Company, L.P. Informace v tomto - HP Designjet Z5200 | HP Designjet Z5200ps Printer - Introductory Information - Page 109
Přední panel Přední panel má následující části: 1. Čtyři tlačítka přímého přístupu: Zobrazit množství inkoustu, Zobrazit vložený papír, Vysunout papír, Posuv listu a oříznutí. 2. Nabídka: Slouží k návratu do hlavní nabídky na displeji předního panelu. Pokud se již nacházíte v hlavní nabídce, zobrazí - HP Designjet Z5200 | HP Designjet Z5200ps Printer - Introductory Information - Page 110
1. Sejměte pravý konec vřetena z tiskárny, pak sejměte levý konec. Při odebírání vřetena dávejte pozor, abyste nevstrčili prsty do podpěr vřetena. 2. Na obou koncích vřetena je umístěna zarážka, aby se role papíru nepohybovala. Modrá zarážka je pohyblivá a umožňuje vkládat role různé šířky. Je možné - HP Designjet Z5200 | HP Designjet Z5200ps Printer - Introductory Information - Page 111
5. Nasuňte novou roli na vřeteno. Zkontrolujte, zda je papír orientován podle vyobrazení. Pokud tomu tak není, sejměte roli z vřetena, otočte ji o 180 stupňů a znovu ji nasuňte na vřeteno. Na vřetenu jsou štítky, které ukazují správnou orientaci. Při pohledu od zadní strany tiskárny je modrá zarážka - HP Designjet Z5200 | HP Designjet Z5200ps Printer - Introductory Information - Page 112
2. Modrý konec vřetena opřete o pravý držák vřetena. 3. Oběma rukama zasuňte vřeteno do obou držáků současně. Vřeteno zaklapne na své místo. 4. Pokud je okraj nekonečného papíru roztržený (někdy se to stane, protože okraj papíru je přichycen lepicí páskou) nebo není rovný, vytáhněte papír lehce přes - HP Designjet Z5200 | HP Designjet Z5200ps Printer - Introductory Information - Page 113
5. Okraj papíru vložte do podavače. Nestrkejte prsty do dráhy papíru v tiskárně. 6. Otáčejte vřetenem směrem k podavači, dokud neucítíte odpor. Tiskárna detekuje papír a automaticky ho zavede do tiskárny. 7. Jakmile je papír vložen do tiskárny, přední panel zobrazí dotaz, zda se zavádí nekonečný - HP Designjet Z5200 | HP Designjet Z5200ps Printer - Introductory Information - Page 114
13. Pokud je papír na roli uvolněný, zlehka ho za konce vřetena naviňte zpět, aby byl navinutý těsně. Když výtisky padají do koše, mohou se roztrhnout nebo ušpinit od inkoustu z jiných výtisků. Tomu můžete předejít tím, že budete výtisky po jejich odříznutí od role ručně zachytávat a nenecháte je - HP Designjet Z5200 | HP Designjet Z5200ps Printer - Introductory Information - Page 115
papíru. Pomocí tlačítek Up (Nahoru) a Down (Dolů) vyberte možnost Sheet. 5. Vyberte příslušnou kategorii a typ papíru. 6. Zvolíte-li v nabídce Paper Load (Zavedení papíru) možnost Sheet (List), zkontroluje tiskárna zarovnání papíru a změří jeho velikost. V závislosti na délce listu papíru bude list - HP Designjet Z5200 | HP Designjet Z5200ps Printer - Introductory Information - Page 116
: • PENDING (Čeká): Papír nebyl zkalibrován. (Vždy, když aktualizujete firmware tiskárny, je stav kalibrace barev všech papírů vynulován na hodnotu st kalibraci • Z programu HP Color Center: Vyberte možnost Paper Preset Management (Správa předvoleb pro papír) > Calibrate Paper (Kalibrace papíru). • - HP Designjet Z5200 | HP Designjet Z5200ps Printer - Introductory Information - Page 117
ý pro skenování při kalibraci posouvání) Vyjměte papír a zaveďte větší papír. Printhead alignment error: paper too small (Chyba nastavení tiskových hlav: Papír je příliš malý) Vyjměte papír a zaveďte větší papír. Replace [color] cartridge (Vyměňte [barva] kazetu) Vyměňte kazetu. Reseat [color - HP Designjet Z5200 | HP Designjet Z5200ps Printer - Introductory Information - Page 118
pokoušíte tisknout bez okrajů na typ papíru, který to nepodporuje. Restartujte tiskárnu. Pokud problém přetrvává, aktualizujte firmware tiskárny. Pokud problém přetrvává i nadále, volejte podporu HP. Mohlo dojít k uvíznutí papíru. Pokud ano, pokuste se uvíznutý papír odstranit. Pokud problém přetrv - HP Designjet Z5200 | HP Designjet Z5200ps Printer - Introductory Information - Page 119
- HP Designjet Z5200 | HP Designjet Z5200ps Printer - Introductory Information - Page 120
kapcsolatos általános hibák elhárítása • Az előlap hibaüzenetei • HP ügyfélszolgálat • A nyomtató műszaki adatai További információ a HP terméktámogatási webhelyén található (http://www.hp.com/go/z5200/knowledge_center/). Jogi kitételek © Copyright 2009 Hewlett-Packard Development Company, L.P. Az - HP Designjet Z5200 | HP Designjet Z5200ps Printer - Introductory Information - Page 121
Az előlap Az előlap a következő részekből áll: 1. A négy funkciógomb: Tintaszintek ellenőrzése, Betöltött papír megtekintése, Papír eltávolítása, Papírbetöltés és vágás. 2. Menü gomb: Nyomja meg, ha az előlap kijelzőjének főmenüjéhez szeretne visszatérni. Ha már előzőleg is a főmenüben volt, az á - HP Designjet Z5200 | HP Designjet Z5200ps Printer - Introductory Information - Page 122
1. Vegye ki az orsó jobb oldali végét a nyomtatóból, majd a másik végét is. A kiemelés során ne tegye be ujjait az orsó alátámasztásába. 2. Az orsó mindkét végén papírvezető tárcsa található a tekercspapír megfelelő helyzetének biztosításához. A kék papírvezető levehető az új tekercsek felhelyezésé - HP Designjet Z5200 | HP Designjet Z5200ps Printer - Introductory Information - Page 123
5. Csúsztassa az új tekercset az orsóra. Győződjön meg arról, hogy a papíradagolás iránya megegyezik az alábbi ábrán láthatóval. Ellenkező esetben vegye le a tekercset, forgassa el 180 fokkal, és csúsztassa vissza az orsóra. Az orsón található jelzések alapján ellenőrizze a behelyezés helyes irány - HP Designjet Z5200 | HP Designjet Z5200ps Printer - Introductory Information - Page 124
2. Helyezze az orsó kék végét a jobb oldali tekercstartóra. 3. Mindkét kezével egyszerre nyomja be az orsót a tekercstartókba. Az orsó a helyére kattan. 4. Ha a papírtekercs éle szakadt (ezt néha a tekercs végét rögzítő szalag okozza) vagy nem egyenes, húzza a papírt kissé túl a vágó sínén, és a - HP Designjet Z5200 | HP Designjet Z5200ps Printer - Introductory Information - Page 125
5. Helyezze a papír élét az adagolóba. Az ujjait ne dugja a nyomtató papírútjába. 6. Forgassa az orsót az adagolóba ütközésig. A nyomtató érzékeli a papírt, és automatikusan behúzza a nyomtatóba. 7. Miután a papírt betöltötte a nyomtatóba, az előlap kijelzőjén meg kell adnia, hogy tekercset vagy - HP Designjet Z5200 | HP Designjet Z5200ps Printer - Introductory Information - Page 126
13. Ha a papír lazán van a tekercsen, óvatosan tekerje vissza az orsót a végeinél fogva, amíg feszes nem lesz. Amikor a nyomatok a kosárba hullnak, előfordulhat, hogy elszakadnak vagy tintafoltokat hagynak a többi nyomaton. Ennek elkerüléséhez a tekercsről levágott nyomatokat fogja meg kézzel, és ne - HP Designjet Z5200 | HP Designjet Z5200ps Printer - Introductory Information - Page 127
ött-e be. Válassza a Sheet (Papírlap) lehetőséget a Fel és a Le gomb segítségével. 5. Válassza ki a papír kategóriáját és típusát. 6. Ha a Paper Load (Papírbetöltés) menüben a Sheet (Papírlap) lehetőséget választotta, a nyomtató ellenőrzi a papír igazítását és a papírlap méretét. A papírlap a hossz - HP Designjet Z5200 | HP Designjet Z5200ps Printer - Introductory Information - Page 128
ó illesztőprogramja által megjelenített, a kalibrálás szükségességét jelző figyelmeztetés ablakából. • A HP Color Center programból: Válassza a Paper Preset Management (Előre beállított papírtípusok kezelése) > Calibrate Paper (Papír kalibrálása) lehetőséget. • Az előlapról: Válassza az Image Quality - HP Designjet Z5200 | HP Designjet Z5200ps Printer - Introductory Information - Page 129
(A papír túl kicsi a papírtovábbítás kalibrálásának beolvasásához) Printhead alignment error: paper too small (Nyomtatófejigazítási hiba: túl kicsi a papír) Replace [szín] cartridge (Cserélje ki a [szín] tintapatront) Cserélje ki a tintapatront. Helyezze be a megfelelő színű tintapatront - HP Designjet Z5200 | HP Designjet Z5200ps Printer - Introductory Information - Page 130
Üzenet vagy kód Javaslat Reseat [szín] cartridge (Helyezze be újra a [szín] tintapatront) Update: failed a nyomtató eszközvezérlő-programját. Amennyiben a hiba még ezután is előfordul, lépjen kapcsolatba a HP ügyfélszolgálatával. Esetleg papírelakadás történt. Ha valóban, akkor próbálja elhárítani - HP Designjet Z5200 | HP Designjet Z5200ps Printer - Introductory Information - Page 131
- HP Designjet Z5200 | HP Designjet Z5200ps Printer - Introductory Information - Page 132
• Rozwiązywanie ogólnych problemów z drukarką • Komunikaty o błędach wyświetlane na panelu przednim • Centrum Obsługi Klientów HP • Specyfikacje drukarki Dalsze informacje są dostępne w witrynie pomocy technicznej firmy HP (http://www.hp.com/go/z5200/knowledge_center/). Informacje prawne © Copyright - HP Designjet Z5200 | HP Designjet Z5200ps Printer - Introductory Information - Page 133
Panel przedni Panel przedni składa się z następujących elementów: 1. Cztery przyciski bezpośredniego dostępu: Widok poziomów atramentu, Widok załadowanego papieru, Wyładuj papier, Wysunięcie strony i obcięcie. 2. Przycisk Menu: Naciśnij, aby wrócić do głównego menu na wyświetlaczu panelu przedniego. - HP Designjet Z5200 | HP Designjet Z5200ps Printer - Introductory Information - Page 134
1. Zdejmij prawy koniec trzpienia z drukarki, a następnie drugi koniec. Wyjmując trzpień, nie wkładaj palców w jego podporę. 2. Oba końce trzpienia są wyposażone w ograniczniki, które utrzymują rolę papieru we właściwej pozycji. Ogranicznik oznaczony niebieskim kolorem można zdejmować, co umożliwia - HP Designjet Z5200 | HP Designjet Z5200ps Printer - Introductory Information - Page 135
5. Wsuń nową rolę na trzpień obrotowy. Upewnij się, że orientacja papieru jest taka, jak pokazano poniżej. W przeciwnym razie zdejmij rolę, obróć ją o 180 stopni i wsuń z powrotem na trzpień obrotowy. Trzpień obrotowy ma oznaczenia pokazujące poprawne położenie. Patrząc od tyłu drukarki, niebieski - HP Designjet Z5200 | HP Designjet Z5200ps Printer - Introductory Information - Page 136
2. Oprzyj niebieski koniec trzpienia obrotowego na prawym uchwycie roli. 3. Posługując się obiema rękami, wepchnij trzpień obrotowy w oba uchwyty roli jednocześnie. Trzpień obrotowy wskoczy na miejsce. 4. Jeśli brzeg roli jest rozdarty (czasami powodem jest taśma do mocowania końca roli) lub nie - HP Designjet Z5200 | HP Designjet Z5200ps Printer - Introductory Information - Page 137
5. Włóż krawędź papieru do podajnika. Uważaj, aby nie włożyć palców do szczeliny podawania papieru. 6. Odwijaj rolę na trzpieniu do podajnika, aż wyczujesz opór. Po wykryciu papieru drukarka pobiera go automatycznie. 7. Kiedy papier zostanie pobrany do drukarki, na wyświetlaczu panelu przedniego - HP Designjet Z5200 | HP Designjet Z5200ps Printer - Introductory Information - Page 138
13. Jeśli papier jest luźny, nawiń nadmiar papieru, aby był ciasno zrolowany na trzpieniu. Podczas wpadania do kosza wydruki mogą rwać się lub brudzić atramentem od innych wydruków. Aby tego uniknąć, zaleca się przechwytywanie wydruków zaraz po odcięciu od roli i nieukładanie wydruków w stos w koszu - HP Designjet Z5200 | HP Designjet Z5200ps Printer - Introductory Information - Page 139
3. Po odliczeniu papier zostanie pobrany do drukarki. Wprowadź arkusz do drukarki; jest to szczególne ważne w przypadku grubszych rodzajów papieru. 4. Na panelu przednim wyświetlone zostanie pytanie, czy załadowane zostały rola czy arkusz. Wybierz arkusz za pomocą przycisków W górę i W dół. 5. - HP Designjet Z5200 | HP Designjet Z5200ps Printer - Introductory Information - Page 140
na następujące sposoby: • Za pomocą alarmu sterownika drukarki zalecającego kalibrację. • W pakiecie HP Color Center: wybierz kolejno opcje Paper Preset Management > Calibrate Paper (Zarządzanie wstępnymi ustawieniami papieru > Kalibruj papier). • Na panelu przednim: wybierz ikonę menu Konserwacja - HP Designjet Z5200 | HP Designjet Z5200ps Printer - Introductory Information - Page 141
pomocą techniczną firmy HP. Komunikat lub kod Zalecenie [Color] cartridge has expired (Wkład koloru [kolor] jest przeterminowany) [Color] cartridge is missing (Brak wkładu koloru [kolor]) [Color] cartridge is out of ink (Brak atramentu we wkładzie koloru [kolor]) [Color] printhead #[n] error: not - HP Designjet Z5200 | HP Designjet Z5200ps Printer - Introductory Information - Page 142
Printhead alignment error: paper too small (Błąd pozycjonowania głowic: za mały papier) Wyjmij papier i załaduj większy papier. Replace [color] cartridge komputera, gdy trwa aktualizowanie. Jeśli problem nadal występuje, skontaktuj się z pomocą techniczną firmy HP. 78 Być może próbujesz drukowa - HP Designjet Z5200 | HP Designjet Z5200ps Printer - Introductory Information - Page 143
- HP Designjet Z5200 | HP Designjet Z5200ps Printer - Introductory Information - Page 144
za uporabnike • Tehnični podatki tiskalnika Več informacij je na voljo na HP-jevem spletnem mestu za podporo (http://www.hp.com/go/z5200/knowledge_center/). Pravna obvestila © Copyright 2009 Hewlett-Packard Development Company, L.P. Te informacije se lahko spremenijo brez predhodnega obvestila - HP Designjet Z5200 | HP Designjet Z5200ps Printer - Introductory Information - Page 145
Nadzorna plošča Na nadzorni plošči so te komponente: 1. Štiri tipke za neposreden dostop: Ogled ravni črnila, Ogled naloženega papirja, Odstranjevanje papirja, Pomik strani in rezanje. 2. Tipka Meni: Z njo se vrnete v glavni meni na zaslonu nadzorne plošče. Če ste že v glavnem meniju, s to tipko - HP Designjet Z5200 | HP Designjet Z5200ps Printer - Introductory Information - Page 146
1. S tiskalnika snemite desno stran vretena, nato pa levo. Med odstranjevanjem ne vtikajte prstov v nosilca vretena. 2. Vreteno ima na obeh koncih držali, ki zvitek držita v pravilnem položaju. Modro držalo lahko odstranite, da namestite nov zvitek; držalo drsi po vretenu, da drži zvitke različne š - HP Designjet Z5200 | HP Designjet Z5200ps Printer - Introductory Information - Page 147
5. Nataknite nov zvitek na vreteno. Papir mora biti usmerjen tako, kot je prikazano na sliki. Če ni, odstranite zvitek, ga obrnite za 180 stopinj in ponovno nataknite na vreteno. Na vretenu so oznake, ki označujejo pravilno usmerjenost. Z zadnje strani tiskalnika namestite modri nastavek v držalo na - HP Designjet Z5200 | HP Designjet Z5200ps Printer - Introductory Information - Page 148
2. Modri konec vretena položite na desno držalo zvitka. 3. Z obema rokama hkrati potisnite vreteno v obe držali zvitka. Vreteno se zaskoči. 4. Če je rob zvitka strgan (včasih zaradi traku, ki drži konec zvitka), povlecite papir malo dlje od strganega dela in ga z rezalnikom odrežite. Papir odrežite - HP Designjet Z5200 | HP Designjet Z5200ps Printer - Introductory Information - Page 149
5. Rob papirja potisnite v podajalnik. Ne potiskajte prstov v pot papirja tiskalnika. 6. Vreteno zavrtite v podajalnik, dokler ne začutite upora. Tiskalnik zazna papir in ga samodejno poda v tiskalnik. 7. Ko je papir v tiskalniku, se na zaslonu nadzorne plošče izpiše vprašanje, ali nalagate zvitek - HP Designjet Z5200 | HP Designjet Z5200ps Printer - Introductory Information - Page 150
13. Če je papir na zvitku preveč odvit, konec vretena nekoliko obrnite nazaj, da bo papir zategnjen. Ko izpisi padejo v koš, se lahko strgajo ali umažejo s črnilom drugih izpisov. Če se hočete temu izogniti, primite izpise, ko jih tiskalnik odreže z zvitka, in jih ne nalagajte v koš. Poleg tega - HP Designjet Z5200 | HP Designjet Z5200ps Printer - Introductory Information - Page 151
šanje, ali nalagate zvitek ali list papirja. S tipkama Gor in Dol izberite Sheet (List). 5. Izberite kategorijo in vrsto papirja. 6. Če ste v meniju Paper Load (Nalaganje papirja) izbrali možnost Sheet (List), tiskalnik preveri poravnavo in izmeri list. Odvisno od dolžine lista lahko pride izpis iz - HP Designjet Z5200 | HP Designjet Z5200ps Printer - Introductory Information - Page 152
na več načinov: • iz opozorila gonilnika tiskalnika, ki priporoča kalibracijo; • iz orodja HP Color Center: izberite Paper Preset Management (Upravljanje prednastavitev papirja) > Calibrate Paper (Kalibracija papirja). • z nadzorne plošče: izberite ikono menija Image Quality Maintenance (Vzdrževanje - HP Designjet Z5200 | HP Designjet Z5200ps Printer - Introductory Information - Page 153
[Color] cartridge is out of ink ([Barvni] kartuši je zmanjkalo črnila) [Color] printhead #[n] error: not present (Napaka [barvne] tiskalne glave #[n]: ni prisotna) [Color] printhead #[n] error: please remove (Napaka [barvne] tiskalne glave#[n]: odstrani) [Color] printhead #[n] error: replace (Napaka - HP Designjet Z5200 | HP Designjet Z5200ps Printer - Introductory Information - Page 154
Sporočilo ali koda Replace [color] cartridge (Zamenjaj [barvno] kartušo) Reseat [color] cartridge (Ponovno vstavi [barvno] kartušo) Update: , medtem ko poteka posodobitev. Če se težava še vedno ponavlja, se obrnite na HP-jevo podporo. Morda poskušate tiskati brez robov na papir, ki te možnosti ne - HP Designjet Z5200 | HP Designjet Z5200ps Printer - Introductory Information - Page 155
- HP Designjet Z5200 | HP Designjet Z5200ps Printer - Introductory Information - Page 156
ícii na webovej stránke podpory spoločnosti HP (http://www.hp.com/go/z5200/knowledge_center/). Právne upozornenia © Copyright 2009 Hewlett do styku s kovmi alebo kvapalinami (okrem tých, ktoré sú súčasťou čistiacej súpravy HP). V opačnom prípade môže dôjsť k požiaru, úrazu elektrickým prúdom alebo - HP Designjet Z5200 | HP Designjet Z5200ps Printer - Introductory Information - Page 157
Predný panel Predný panel obsahuje nasledujúce súčasti: 1. Štyri tlačidlá priameho prístupu: Zobraziť úrovne atramentu, Zobraziť vložený papier, Vytiahnuť papier, Posunúť a odrezať. 2. Tlačidlo Ponuka: stlačením sa vrátite do hlavnej ponuky displeja predného panela. Ak už ste v hlavnej ponuke, - HP Designjet Z5200 | HP Designjet Z5200ps Printer - Introductory Information - Page 158
1. Vytiahnite z tlačiarne pravý koniec cievky a potom druhý koniec. Počas vyberania nevkladajte prsty do stojana cievky. 2. Cievka má na každom konci zarážku, ktorá udržuje kotúč papiera na mieste. Pri vkladaní kotúča je možné vytiahnuť modrú zarážku. Posúvaním po cievke ju možno vhodne nastaviť pre - HP Designjet Z5200 | HP Designjet Z5200ps Printer - Introductory Information - Page 159
5. Založte nový kotúč papiera na cievku. Skontrolujte, či je papier otočený správne. Ak nie je, vyberte kotúč, otočte ho o 180 stupňov a založte ho späť na cievku. Na cievke sú štítky zobrazujúce správnu orientáciu. Pri pohľade na tlačiareň zozadu je modrá zarážka vložená na pravej strane cievky. - HP Designjet Z5200 | HP Designjet Z5200ps Printer - Introductory Information - Page 160
2. Položte modrý koniec cievky na pravú stranu držiaka kotúča. 3. Oboma rukami zatlačte cievku do obidvoch držiakov súčasne. Cievka dosadne na svoje miesto. 4. Ak je okraj kotúča roztrhnutý (niekedy to môže spôsobiť páska držiaca koniec kotúča) alebo nie je zarovnaný, opatrne potiahnite papier za dr - HP Designjet Z5200 | HP Designjet Z5200ps Printer - Introductory Information - Page 161
5. Vložte okraj papiera do podávača. Nevkladajte prsty do dráhy papiera vo vnútri tlačiarne. 6. Otáčajte cievkou smerom do podávača, kým neucítite odpor. Tlačiareň zistí prítomnosť papiera a automaticky ho podá do tlačiarne. 7. Keď je papier podaný do tlačiarne, displej na prednom paneli zobrazí - HP Designjet Z5200 | HP Designjet Z5200ps Printer - Introductory Information - Page 162
13. Ak je papier na kotúči uvoľnený, trocha potočte koncom cievky, kým sa nenapne. Keď výtlačky spadnú do koša, môžu sa roztrhnúť alebo poznačiť stopami atramentu z iných výtlačkov. Ak tomu chcete zabrániť, berte výtlačky, hneď ako sú odrezané, a nestohujte ich v koši. Môžete tiež vypnúť automatickú - HP Designjet Z5200 | HP Designjet Z5200ps Printer - Introductory Information - Page 163
kotúč alebo hárok. Pomocou tlačidiel Nahor a Nadol vyberte možnosť Sheet (Hárok). 5. Vyberte kategóriu a typ papiera. 6. Ak ste v ponuke Paper Load (Vloženie papiera) vybrali možnosť Sheet (Hárok), tlačiareň skontroluje zarovnanie a odmeria hárok. V závislosti od dĺžky hárka môže hárok vyjsť prednou - HP Designjet Z5200 | HP Designjet Z5200ps Printer - Introductory Information - Page 164
spôsobmi: • Z upozornenia ovládača tlačiarne, ktoré odporúča kalibráciu. • Pomocou aplikácie HP Color Center: Vyberte položky Paper Preset Management (Správa predvolieb papiera) > Calibrate Paper (Kalibrovať papier). • Pomocou predného panela: Vyberte ikonu ponuky Image Quality Maintenance (Údržba - HP Designjet Z5200 | HP Designjet Z5200ps Printer - Introductory Information - Page 165
í príliš malý) Vytiahnite papier a vložte dlhší papier. Printhead alignment error: paper too small (Chyba zarovnania tlačovej hlavy: papier je príliš malý) Vytiahnite papier a vložte dlhší papier. Replace [color] cartridge (Vymeňte kazetu s atramentom [farba]) Vymeňte kazetu. Reseat [color - HP Designjet Z5200 | HP Designjet Z5200ps Printer - Introductory Information - Page 166
procesu aktualizácie. Ak problém pretrváva, obráťte sa na podporu spoločnosti HP. Možno sa pokúšate tlačiť bez okrajov na typ papiera, ktorý to nepodporuje tlačiarne. Ak problém stále trvá, obráťte sa na podporu spoločnosti HP. Možno sa zasekol papier. V takom prípade sa pokúste odstrániť zaseknutie - HP Designjet Z5200 | HP Designjet Z5200ps Printer - Introductory Information - Page 167
- HP Designjet Z5200 | HP Designjet Z5200ps Printer - Introductory Information - Page 168
trikčių šalinimas • Pranešimai apie klaidas priekiniame skydelyje • HP klientų aptarnavimo tarnyba • Spausdintuvo techniniai duomenys Daugiau informacijos rasite HP svetainėje (http://www.hp.com/go/z5200/knowledge_center/). Teisinės pastabos © Copyright 2009 Hewlett-Packard Development Company - HP Designjet Z5200 | HP Designjet Z5200ps Printer - Introductory Information - Page 169
Priekinis skydelis Priekinį skydelį sudaro tokie komponentai: 1. Keturi tiesioginės prieigos klavišai: Pažiūrėti, kiek liko rašalo, Pažiūrėti, koks popierius įdėtas, Išimti popierių, Tiekti ir nupjauti popierių. 2. Klavišas Meniu: norėdami grįžti į pagrindinį priekinio skydelio meniu, paspauskite. - HP Designjet Z5200 | HP Designjet Z5200ps Printer - Introductory Information - Page 170
1. Nuo spausdintuvo nuimkite dešinįjį, tada kairįjį veleno galą. Nuimdami neįkiškite pirštų į veleno atramas. 2. Kiekviename veleno gale yra stabdikliai, kurie laiko ritinį vietoje. Prieš įdedant naują ritinį mėlyną stabdiklį galima nuimti; jis slankioja po veleną ir prilaiko įvairaus pločio - HP Designjet Z5200 | HP Designjet Z5200ps Printer - Introductory Information - Page 171
5. Uždėkite naują ritinį ant veleno. Žiūrėkite, kad atitinkamos rūšies popierius būtų nukreiptas taip, kaip parodyta paveikslėlyje. Jei taip nėra, nuimkite ritinį, pasukite jį 180 laipsnių kampu ir vėl uždėkite ant veleno. Tinkamą kryptį nurodo ant veleno esantys lipdukai. Žiūrint nuo spausdintuvo - HP Designjet Z5200 | HP Designjet Z5200ps Printer - Introductory Information - Page 172
2. Padėkite mėlynąjį veleno galą ant dešiniojo ritinio laikiklio. 3. Abiem rankomis vienu metu įstumkite veleną į abu ritinio laikiklius. Velenas įsistato į vietą. 4. Jei popieriaus ritinio kraštas yra suplėšytas (kartais taip atsitinka dėl juostos, kuri laiko ritinio kraštą) arba nelygus, atsargiai - HP Designjet Z5200 | HP Designjet Z5200ps Printer - Introductory Information - Page 173
5. Įkiškite popieriaus kraštą į tiektuvą. Nekiškite pirštų į popieriaus tiekimo kelią. 6. Sukite veleną į tiektuvą, kol pajusite pasipriešinimą. Spausdintuvas aptinka popierių ir automatiškai pradeda jį tiekti į spausdintuvą. 7. Kai įdėsite popierių į spausdintuvą, priekiniame skydelyje bus - HP Designjet Z5200 | HP Designjet Z5200ps Printer - Introductory Information - Page 174
kite pagal dėjimo liniją ir įstumkite iki galo; jei lapas storesnis, stumkite tol, kol pajusite pasipriešinimą. Spausdintuvas lapą aptinka per tris sekundes. Priekinio skydelio lange pradedamas atgalinis laiko skaičiavimas. Nekiškite pirštų į popieriaus tiekimo kelią. 3. Pasibaigus atgaliniam laiko - HP Designjet Z5200 | HP Designjet Z5200ps Printer - Introductory Information - Page 175
- ritinį ar lapą. Klavišais Aukštyn ir Žemyn pasirinkite Sheet (lapas). 5. Išrinkite popieriaus kategoriją ir rūšį. 6. Jei meniu Paper Load (popieriaus įdėjimas) pasirinkote Sheet (lapas), spausdintuvas patikrins lygiavimą ir išmatuos lapą. Lapas tiekiamas pro spausdintuvo priekį pagal ilgį. 7. Jei - HP Designjet Z5200 | HP Designjet Z5200ps Printer - Introductory Information - Page 176
ėti tokiais būdais: • Nuo rekomenduojamo spausdintuvo tvarkyklės įspėjimo kalibruoti. • „HP Color Center" (HP spalvų centras): pasirinkite Paper Preset Management (popieriaus profilio valdymas) > Calibrate Paper (kalibruoti popierių). • Priekiniame skydelyje: meniu „Image Quality Maintenance" (vaizdo - HP Designjet Z5200 | HP Designjet Z5200ps Printer - Introductory Information - Page 177
galvutės lygiavimo Išimkite popierių ir įdėkite didesnio formato popieriaus. klaida: per mažas popierius Pakeiskite [spalva] kasetę Pakeiskite kasetę. Iš naujo įdė purškimo detektorių. Jei problema išliks, susisiekite su HP technine pagalba. 61:01 Netinkamas failo formatas, todėl spausdintuvas - HP Designjet Z5200 | HP Designjet Z5200ps Printer - Introductory Information - Page 178
Bandykite iš naujo naujinti mikroprogramą. Jei įmanoma, pasistenkite atnaujinti iš tinklo, jei nepavyko atnaujinti per USB. Vykstant naujinimui nesinaudokite kompiuteriu. Jei problema išliks, susisiekite su HP technine pagalba. Jūs galite bandyti spausdinti be apvadų ant popieriaus rūšies, kurios ji - HP Designjet Z5200 | HP Designjet Z5200ps Printer - Introductory Information - Page 179
- HP Designjet Z5200 | HP Designjet Z5200ps Printer - Introductory Information - Page 180
for HP products and services are set forth in the express warranty statements accompanying such products and services. Nothing herein should be construed as constituting an additional warranty. HP shall Graells 1-21 · 08174 Sant Cugat del Vallès Barcelona · Spain All rights reserved Printed in XXX
-
 1
1 -
 2
2 -
 3
3 -
 4
4 -
 5
5 -
 6
6 -
 7
7 -
8
-
9
-
10
-
11
-
12
-
13
-
14
-
15
-
16
-
17
-
18
-
19
-
20
-
21
-
22
-
23
-
24
-
25
-
26
-
27
-
28
-
29
-
30
-
31
-
32
-
33
-
34
-
35
-
36
-
37
-
38
-
39
-
40
-
41
-
42
-
43
-
44
-
45
-
46
-
47
-
48
-
49
-
50
-
51
-
52
-
53
-
54
-
55
-
56
-
57
-
58
-
59
-
60
-
61
-
62
-
63
-
64
-
65
-
66
-
67
-
68
-
69
-
70
-
71
-
72
-
73
-
74
-
75
-
76
-
77
-
78
-
79
-
80
-
81
-
82
-
83
-
84
-
85
-
86
-
87
-
88
-
89
-
90
-
91
-
92
-
93
-
94
-
95
-
96
-
97
-
98
-
99
-
100
-
101
-
102
-
103
-
104
-
105
-
106
-
107
-
108
-
109
-
110
-
111
-
112
-
113
-
114
-
115
-
116
-
117
-
118
-
119
-
120
-
121
-
122
-
123
-
124
-
125
-
126
-
127
-
128
-
129
-
130
-
131
-
132
-
133
-
134
-
135
-
136
-
137
-
138
-
139
-
140
-
141
-
142
-
143
-
144
-
145
-
146
-
147
-
148
-
149
-
150
-
151
-
152
-
153
-
154
-
155
-
156
-
157
-
158
-
159
-
160
-
161
-
162
-
163
-
164
-
165
-
166
-
167
-
168
-
169
-
170
-
171
-
172
-
173
-
174
-
175
-
176
-
177
-
178
-
179
-
180
 |
 |
HP Designjet Z5200
Printer series
Introductory Information
Imprimantes HP Designjet
série Z5200
Introduction
HP Designjet Z5200
Einführende Informationen
Stampanti HP Designjet
serie Z5200
Informazioni preliminari
Impresora HP Designjet series
Z5200
Información preliminar
Impressora HP Designjet
série Z5200
Informações iniciais
HP Designjet Z5200
Σειρά
εκτυπωτών
Εισαγωγικές
πληροφορίες
Принтеры
HP Designjet Z5200
C
ерия
принтеров
Введение
HP Designjet Z5200
Yaz
ı
c
ı
serisi
Tan
ı
t
ı
c
ı
Bilgiler
Tiskárny HP Designjet
Z5200
Úvodní informace
HP Designjet Z5200
nyomtatósorozat
Bevezet
ő
tudnivalók
HP Designjet Z5200
Seria drukarek
Informacje wst
ę
pne
Tiskalnik HP Designjet
Z5200 series
Uvodne informacije
Tla
č
iare
ň
série
HP Designjet Z5200
Úvodné informácie
„HP Designjet“ Z5200
Spausdintuv
ų
serija
Pradin
ė
informacija
EN
FR
DE
IT
ES
PT
EL
RU
TR
CS
HU
PL
SL
SK
LT
HP cares about the environment
USB 2.0 high-speed certified.