HP Deskjet 2050A Setup Poster
HP Deskjet 2050A Manual
 |
View all HP Deskjet 2050A manuals
Add to My Manuals
Save this manual to your list of manuals |
HP Deskjet 2050A manual content summary:
- HP Deskjet 2050A | Setup Poster - Page 1
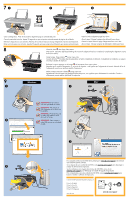
-click the Read Me folder located at the top-level of the software CD. Register your HP Deskjet Get quicker service and support alerts by registering at http://www.register.hp.com. Black Cartridge Tri-color Cartridge 704 704 www.hp.com/support You might need to purchase a USB cable separately - HP Deskjet 2050A | Setup Poster - Page 2
: www.hp.eu/certificates. Install electronic Help To install the electronic Help, insert the software CD in your computer and follow the on-screen instructions. Windows: Find electronic Help After software installation, click Start > All Programs > HP > HP Deskjet Ink Adv 2060 K110 series > Help
-
 1
1 -
 2
2
 |
 |
1
CH350-90048
*CH350-90048*
*CH350-90048*
DESKJET
2050 ALL-IN-ONE J510 SERIES
DESKJET
1050 ALL-IN-ONE J410 SERIES
2
3
4
5
6
7
*CB730-90016*
*CB730-90016*
XXXXX-XXXXX
© 2010 Hewlett-Packard Development Company, L.P.
DESKJET INK ADVANTAGE 2060
ALL-IN-ONE K110 SERIES
704
704
Windows:
Mac:
www.hp.com/support
Information
For setup information, see the setup poster. All other product information can be found in the electronic Help and Readme.
The electronic Help is automatically installed during printer software installation. Electronic Help includes instructions on
product features and troubleshooting. It also provides product specifications, legal notices, environmental, regulatory, and
support information. The Readme file contains HP support contact information, operating system requirements, and the most
recent updates to your product information. For computers without a CD/DVD drive, please go to
www.hp.com/support
to
download and install the printer software.
Install electronic Help
After software installation, click
Start
>
All Programs
>
HP
>
HP Deskjet Ink Adv 2060 K110 series
>
Help
.
Find Readme
Insert software CD. On software CD locate
ReadMe.chm. Click ReadMe.chm to open and then
select ReadMe in your language.
Find Readme
Insert the software CD, and then double-click the Read
Me folder located at the top-level of the software CD.
Find electronic Help
To install the electronic Help, insert the software CD in your computer and follow the on-screen instructions.
Find electronic Help
Mac OS X v10.5 and v10.6: From
Finder Help
, choose
Mac Help
. In the
Help Viewer
, click and hold the
Home
button, and then choose the Help for your device.
Register your HP Deskjet
Get quicker service and support alerts by registering at http://www.register.hp.com.
Black Cartridge
Tri-color Cartridge
To find the European Union Regulatory Notice statement and compliance information, go to
the onscreen Help, click
Appendix
>
Technical information
>
Regulatory notices
>
European
Union Regulatory Notice
or click
Technical information
>
Regulatory notices
>
European Union
Regulatory Notice
. The Declaration of Conformity for this product is available at the following
web address:
www.hp.eu/certificates
.
English
Printed in [Country]
Printed in [Country]
Printed in [Country]
1
3
2
1
3
1
2
1
2
3
!
3
2
Comece aqui
É preciso adquirir um cabo USB separadamente.
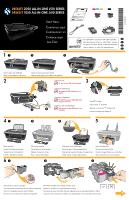
Remova a fita adesiva e os pedaços de papelão.
Conecte o cabo de alimentação.
Não conecte o cabo USB até isso ser
solicitado
.
Pressione o botão Liga/Desliga
.
Abra a porta de acesso aos cartuchos.
Levante a bandeja de entrada.
Puxe o extensor da bandeja.
Deslize a guia. Coloque papel branco.
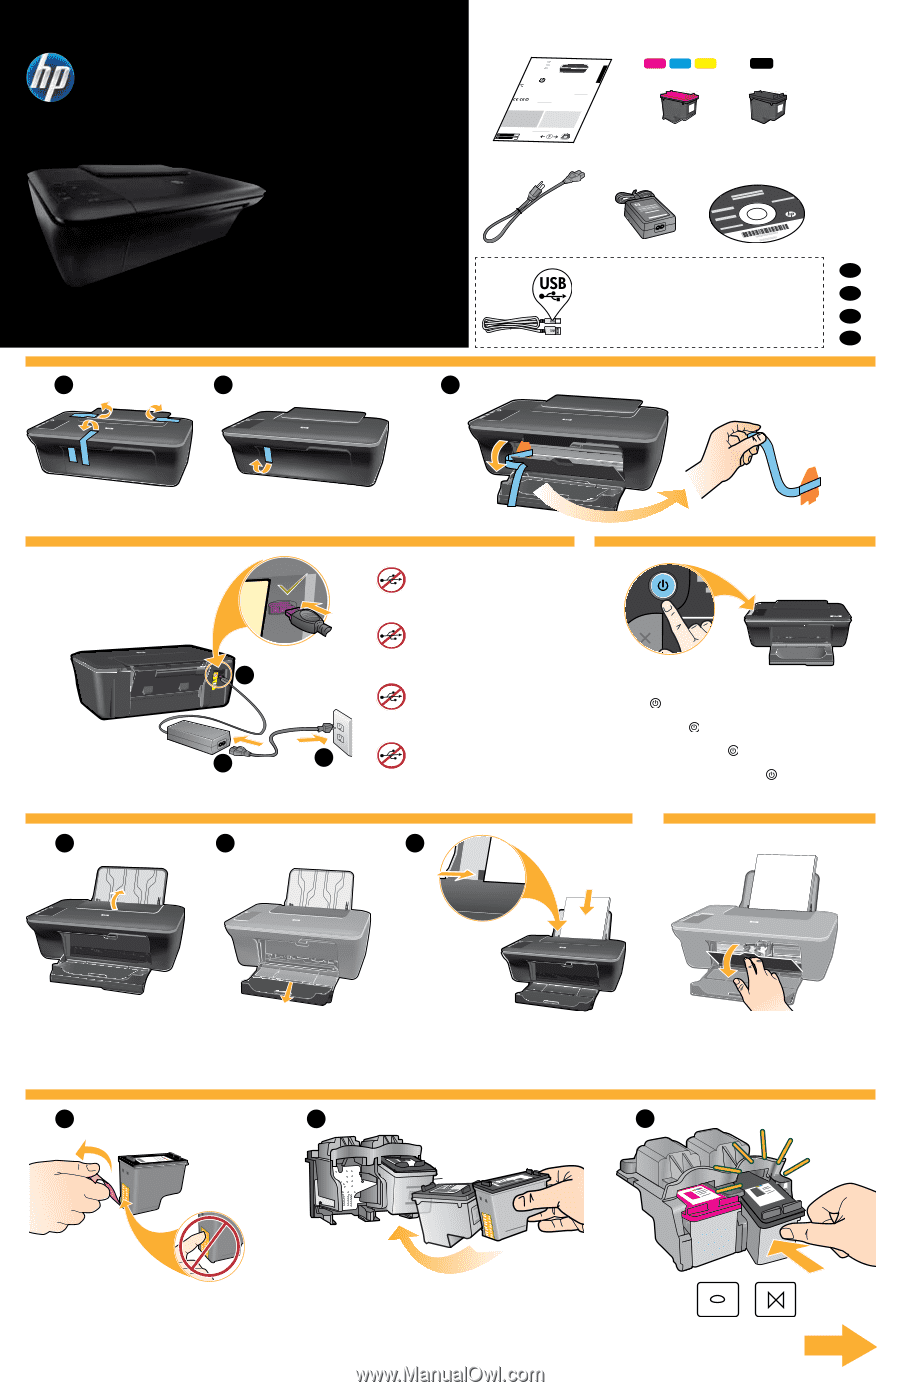
Puxe a tira rosa e remova a fita adesiva transparente.
Empurre os dois cartuchos para dentro do compartimento no carro até eles se encaixarem.
Appuyez sur le bouton
Marche/arrêt.
Ouvrez la trappe d’accès aux cartouches.
Soulevez le bac d’alimentation.
Déployez l’extension du bac.
Tirez sur la languette rose pour retirer l’adhésif.
Introduisez les deux cartouches dans leur logement jusqu’à ce qu’elles émettent un déclic.
Commencez ici
Il se peut que vous deviez acheter un câble USB séparément.
Faites glisser le guide. Chargez du papier blanc.
Retirez le carton et le ruban adhésif.
Connectez l’alimentation.
Ne branchez pas le câble USB avant
d’y avoir été invité
.
Pulse el botón
Encender.
Abra la puerta del cartucho.
Levante la bandeja de entrada.
Tire del extensor de la bandeja.
Tire de la pestaña rosa para quitar la cinta adhesiva transparente
.
Empuje los cartuchos en la guía hasta que encajen.
Comience aquí
Puede que tenga que adquirir un cable USB por separado
.
Deslice la guía. Coloque papel blanco.
Retire la cinta adhesiva y el cartón.
Conecte la alimentación.
No conecte el USB, hasta que se le
solicite
.
Press
On button.
Open cartridge door.
Raise input tray.
Pull out tray extender.
Pull pink tab to remove clear tape.
Push both cartridges into carriage until they snap.
Start Here
You might need to purchase a USB cable separately.
Slide guide. Load white paper.
Remove tape and cardboard.
Connect power.
Do not connect USB until prompted
.
EN
ES
FR
PT
Lea Esto