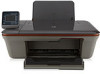
HP Deskjet 3050A User Guide - Page 34
Traditional wireless connection (requires router), USB Connection (non-network connection) - all in one j611 series
 |
View all HP Deskjet 3050A manuals
Add to My Manuals
Save this manual to your list of manuals |
Page 34 highlights
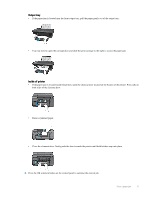
Chapter 8 Traditional wireless connection (requires router) To connect the HP All-in-One to an integrated wireless WLAN 802.11 network, you will need the following: A wireless 802.11b/g/n network that includes a wireless router or access point. NOTE: 802.11n will only support 2.4Ghz A desktop computer or laptop with either wireless networking support, or a network interface card (NIC). The computer must be connected to the wireless network that you intend to install the HP All-in-One on. Network name (SSID). WEP key or WPA Passphrase (if needed). To connect the product 1. Insert the product Software CD in the computer CD-ROM drive. 2. Follow the instructions on the screen. When you are prompted, connect the product to the computer using the USB setup cable included in the box. Follow the onscreen prompts to enter your wireless network settings. The product will attempt to connect to the network. If the connection fails, follow the prompts to correct the problem, and then try again. 3. When the setup is finished, you will be prompted to disconnect the USB cable and test the wireless network connection. Once the product connects successfully to the network, install the software on each computer that will use the product over the network. USB Connection (non-network connection) The HP All-in-One supports a rear USB 2.0 High Speed port for connection to a computer. NOTE: Web services will not be available with a USB direct connection. To connect the product with the USB cable ▲ Refer to the setup instructions that came with your product for information on connecting to a computer with a USB cable. NOTE: Do not connect the USB cable to the product until you are prompted to do so. If the printer software has been installed, the printer will operate as a plug and play device. If the software has not been installed, insert the CD that came with the device and follow the onscreen instructions. Change from a USB connection to a wireless network If you first setup your printer and installed the software with a USB cable, directly connecting the printer to your computer, you can easily change to a wireless network connection. You will need a wireless 802.11b/g/n network that includes a wireless router or access point. NOTE: 802.11n will only support 2.4Ghz Change from a USB connection to a wireless network 1. From the computer's start menu select All Programs or Programs, and then select HP. 2. Select HP Deskjet 3050A J611 series 3. Select Printer Setup and Software Selection. 4. Select Convert a USB connected printer to wireless. Follow the onscreen instructions. 32 Connectivity
-
 1
1 -
2
-
3
-
4
-
5
-
6
-
7
-
8
-
9
-
10
-
11
-
12
-
13
-
14
-
15
-
16
-
17
-
18
-
19
-
20
-
21
-
22
-
23
-
24
-
25
-
26
-
27
-
28
-
 29
29 -
 30
30 -
 31
31 -
 32
32 -
 33
33 -
 34
34 -
 35
35 -
 36
36 -
 37
37 -
 38
38 -
 39
39 -
40
-
41
-
42
-
43
-
44
-
45
-
46
-
47
-
48
-
49
-
50
-
51
-
52
-
53
-
54
-
55
-
56
-
57
-
58
 |
 |