HP Deskjet 460 User's Guide - Page 22
Cards and envelopes, Photo paper, Transparencies, Custom-sized media - windows 7
 |
View all HP Deskjet 460 manuals
Add to My Manuals
Save this manual to your list of manuals |
Page 22 highlights
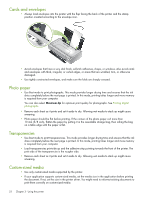
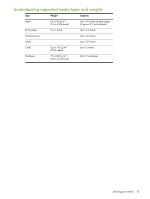
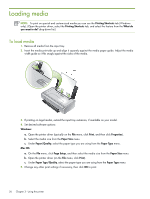
Cards and envelopes • Always load envelopes into the printer with the flap facing the back of the printer and the stamp position oriented according to the envelope icon. • Avoid envelopes that have a very slick finish, self-stick adhesives, clasps, or windows. Also avoid cards and envelopes with thick, irregular, or curled edges, or areas that are wrinkled, torn, or otherwise damaged. • Use tightly constructed envelopes, and make sure the folds are sharply creased. Photo paper • Use Best mode to print photographs. This mode provides longer drying time and ensures that the ink dries completely before the next page is printed. In this mode, printing takes longer and more memory is required from your computer. You can also select Maximum dpi for optimum print quality for photographs. See Printing digital photographs. • Remove each sheet as it prints and set it aside to dry. Allowing wet media to stack up might cause smearing. • Photo paper should be flat before printing. If the corners of the photo paper curl more than 10 mm (3/8 inch), flatten the paper by putting it in the resealable storage bag, then rolling the bag on a table edge until the paper is flat. Transparencies • Use Best mode to print transparencies. This mode provides longer drying time and ensures that the ink dries completely before the next page is printed. In this mode, printing takes longer and more memory is required from your computer. • Load transparencies print-side up and the adhesive strip pointing towards the front of the printer. The print side of the transparencies is the rougher side. • Remove each sheet as it prints and set it aside to dry. Allowing wet media to stack up might cause smearing. Custom-sized media • Use only custom-sized media supported by the printer. • If your application supports custom-sized media, set the media size in the application before printing the document. If not, set the size in the printer driver. You might need to reformat existing documents to print them correctly on custom-sized media. 22 Chapter 3 - Using the printer
-
 1
1 -
2
-
3
-
4
-
5
-
6
-
7
-
8
-
9
-
10
-
11
-
12
-
13
-
14
-
15
-
16
-
 17
17 -
 18
18 -
 19
19 -
 20
20 -
 21
21 -
 22
22 -
 23
23 -
 24
24 -
 25
25 -
 26
26 -
 27
27 -
28
-
29
-
30
-
31
-
32
-
33
-
34
-
35
-
36
-
37
-
38
-
39
-
40
-
41
-
42
-
43
-
44
-
45
-
46
-
47
-
48
-
49
-
50
-
51
-
52
-
53
-
54
-
55
-
56
-
57
-
58
-
59
-
60
-
61
-
62
-
63
-
64
-
65
-
66
-
67
-
68
-
69
-
70
-
71
-
72
-
73
-
74
-
75
-
76
-
77
-
78
-
79
-
80
-
81
-
82
-
83
-
84
-
85
-
86
-
87
-
88
-
89
-
90
-
91
-
92
-
93
-
94
-
95
-
96
-
97
-
98
-
99
-
100
-
101
-
102
-
103
-
104
-
105
-
106
-
107
-
108
-
109
-
110
-
111
-
112
-
113
-
114
-
115
-
116
-
117
-
118
-
119
-
120
-
121
-
122
-
123
-
124
-
125
-
126
-
127
-
128
-
129
-
130
-
131
-
132
 |
 |
