HP Deskjet 460 User's Guide - Page 26
Loading media, To load media - software
 |
View all HP Deskjet 460 manuals
Add to My Manuals
Save this manual to your list of manuals |
Page 26 highlights
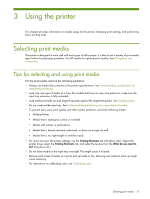
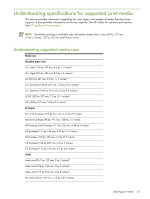
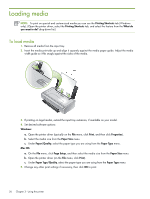
Loading media NOTE: To print on special and custom-sized media you can use the Printing Shortcuts tab (Windows only). (Open the printer driver, select the Printing Shortcuts tab, and select the feature from the What do you want to do? drop-down list.) To load media 1. Remove all media from the input tray. 2. Insert the media print-side up and align it squarely against the media paper guide. Adjust the media width guide so it fits snugly against the sides of the media. 3. If printing on legal media, extend the input tray extension, if available on your model. 4. Set desired software options: Windows: a. Open the printer driver (typically on the File menu, click Print, and then click Properties). b. Select the media size from the Paper Size menu. c. Under Paper/Quality, select the paper type you are using from the Paper Type menu. Mac OS: a. On the File menu, click Page Setup, and then select the media size from the Paper Size menu. b. Open the printer driver (on the File menu, click Print). c. Under Paper Type/Quality, select the paper type you are using from the Paper Type menu. 5. Change any other print settings if necessary, then click OK to print. 26 Chapter 3 - Using the printer
-
 1
1 -
2
-
3
-
4
-
5
-
6
-
7
-
8
-
9
-
10
-
11
-
12
-
13
-
14
-
15
-
16
-
17
-
18
-
19
-
20
-
 21
21 -
 22
22 -
 23
23 -
 24
24 -
 25
25 -
 26
26 -
 27
27 -
 28
28 -
 29
29 -
 30
30 -
 31
31 -
32
-
33
-
34
-
35
-
36
-
37
-
38
-
39
-
40
-
41
-
42
-
43
-
44
-
45
-
46
-
47
-
48
-
49
-
50
-
51
-
52
-
53
-
54
-
55
-
56
-
57
-
58
-
59
-
60
-
61
-
62
-
63
-
64
-
65
-
66
-
67
-
68
-
69
-
70
-
71
-
72
-
73
-
74
-
75
-
76
-
77
-
78
-
79
-
80
-
81
-
82
-
83
-
84
-
85
-
86
-
87
-
88
-
89
-
90
-
91
-
92
-
93
-
94
-
95
-
96
-
97
-
98
-
99
-
100
-
101
-
102
-
103
-
104
-
105
-
106
-
107
-
108
-
109
-
110
-
111
-
112
-
113
-
114
-
115
-
116
-
117
-
118
-
119
-
120
-
121
-
122
-
123
-
124
-
125
-
126
-
127
-
128
-
129
-
130
-
131
-
132
 |
 |