HP Dv6353cl Remote Control - Windows XP
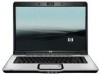
HP Dv6353cl - Pavilion - Turion 64 X2 1.8 GHz Manual
 |
UPC - 883585222315
View all HP Dv6353cl manuals
Add to My Manuals
Save this manual to your list of manuals |
HP Dv6353cl manual content summary:
- HP Dv6353cl | Remote Control - Windows XP - Page 1
Remote Control (Select Models Only) User Guide - HP Dv6353cl | Remote Control - Windows XP - Page 2
2006 Hewlett-Packard Development Company, L.P. Microsoft and Windows are U.S. registered trademarks of Microsoft Corporation. The information contained herein is subject to change without notice. The only warranties for HP products and services are set forth in the express warranty statements - HP Dv6353cl | Remote Control - Windows XP - Page 3
of contents 1 Introduction 2 HP Mobile Remote Control (PC Card version) Inserting the battery (PC Card version 4 Storing the remote control in the PC Card slot 6 Button quick reference (PC Card version 7 HP Mobile Remote Control (PC Card version) component functions 10 3 HP Mobile Remote Control - HP Dv6353cl | Remote Control - Windows XP - Page 4
iv ENWW - HP Dv6353cl | Remote Control - Windows XP - Page 5
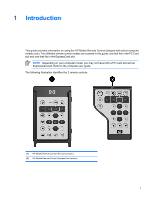
Depending on your computer model, you may not have both a PC Card slot and an ExpressCard slot. Refer to the computer user guide. The following illustration identifies the 2 remote controls. (1) HP Mobile Remote Control (PC Card version) (2) HP Mobile Remote Control (ExpressCard version) ENWW 1 - HP Dv6353cl | Remote Control - Windows XP - Page 6
2 Chapter 1 Introduction ENWW - HP Dv6353cl | Remote Control - Windows XP - Page 7
2 HP Mobile Remote Control (PC Card version) This chapter provides information on the PC Card remote control. ENWW 3 - HP Dv6353cl | Remote Control - Windows XP - Page 8
the battery (PC Card version) WARNING! Risk of explosion if battery is replaced by an incorrect type. Dispose of used batteries according to the instructions. To insert the battery into the HP Mobile Remote Control (PC Card version): 1. On the back of the remote control, turn the battery compartment - HP Dv6353cl | Remote Control - Windows XP - Page 9
3. Insert the tabs on the battery compartment cover into the slots in the battery compartment and turn the cover clockwise to close. ENWW Inserting the battery (PC Card version) 5 - HP Dv6353cl | Remote Control - Windows XP - Page 10
models only). The PC Card slot or slot insert may display the following icon. To store the remote control: NOTE Your computer model may look different than the illustrations in this section. Refer to the computer user guide for the location of the PC Card slot. 1. Remove the PC Card slot insert - HP Dv6353cl | Remote Control - Windows XP - Page 11
) This section provides information on the button functions of the HP Mobile Remote Control (PC Card version). When the computer is off: ● Press the power button (1) to start the computer in Windows. ● Press the DVD Menu button (2) to open QuickPlay DVD mode (select computer models only). ● Press - HP Dv6353cl | Remote Control - Windows XP - Page 12
, press to open QuickPlay DVD mode (select computer models only). ● In Windows, press to open the default Windows music player. In QuickPlay DVD mode, press to switch to QuickPlay music mode scroll up. Navigation. Press to scroll up. 8 Chapter 2 HP Mobile Remote Control (PC Card version) ENWW - HP Dv6353cl | Remote Control - Windows XP - Page 13
to open the default Windows media application. None Switch Screens Press to switch the computer image between the Press to switch the computer image between the computer display and an external display. computer display and an external display. ENWW Button quick reference (PC Card version) 9 - HP Dv6353cl | Remote Control - Windows XP - Page 14
HP Mobile Remote Control (PC Card version) component functions The infrared lens on the remote control links the remote control to the computer. The link requires a lineof-sight path between the infrared lens on the remote control and the infrared lens on the computer. Things to remember: ● The HP - HP Dv6353cl | Remote Control - Windows XP - Page 15
3 HP Mobile Remote Control (ExpressCard version) This chapter provides information on the ExpressCard remote control. ENWW 11 - HP Dv6353cl | Remote Control - Windows XP - Page 16
) WARNING! Risk of explosion if battery is replaced by an incorrect type. Dispose of used batteries according to the instructions. To insert the battery into the HP Mobile Remote Control (ExpressCard version): 1. On the back of the remote control, lift the battery compartment cover (1) and remove it - HP Dv6353cl | Remote Control - Windows XP - Page 17
3. Align the battery compartment cover (1) with the battery compartment and press down to close the cover (2). ENWW Inserting the battery (ExpressCard version) 13 - HP Dv6353cl | Remote Control - Windows XP - Page 18
ExpressCard into the PC Card slot (select computer models only). The ExpressCard slot or slot insert may display the following icon. To store the remote control: NOTE Your computer model may look different than the illustrations in this section. Refer to the computer user guide - HP Dv6353cl | Remote Control - Windows XP - Page 19
To remove the remote control from the ExpressCard slot: ● If the ExpressCard slot has an eject button: a. Press the ExpressCard slot eject button to release the remote control. b. Pull the remote control out of the slot. ● If the ExpressCard slot does not have an eject button: a. Gently push in on - HP Dv6353cl | Remote Control - Windows XP - Page 20
HP Mobile Remote Control (ExpressCard version). When the computer is off: ● Press the power button (1) to start the computer in Windows only). Button Power Switch Screens Function in Microsoft® Windows® Function in display and an external display. computer display and an external display - HP Dv6353cl | Remote Control - Windows XP - Page 21
● In standby, press briefly to resume from standby. ● In hibernation, press to open QuickPlay Display DVD mode (select computer models only). Music If the computer is ● On, press to open QuickPlay for Windows Music mode (select models only) or the default media application. ● In standby, press - HP Dv6353cl | Remote Control - Windows XP - Page 22
Windows® screen. Right Navigation. Press to scroll right. Navigation. Press to scroll right. Down Navigation. Press to scroll down. Navigation. Press to scroll down. Back Information Press to emulate the "back" function of the backspace key command in the active application. Press to display - HP Dv6353cl | Remote Control - Windows XP - Page 23
the computer. Things to remember: ● The HP Mobile Remote Control operates within Microsoft® Windows®, QuickPlay (select computer models only), and as computer hotkeys. Refer to the computer user guide for information on supported hotkeys. ● Other remote control buttons provide functions that - HP Dv6353cl | Remote Control - Windows XP - Page 24
20 Chapter 3 HP Mobile Remote Control (ExpressCard version) ENWW - HP Dv6353cl | Remote Control - Windows XP - Page 25
has a charge. Replace the battery if necessary. ● Be sure you are using the remote control with a supported computer or expansion product. My remote control will not fit into the slot for storage. Be sure you are inserting the remote control into the proper slot on the computer. A PC Card remote - HP Dv6353cl | Remote Control - Windows XP - Page 26
22 Chapter 4 Troubleshooting the remote control ENWW - HP Dv6353cl | Remote Control - Windows XP - Page 27
slot storing remote control 14 P PC Card slot storing remote control 6 Q QuickPlay using with remote control (PC Card version) 7 R remote control, ExpressCard button quick reference 16 inserting battery 12 overview 1, 11 storing 14 remote control, PC Card button quick reference 7 inserting - HP Dv6353cl | Remote Control - Windows XP - Page 28
24 Index ENWW - HP Dv6353cl | Remote Control - Windows XP - Page 29
- HP Dv6353cl | Remote Control - Windows XP - Page 30
-
 1
1 -
 2
2 -
 3
3 -
 4
4 -
 5
5 -
 6
6 -
 7
7 -
8
-
9
-
10
-
11
-
12
-
13
-
14
-
15
-
16
-
17
-
18
-
19
-
20
-
21
-
22
-
23
-
24
-
25
-
26
-
27
-
28
-
29
-
30
 |
 |

Remote Control (Select Models Only)
User Guide