HP ENVY 700-074 Upgrading and Servicing Guide - Page 17
Upgrading or Replacing Memory, the retaining clips on the left and right sides
 |
View all HP ENVY 700-074 manuals
Add to My Manuals
Save this manual to your list of manuals |
Page 17 highlights
4. Using a flathead or Torx screwdriver, loosen the screw at the back of the computer that secures the side panel to the computer. 6. Lay the computer on a flat surface. 7. Locate the memory inside the computer. 5. Slide the side panel toward the back of the computer, and then pull the side panel away from the computer. 8. To release the memory card, press outwards on the retaining clips on the left and right sides of the top memory card (1). Holding the memory card by the edges, gently remove it from the compartment (2). The inside of the computer is exposed. 9. To remove additional memory cards, repeat step 8. Features may vary by model. Upgrading or Replacing Memory 15
-
 1
1 -
2
-
3
-
4
-
5
-
6
-
7
-
8
-
9
-
10
-
11
-
 12
12 -
 13
13 -
 14
14 -
 15
15 -
 16
16 -
 17
17 -
 18
18 -
 19
19 -
 20
20 -
 21
21 -
 22
22 -
23
-
24
-
25
 |
 |

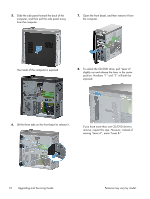
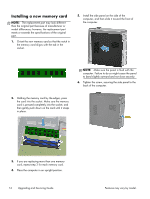
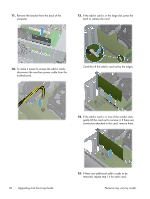
4.
Using a flathead or Torx screwdriver, loosen the
screw at the back of the computer that secures
the side panel to the computer.
5.
Slide the side panel toward the back of the
computer, and then pull the side panel away
from the computer.
The inside of the computer is exposed.
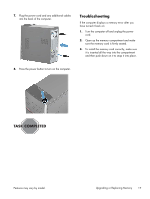
6.
Lay the computer on a flat surface.
7.
Locate the memory inside the computer.
8.
To release the memory card, press outwards on
the retaining clips on the left and right sides of
the top memory card (1). Holding the memory
card by the edges, gently remove it from the
compartment (2).
9.
To remove additional memory cards, repeat step
8.
Features may vary by model.
Upgrading or Replacing Memory
15