HP FV247AA#ABA User Guide - w185, w185q LCD Display
HP FV247AA#ABA - Compaq Presario Q1859 Manual
 |
UPC - 884420313663
View all HP FV247AA#ABA manuals
Add to My Manuals
Save this manual to your list of manuals |
HP FV247AA#ABA manual content summary:
- HP FV247AA#ABA | User Guide - w185, w185q LCD Display - Page 1
v185e/v185es/v185w/v185ws/w185/W185q LCD Monitor User's Guide - HP FV247AA#ABA | User Guide - w185, w185q LCD Display - Page 2
services. Nothing herein should be construed as constituting an additional warranty. HP shall not be liable for technical or editorial errors or omissions contained herein. HP HP. This document contains proprietary information that is protected by copyright. No part Windows license. HP supports lawful - HP FV247AA#ABA | User Guide - w185, w185q LCD Display - Page 3
Using the Monitor y Installing Drivers and Using the Auto-Adjustment Feature y Technical Support FAQs y Specifications y LCD Monitor Quality you how to avoid the problem. WARNING: A WARNING indicates the potential for bodily harm and tells you how to avoid the problem. Some warnings may appear in - HP FV247AA#ABA | User Guide - w185, w185q LCD Display - Page 4
manufacturer offers a damage replacement policy so you can replace your equipment if surge protection fails. Safety Precautions CAUTION: Avoid applying pressure to the LCD screen; doing so can cause damage. y Use only a power source and connection compatible with this monitor, as indicated on the - HP FV247AA#ABA | User Guide - w185, w185q LCD Display - Page 5
or damaged, contact your HP authorized dealer, reseller, or service provider. y Adjust only those controls that are described in the operating instructions. y Turn your monitor off when not in use. You can substantially increase the life expectancy of your monitor by using a screen saver and turning - HP FV247AA#ABA | User Guide - w185, w185q LCD Display - Page 6
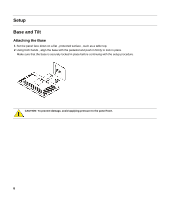
Setup Base and Tilt Attaching the Base 1 Set the panel face down on a flat , protected surface , such as a table top. 2 Using both hands , align the base with the pedestal and push in firmly to lock in place. Make sure - HP FV247AA#ABA | User Guide - w185, w185q LCD Display - Page 7
the lock. 3 Remove the base from the pedestal. CAUTION: To prevent damage, avoid applying pressure to the panel front. Adjusting the Tilt For optimal viewing, adjust the screen tilt to your own preference, as follows: 1 Face the front of the monitor and hold the stand so that you do not topple the - HP FV247AA#ABA | User Guide - w185, w185q LCD Display - Page 8
Cables Attaching the Cables 1 Turn off your computer. 2 If you are attaching a VGA cable, connect one end of the 15-pin D-Sub VGA cable (blue connector) to the back of the monitor and connect the other end to the computer VGA port. 3 If attaching a DVI cable, connect one end of the cable to the back - HP FV247AA#ABA | User Guide - w185, w185q LCD Display - Page 9
4 Connect one end of the power cord to the back of the monitor and plug the other end into a grounded outlet. 5 Turn on your monitor and computer. If your monitor displays an image, installation is complete. If it does not display an image, see Technical Support FAQs and Using the Monitor. 9 - HP FV247AA#ABA | User Guide - w185, w185q LCD Display - Page 10
on a protected surface, remove the screws and the pedestal/base attachment. 3 Follow the manufacturer's instructions to assemble the wall mounting arm. Installing a Wall Mounting Arm 1 Set the monitor screen down on a flat, soft, protected surface. 2 Place the wall mounting arm onto the back of the - HP FV247AA#ABA | User Guide - w185, w185q LCD Display - Page 11
. The power indicator lights up when the monitor is on. y The monitor must be turned on for the other control buttons to work. y Set the resolution (Setting the Optimal Resolution) and adjust the volume (Adjusting the Volume). y Adjust the onscreen display (OSD) settings (Adjusting On-screen Display - HP FV247AA#ABA | User Guide - w185, w185q LCD Display - Page 12
) button E Power button F Power LED Navigates forward through the OSD menu and increases adjustment levels. If the OSD menu is inactive, activates the Volume increase. Turns the monitor on or off. Fully powered = green Sleep mode = amber Sleep timer mode = flashing amber See Technical Support - HP FV247AA#ABA | User Guide - w185, w185q LCD Display - Page 13
the Windows Start Button®, and then click Control Panel. 2 Under Appearance and Personalization, click Adjust Screen Resolution. 3 Set the resolution slide bar to 1366 x 768. NOTE: If 1366 x 768 is not shown, download the monitor driver from the Web. See Using the Monitor for instructions. Adjusting - HP FV247AA#ABA | User Guide - w185, w185q LCD Display - Page 14
On-Screen Display Settings Use the OSD menu to adjust the screen image and change settings. To access the OSD menu: 1 If the monitor is not already on, press the Power button to turn the monitor on. 2 Press the Menu button to activate the OSD menu. 3 Press the - (minus) and + (plus) buttons to - HP FV247AA#ABA | User Guide - w185, w185q LCD Display - Page 15
and their functions at each level. OSD Menu Levels Level 1 Level 2 Switch Video Input (w185 / W185q only) Brightness Contrast Image Control Adjustment Scale Reset Cancel Save and Return Adjustment Scale Reset Cancel Save and Return Auto Adjustment Horizontal Position Vertical Position Custom - HP FV247AA#ABA | User Guide - w185, w185q LCD Display - Page 16
Status Display On / Off Selection DDC/CI Support On / Off Selection Bezel Power LED On / Off Selection Sleep Timer Timer Set Menu Default Video Input Analog-VGA (w185 / W185q only) Digital-DVI Adjustment Scale Adjustment Scale Adjustment Scale Adjustment Scale 16 Factory Preset Y English - HP FV247AA#ABA | User Guide - w185, w185q LCD Display - Page 17
continued) Level 1 Level 2 Level 3 OSD Control (v185w only) Information Factory Reset Exit Cancel Save and Return Horizontal OSD Position Vertical OSD Position OSD Transparency OSD Timeout Cancel Save and Return Adjustment Scale Adjustment Scale Adjustment Scale Adjustment Scale Yes No Level - HP FV247AA#ABA | User Guide - w185, w185q LCD Display - Page 18
monitor will be displayed. 5 Download and install the driver and software files using the instructions in the download pages. Using the Auto-Adjustment Function Press the Auto button to optimize the screen performance for VGA (analog). If your monitor is using VGA (analog) input, auto-adjustment - HP FV247AA#ABA | User Guide - w185, w185q LCD Display - Page 19
computer. y For VGA input, the auto-adjustment function may fix this problem. y Move electrical devices that may cause electrical interference as far away from the monitor as possible. y Use the maximum refresh rate your monitor is capable of at the resolution you are using. y The computer power - HP FV247AA#ABA | User Guide - w185, w185q LCD Display - Page 20
to the computer. y Adjust horizontal and vertical screen position. y For VGA input, the auto-adjustment function may fix this problem. y Adjust RGB color or select color temperature. Unable to set the monitor to the optimal resolution. y Make sure that the graphics card supports the optimal - HP FV247AA#ABA | User Guide - w185, w185q LCD Display - Page 21
Width 8.47 lb. 13.54 inches 7.05 inches 17.4 inches 3.8 kg 344 mm 179 mm 442 mm Optimum Display Resolution Text Mode Dot Pitch Horizontal Frequency Vertical Refresh Rate Audio Power Output Speaker (R/L) Power Consumption Input Terminal Environmental Requirements Temperature: Operating Non - HP FV247AA#ABA | User Guide - w185, w185q LCD Display - Page 22
Preset Display Modes Preset Pixel Format Horz Freq (kHz) Horz Polarity Vert Freq (Hz) Vert Polarity Pixel Clk (MHz) Source 1 640 x 480 31.469 - 59.940 - 25.175 VGA 2 640 x 480 37.861 - 72.809 - 31.500 VESA 3 640 x 480 37.500 - 75.000 - 31.500 VESA 4 720 x 400 31.469 - HP FV247AA#ABA | User Guide - w185, w185q LCD Display - Page 23
monitor to operate on input voltages in the range of 100-240V∿, 50 / 60 Hz, 1.5A. The power cord set (flexible cord or wall plug) received with the monitor cord exits from the product. VGA Pin Assignments DVI Pin Assignments Pin Number 1 2 3 4 5 6 7 8 9 10 11 12 13 14 15 15-Pin Side of the Signal - HP FV247AA#ABA | User Guide - w185, w185q LCD Display - Page 24
LCD Monitor Quality and Pixel Policy The HP LCD Monitor uses high-precision technology, manufactured according to high standards, to help guarantee trouble , the monitor should be viewed under normal operating conditions and in normal operating mode at a supported resolution and response rate, from - HP FV247AA#ABA | User Guide - w185, w185q LCD Display - Page 25
Packard Company P. O. Box 692000, Mail Stop 510101 Houston, Texas 77269-2000 Or call: 1-(281)-514-3333 To identify this product, refer to the part, series, or model number found on the product. Canadian Notice This Class B digital apparatus meets all requirements of the Canadian Interference-Causing - HP FV247AA#ABA | User Guide - w185, w185q LCD Display - Page 26
European Union Regulatory Notice This product complies with the following EU directives: y Low Voltage Directive 2006/95/EC y EMC Directive 2004/108/EC Compliance with these directives implies conformity to applicable harmonized European standards (European Norms) which are listed on the EU - HP FV247AA#ABA | User Guide - w185, w185q LCD Display - Page 27
environment. For more information about where you can drop off your waste equipment for recycling, please contact your local city office, your household waste disposal service or the shop where you purchased the product. Japanese Notice 27 - HP FV247AA#ABA | User Guide - w185, w185q LCD Display - Page 28
of electronic products offered for sale after July 1, 2006. To view the JIS C 0950 material declaration for this product, visit www.hp.com/go/jisc0950. Korean Notice Materials Disposal This HP product contains Mercury in the fluorescent lamp in the display LCD that might require special handling - HP FV247AA#ABA | User Guide - w185, w185q LCD Display - Page 29
programs vary by geography because of differences in regulatory requirements and local customer demand. For information on the HP recycling program, refer to the HP Web site at: http://www.hp.com/recycle EPA ENERGY STAR® Compliance Products marked with the ENERGY STAR® logo on the packaging box - HP FV247AA#ABA | User Guide - w185, w185q LCD Display - Page 30
30 - HP FV247AA#ABA | User Guide - w185, w185q LCD Display - Page 31
Part number: 506356-002
-
 1
1 -
 2
2 -
 3
3 -
 4
4 -
 5
5 -
 6
6 -
 7
7 -
8
-
9
-
10
-
11
-
12
-
13
-
14
-
15
-
16
-
17
-
18
-
19
-
20
-
21
-
22
-
23
-
24
-
25
-
26
-
27
-
28
-
29
-
30
-
31
 |
 |

v185e/v185es/v185w/v185ws/w185/W185q LCD
Monitor User’s
Guide