HP G61-320US Wireless (Select Models Only) - Windows 7
HP G61-320US Manual
 |
UPC - 884962533956
View all HP G61-320US manuals
Add to My Manuals
Save this manual to your list of manuals |
HP G61-320US manual content summary:
- HP G61-320US | Wireless (Select Models Only) - Windows 7 - Page 1
Wireless (Select Models Only) User Guide - HP G61-320US | Wireless (Select Models Only) - Windows 7 - Page 2
products and services. Nothing herein should be construed as constituting an additional warranty. HP shall not be liable for technical or editorial errors or omissions contained herein. First Edition: August 2009 Document Part Number: 539901-001 Product notice This user guide describes features - HP G61-320US | Wireless (Select Models Only) - Windows 7 - Page 3
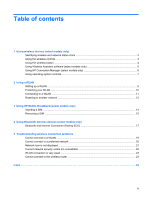
another network ...12 3 Using HP Mobile Broadband (select models only) Inserting a SIM ...14 Removing a SIM ...15 4 Using Bluetooth wireless devices (select models only) Bluetooth and Internet Connection Sharing (ICS 17 5 Troubleshooting wireless connection problems Cannot connect to a WLAN ...19 - HP G61-320US | Wireless (Select Models Only) - Windows 7 - Page 4
iv - HP G61-320US | Wireless (Select Models Only) - Windows 7 - Page 5
HP Mobile Broadband Module-A wireless wide area network (WWAN) device that provides access to information wherever mobile network operator service is with 802.11b devices, so they can operate on the same network. ● 802.11a supports data rates of up to 54 Mbps and operates at a frequency of 5 GHz. - HP G61-320US | Wireless (Select Models Only) - Windows 7 - Page 6
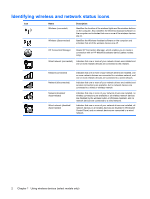
of the wireless devices are off. HP Connection Manager Opens HP Connection Manager, which enables you to create a connection with an HP Mobile Broadband device (select models only). Wired network (connected) Indicates that one or more of your network drivers are installed and one or more network - HP G61-320US | Wireless (Select Models Only) - Windows 7 - Page 7
devices in your computer using these features: ● Wireless button or wireless switch (referred to in this guide as the wireless button) ● Wireless Assistant software (select models only) ● HP Connection Manager software (select models only) ● Operating system controls Using the wireless controls 3 - HP G61-320US | Wireless (Select Models Only) - Windows 7 - Page 8
Using the wireless button The computer has a wireless button, one or more wireless devices, and one or two wireless lights, depending on the model. All of the wireless devices on your computer are enabled at the factory, so the wireless light is on (blue) when you turn on the computer. The wireless - HP G61-320US | Wireless (Select Models Only) - Windows 7 - Page 9
Wireless Assistant tile, which is located in the bottom row of Windows® Mobility Center. 3. Click Properties. 4. Select the check box next to HP Wireless Assistant icon in notification area. 5. Click Apply. 6. Click Close. For more information, refer to the Wireless Assistant software Help: 1. Open - HP G61-320US | Wireless (Select Models Only) - Windows 7 - Page 10
Connection Manager icon in the notification area, at the far right of the taskbar. - or - Select Start > All Programs > HP Connection Manager > HP Connection Manager. For more details about using Connection Manager, refer to the Connection Manager software Help. 6 Chapter 1 Using wireless devices - HP G61-320US | Wireless (Select Models Only) - Windows 7 - Page 11
Sharing Center that allows you to set up a connection or network, connect to a network, manage wireless networks, and diagnose and repair network problems. To access the Network and Sharing Center, select Start > Control Panel > Network and Internet > Network and Sharing Center. For more information - HP G61-320US | Wireless (Select Models Only) - Windows 7 - Page 12
typically uses wireless access points that can accommodate a large number of computers and accessories and can separate critical network functions. ● A home or small office WLAN to a WLAN infrastructure (provided through a service provider or a public or corporate network). 8 Chapter 2 Using a WLAN - HP G61-320US | Wireless (Select Models Only) - Windows 7 - Page 13
to the Internet, you need the following equipment: ● A broadband modem (either DSL or cable) (1) and high-speed Internet service purchased from an Internet service provider (ISP) ● A wireless router (purchased separately) (2) ● The wireless computer (3) The illustration below shows an example of - HP G61-320US | Wireless (Select Models Only) - Windows 7 - Page 14
security. New technologies are being developed by wireless manufacturers and hotspot service providers that make the public environment more secure and anonymous. If protocols is available for your WLAN. Find the solution that works best for your network security: ◦ Wired Equivalent Privacy (WEP) is - HP G61-320US | Wireless (Select Models Only) - Windows 7 - Page 15
or network. A list of options is displayed. You can choose to manually search for and connect to a network or to create a new network connection and the user guides included with your wireless router and other WLAN equipment ● Information and Web site links provided in Help and Support For a list - HP G61-320US | Wireless (Select Models Only) - Windows 7 - Page 16
Roaming to another network When you move your computer within range of another WLAN, Windows attempts to connect to that network. If the attempt is successful, your computer is automatically connected to the new network. If Windows does not recognize the new network, follow the same procedure you - HP G61-320US | Wireless (Select Models Only) - Windows 7 - Page 17
on the code division multiple access (CDMA) telecommunications standard. You may need the HP Mobile Broadband Module serial number to activate mobile broadband service. The serial number is printed on a label inside the battery bay of your computer. Some mobile network operators require the use of - HP G61-320US | Wireless (Select Models Only) - Windows 7 - Page 18
cord from the AC outlet. 5. Turn the computer upside down on a flat surface, with the battery bay toward you. 6. Remove the battery. 7. Insert until it is firmly seated. 8. Replace the battery. NOTE: HP Mobile Broadband will be disabled if the battery is not replaced. 9. Reconnect external power. 10 - HP G61-320US | Wireless (Select Models Only) - Windows 7 - Page 19
. 3. Disconnect all external devices connected to the computer. 4. Unplug the power cord from the AC outlet. 5. Turn the computer upside down on a flat surface, with the battery bay toward you. 6. Remove the battery. 7. Press in on the SIM (1), and then remove it from the slot (2). 8. Replace the - HP G61-320US | Wireless (Select Models Only) - Windows 7 - Page 20
that replace the physical cable connections that traditionally link electronic devices such as the following: ● Computers (desktop, notebook, PDA) ● Phones (cellular, cordless, smart phone) ● Imaging devices (printer, camera) ● Audio devices (headset, speakers) Bluetooth devices provide - HP G61-320US | Wireless (Select Models Only) - Windows 7 - Page 21
Bluetooth and Internet Connection Sharing (ICS) HP does not recommend setting up one computer with Bluetooth as a host and using it as a gateway through which other computers may connect to the Internet. - HP G61-320US | Wireless (Select Models Only) - Windows 7 - Page 22
5 Troubleshooting wireless connection problems Some possible causes for wireless connection problems include the following: ● Network configuration ( the sequence of possible solutions to your network connection problem, be sure that device drivers are installed for all wireless devices. Use the - HP G61-320US | Wireless (Select Models Only) - Windows 7 - Page 23
problem connecting to Network adapters to expand the list and show all adapters. 4. Identify the WLAN device from the Network adapters list. driver for the WLAN device is not properly installed. For more information on troubleshooting WLANs, refer to the Web site links provided in Help and Support - HP G61-320US | Wireless (Select Models Only) - Windows 7 - Page 24
: ● If there is a network icon in the notification area, at the far right of the taskbar, right-click the icon, and then click Troubleshoot problems. Windows resets your network device and attempts to reconnect to one of the preferred networks. ● If there is no network icon in the notification area - HP G61-320US | Wireless (Select Models Only) - Windows 7 - Page 25
your Internet browser and go to http://www.hp.com/support. 2. Select your country or region. 3. Click the option for software and driver downloads, and then type your computer model number in the search box. 4. Press enter, and then follow the on-screen instructions. NOTE: If the WLAN device you are - HP G61-320US | Wireless (Select Models Only) - Windows 7 - Page 26
computer to the network. ● For a network connected to your personal wireless router, review the router user guide for instructions on setting up the same codes on both the router and the WLAN device. ● . 5. Click OK to save these settings. 22 Chapter 5 Troubleshooting wireless connection problems - HP G61-320US | Wireless (Select Models Only) - Windows 7 - Page 27
WLAN connection is very weak If the connection is very weak, or if your computer cannot make a connection to a WLAN, minimize interference from other devices, as follows: ● Move your computer closer to the wireless router or access point. ● Temporarily disconnect devices such as a microwave, - HP G61-320US | Wireless (Select Models Only) - Windows 7 - Page 28
for 10 to 15 seconds. If the computer still cannot make a connection to a WLAN, restart the wireless router. For details, refer to the router manufacturer's instructions. 24 Chapter 5 Troubleshooting wireless connection problems - HP G61-320US | Wireless (Select Models Only) - Windows 7 - Page 29
WWAN device 13 S security, wireless 10 setup of WLAN 9 SIM inserting 14 removing 15 software HP Connection Manager 6 Wireless Assistant 5 T troubleshooting 18 W Wireless Assistant software 3, 5 wireless button 3 wireless controls button 3 Connection Manager software 3 operating system 3 Wireless - HP G61-320US | Wireless (Select Models Only) - Windows 7 - Page 30
-
 1
1 -
 2
2 -
 3
3 -
 4
4 -
 5
5 -
 6
6 -
 7
7 -
8
-
9
-
10
-
11
-
12
-
13
-
14
-
15
-
16
-
17
-
18
-
19
-
20
-
21
-
22
-
23
-
24
-
25
-
26
-
27
-
28
-
29
-
30
 |
 |

Wireless (Select Models Only)
User Guide