HP G61-320US Multimedia - Windows 7
HP G61-320US Manual
 |
UPC - 884962533956
View all HP G61-320US manuals
Add to My Manuals
Save this manual to your list of manuals |
HP G61-320US manual content summary:
- HP G61-320US | Multimedia - Windows 7 - Page 1
Multimedia User Guide - HP G61-320US | Multimedia - Windows 7 - Page 2
and services. Nothing herein should be construed as constituting an additional warranty. HP shall not be liable for technical or editorial errors or omissions contained herein. Second Edition: August 2009 First Edition: August 2009 Document Part Number: 539210-002 Product notice This user guide - HP G61-320US | Multimedia - Windows 7 - Page 3
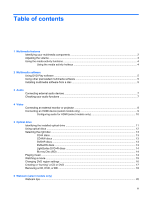
Identifying the installed optical drive 11 Using optical discs ...12 Selecting the right disc ...13 CD-R discs ...13 CD-RW discs ...13 DVD±R discs ...13 DVD±RW discs ...13 LightScribe DVD+R discs 14 Blu-ray Disc (BD) ...14 Playing music ...14 Watching a movie ...15 Changing DVD region settings - HP G61-320US | Multimedia - Windows 7 - Page 4
properties ...20 7 Troubleshooting The optical disc tray does not open for removal of a CD, DVD, or BD 21 The computer does not detect the optical drive 22 A disc does 24 A device driver must be reinstalled ...25 Obtaining the latest HP device drivers 25 Obtaining the latest Windows device - HP G61-320US | Multimedia - Windows 7 - Page 5
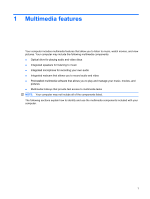
that allow you to listen to music, watch movies, and view pictures. Your computer may include the following multimedia components: ● Optical drive for playing audio and video discs ● Integrated speakers for listening to music ● Integrated microphone for recording your own audio ● Integrated webcam - HP G61-320US | Multimedia - Windows 7 - Page 6
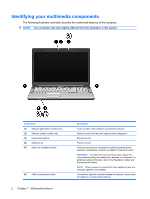
Identifying your multimedia components The following illustration and table describe the multimedia features of the computer. NOTE: Your computer may look slightly different from the illustration in this section. Component (1) Webcam light (select models only) (2) Webcam (select models only) (3) - HP G61-320US | Multimedia - Windows 7 - Page 7
Adjusting the volume You can adjust the volume using the following controls: ● Hotkeys: ◦ To mute or restore speaker sound, press fn+asterisk. ◦ To decrease speaker sound, press fn+minus sign. Hold down the hotkey to decrease speaker sound incrementally. ◦ To increase speaker sound, press fn+plus - HP G61-320US | Multimedia - Windows 7 - Page 8
functions The media activity hotkeys control the play of an audio CD, DVD, or BD (Blu-ray Disc) in the optical drive. Using the media activity hotkeys A media activity hotkey is a combination of the fn key (1) and a function key (2). ● When an audio CD, DVD, or BD is not playing, press fn+f9 (3) to - HP G61-320US | Multimedia - Windows 7 - Page 9
movies, and view pictures. The following sections provide details about HP DVD Play and other preinstalled multimedia software. Using DVD Play from a CD or DVD, follow these steps: 1. Insert the disc into the optical drive. 2. When the installation wizard opens, follow the on-screen instructions. 3. - HP G61-320US | Multimedia - Windows 7 - Page 10
and images ● Transmit sound and images with instant messaging programs ● Stream radio programs (select models only) or receive FM radio signals ● Create or "burn" audio CDs 6 Chapter 3 Audio - HP G61-320US | Multimedia - Windows 7 - Page 11
device. NOTE: A driver is a required program that acts like a translator between the device and the programs that use the device. Checking your audio functions To check the system sound on your computer, follow these steps: 1. Select Start > Control Panel. 2. Click Hardware and Sound. 3. Click - HP G61-320US | Multimedia - Windows 7 - Page 12
4 Video Your computer enables you to use a variety of video features: ● Watch movies ● Play games over the Internet ● Edit pictures and video to create presentations ● Connect external video devices Connecting an external monitor or projector The external monitor port connects an external display - HP G61-320US | Multimedia - Windows 7 - Page 13
support one HDMI device connected to the HDMI port, while simultaneously supporting an image on the computer display or any other supported end of the cable to the video device, according to the device manufacturer's instructions. 3. Press fn+f4 on the computer to switch the image between the display - HP G61-320US | Multimedia - Windows 7 - Page 14
Configuring audio for HDMI (select models only) To configure HDMI audio, first connect an audio or video device, such as a high-definition TV, to the HDMI port on your computer. Then configure the default audio playback device as follows: 1. Right-click the Speakers icon in the notification area, at - HP G61-320US | Multimedia - Windows 7 - Page 15
following types of drives: ● DVD±RW/R and CD-RW Combo Drive with Double-Layer (DL) support ● LightScribe DVD±RW/R and CD-RW Combo Drive with Double-Layer (DL) support ● Blu-ray Disc ROM Drive with SuperMulti DVD±R/RW Double-Layer (DL) support ● LightScribe Blu-ray Disc ROM Drive with SuperMulti DVD - HP G61-320US | Multimedia - Windows 7 - Page 16
of the optical drives listed may not be supported by your computer. The listed drives are not necessarily all of the supported optical drives. Some optical drives can also write to optical discs as described in the following table. Optical drive type Write to CD-RW DVD±RW and CD-RW Yes SuperMulti - HP G61-320US | Multimedia - Windows 7 - Page 17
CDs but have 6 to 7 times the storage capacity. NOTE: The optical drive on your computer may not support all the types of optical discs discussed in this section. CD-R discs Use CD CDs ● Keeping permanent archives of computer files and scanned home records ● Offloading files from your hard drive to - HP G61-320US | Multimedia - Windows 7 - Page 18
amounts of data ● High-definition video playback and storage ● Video games Playing music 1. Turn on the computer. 2. Press the release button (1) on the optical drive bezel to release the disc tray. 3. Pull out the tray (2). 4. Hold the disc by the edges and position the disc label-side up over the - HP G61-320US | Multimedia - Windows 7 - Page 19
If this message is displayed, click No. ● You may need to restart the CD or DVD to resume playback. Watching a movie Your optical drive allows you to watch movies from a disc. You can also watch high-definition NOTE: To watch a high-definition movie, you must use DVD Play. Watching a movie 15 - HP G61-320US | Multimedia - Windows 7 - Page 20
software, running utilities, or changing Windows settings. Refer to Help and Support for more information. 2. Click the arrow next to DVD/CD-ROM drives to expand the list to show all of the installed drives. 3. Right-click the DVD drive for which you want to change region settings, and then click - HP G61-320US | Multimedia - Windows 7 - Page 21
Open the folder, and then drag the files to the drive that contains the blank optical disc. 7. Initiate the burning process as directed by the program you have selected. For specific instructions, refer to the software manufacturer's instructions, which may be provided with the software, on disc, or - HP G61-320US | Multimedia - Windows 7 - Page 22
Removing a CD, DVD, or BD 1. Press the release button (1) on the drive bezel to release the disc tray, and then gently pull out the tray (2) until it stops. 2. Remove the disc (3) carefully as you remove it. 3. Close the disc tray and place the disc in a protective case. 18 Chapter 5 Optical drive - HP G61-320US | Multimedia - Windows 7 - Page 23
succession. ● Connect-E-mail photos and video using the icon on the software interface. NOTE: For details about using webcam software, refer to the software manufacturer's instructions, which may be provided with the software, on disc, or on the manufacturer's Web site. 19 - HP G61-320US | Multimedia - Windows 7 - Page 24
. NOTE: If you are having trouble viewing or sending multimedia files to someone firewall. To permanently resolve the problem, reconfigure the firewall as necessary, A lower gamma setting makes grays look black, and makes dark colors even darker. Support. 20 Chapter 6 Webcam (select models only) - HP G61-320US | Multimedia - Windows 7 - Page 25
7 Troubleshooting The following sections describe several common issues and resolutions. The optical disc tray does not open for removal of a CD, DVD, or BD 1. Insert the end of a paper clip (1) into the release access in the front bezel of the drive. 2. Press in gently on the paper clip until the - HP G61-320US | Multimedia - Windows 7 - Page 26
changes. Windows scans your system for installed hardware and installs any required drivers. ● Click Properties to see if the device is working properly: -The Properties window provides details about the device to help you troubleshoot issues. -Click the Driver tab to update, disable, or uninstall - HP G61-320US | Multimedia - Windows 7 - Page 27
. 2. Confirm that the Use AutoPlay for all media and devices check box is selected. 3. Click Save. A CD, DVD, or BD should now start automatically when it is inserted into the optical drive. A DVD movie stops, skips, or plays erratically ● Clean the disc. ● Conserve system resources by trying the - HP G61-320US | Multimedia - Windows 7 - Page 28
from your hard drive. ● Reinstall the disc-burning device driver located in the DVD/CD-ROM drives category in Device Manager. A DVD playing in Windows Media Player produces no sound or display Use DVD Play to play a DVD. DVD Play is installed on the computer and is also available from the HP Web - HP G61-320US | Multimedia - Windows 7 - Page 29
.com/support, and select your country or region. 2. Click the option for software and driver downloads, type your computer model number in the search box, and then press enter. - or - If you want a specific SoftPaq, enter the SoftPaq number in the Search box, press enter, and follow the instructions - HP G61-320US | Multimedia - Windows 7 - Page 30
You can obtain the latest Windows device drivers by using Windows Update. This feature can be set to automatically check for and install updates for to enter settings before you can check for updates. 2. Click Check for updates. 3. Follow the on-screen instructions. 26 Chapter 7 Troubleshooting - HP G61-320US | Multimedia - Windows 7 - Page 31
out (headphone) jack 2 B BD inserting 15 removing 18, 21 Blu-ray disc 14 C CD burning 17 inserting 14 removing 18, 21 CD drive 12 checking audio functions 7 D device drivers HP drivers 25 Windows drivers 26 digital dual array microphone, identifying 2 drives, optical drive 12 DVD burning 17 changing - HP G61-320US | Multimedia - Windows 7 - Page 32
W webcam adjusting properties 20 tips 20 using 19 webcam light 2 28 Index - HP G61-320US | Multimedia - Windows 7 - Page 33
-
 1
1 -
 2
2 -
 3
3 -
 4
4 -
 5
5 -
 6
6 -
 7
7 -
8
-
9
-
10
-
11
-
12
-
13
-
14
-
15
-
16
-
17
-
18
-
19
-
20
-
21
-
22
-
23
-
24
-
25
-
26
-
27
-
28
-
29
-
30
-
31
-
32
-
33
 |
 |

Multimedia
User Guide