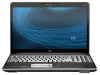
HP HDX X16-1375DX Multimedia - Windows Vista
HP HDX X16-1375DX Manual
 |
View all HP HDX X16-1375DX manuals
Add to My Manuals
Save this manual to your list of manuals |
HP HDX X16-1375DX manual content summary:
- HP HDX X16-1375DX | Multimedia - Windows Vista - Page 1
Multimedia User Guide - HP HDX X16-1375DX | Multimedia - Windows Vista - Page 2
such products and services. Nothing herein should be construed as constituting an additional warranty. HP shall not be liable for technical or editorial errors or omissions contained herein. First Edition: August 2008 Document Part Number: 487230-001 Product notice This user guide describes - HP HDX X16-1375DX | Multimedia - Windows Vista - Page 3
Table of contents 1 Multimedia features Identifying your multimedia components 2 Adjusting the volume ...4 Using the media activity functions ...5 Using the media activity buttons 6 Previous/rewind button 6 Stop button ...6 Play/pause button 6 Next/fast forward button 7 Using the media activity - HP HDX X16-1375DX | Multimedia - Windows Vista - Page 4
6 Webcam Webcam tips ...27 Adjusting webcam properties ...28 7 Troubleshooting The optical disc tray does not DVD playing in Windows Media Player produces no sound or display 33 A device driver must be reinstalled ...34 Obtaining Microsoft device drivers 34 Obtaining HP device drivers 34 Index - HP HDX X16-1375DX | Multimedia - Windows Vista - Page 5
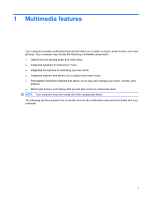
drive for playing audio and video discs ● Integrated speakers for listening to music ● Integrated microphone for recording your own audio ● Integrated webcam that allows you to capture and share video ● Preinstalled multimedia software that allows you to play and manage your music, movies, and - HP HDX X16-1375DX | Multimedia - Windows Vista - Page 6
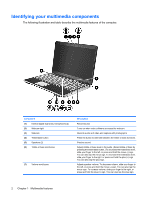
/bass button (5) Speakers (2) (6) Treble or bass scroll zone (7) Volume scroll zone Description Record sound. Turns on when video software accesses the webcam. Records audio and video and captures still photographs. Press the button to alternate between the treble or bass functions. Produce sound - HP HDX X16-1375DX | Multimedia - Windows Vista - Page 7
Component Description (8) TV antenna/cable jack (select models only) Connects a TV antenna or a digital cable device that receives standard or high-definition TV broadcasts. (9) Volume mute button Mutes and restores speaker sound. (10) Audio-out (headphone) jacks (2) Produce sound when - HP HDX X16-1375DX | Multimedia - Windows Vista - Page 8
the treble/bass scroll zone from left to right, or press and hold the treble/bass plus (+) sign (6). You can also tap the plus sign. ● Windows® volume control: a. Click the Volume icon in the notification area, at the far right of the taskbar. b. Increase or decrease the volume by moving the - HP HDX X16-1375DX | Multimedia - Windows Vista - Page 9
c. Under System icons, select the Volume check box. d. Click OK. ● Program volume control: Volume can also be adjusted within some programs. Using the media activity functions The media activity buttons and the media activity hotkeys control the play of an audio CD or a DVD that is inserted into the - HP HDX X16-1375DX | Multimedia - Windows Vista - Page 10
Using the media activity buttons The following illustration and tables describe the functions of the media activity buttons when a disc is inserted in the optical drive. ● Previous/rewind button (1) ● Stop button (2) ● Play/pause button (3) ● Next/fast forward button (4) Previous/rewind button Disc - HP HDX X16-1375DX | Multimedia - Windows Vista - Page 11
Next/fast forward button Disc status Playing Playing Button Next/fast forward button fn + next/fast forward button Function Plays the next track or chapter. Fast forwards the playback. Using the media activity hotkeys A media activity hotkey is a combination of the fn key (1) and a function key - HP HDX X16-1375DX | Multimedia - Windows Vista - Page 12
an Internet connection, play classic oldies, choose from a range of TV shows and channels, and watch the HP-TV channel streamed in full-screen. ● Playlist upload support: ◦ Upload your MediaSmart photo playlists to Internet photo albums, such as Snapfish. ◦ Upload your MediaSmart video playlists - HP HDX X16-1375DX | Multimedia - Windows Vista - Page 13
use. For example, if you want to use Windows Media Player to play an audio CD, click Windows Media Player. NOTE: Some programs may be located the optical drive. 2. When the installation wizard opens, follow the on-screen instructions. 3. Restart the computer if you are prompted to do so. NOTE: For - HP HDX X16-1375DX | Multimedia - Windows Vista - Page 14
. (Cable connectors are normally color-coded to match the corresponding jacks on the computer.) ● Be sure to install any drivers required by the external device. NOTE: A driver is a required program that acts like a translator between the device and the programs that use the device. 10 Chapter - HP HDX X16-1375DX | Multimedia - Windows Vista - Page 15
check the system sound on your computer, follow these steps: 1. Select Start > Control Panel. 2. Click Hardware and Sound. 3. Click Sound. 4. When the Sound window opens, click the Sounds tab. Under Program, select any sound event, such as a beep or alarm, and click the Test button. You should hear - HP HDX X16-1375DX | Multimedia - Windows Vista - Page 16
4 Video Your computer enables you to use a variety of video features: ● Watch movies ● Play games over the Internet ● Edit pictures and video and create presentations ● Connect external video devices ● Watch TV, including high-definition TV (select models only) 12 Chapter 4 Video - HP HDX X16-1375DX | Multimedia - Windows Vista - Page 17
Connecting an external monitor or projector The external monitor port connects an external display device such as an external monitor or a projector to the computer. ▲ To connect a display device, connect the device cable to the external monitor port. NOTE: If a properly connected external display - HP HDX X16-1375DX | Multimedia - Windows Vista - Page 18
display or any other supported external display. To connect a video or audio device to the HDMI port: 1. Connect one end of the HDMI cable to the HDMI port on the computer. 2. Connect the other end of the cable to the video device, according to the device manufacturer's instructions. 3. Press fn+f4 - HP HDX X16-1375DX | Multimedia - Windows Vista - Page 19
computer. You may be prompted for your permission or password for tasks such as installing software, running utilities, or changing Windows settings. Refer to Help and Support for more information. 3. Click the plus sign (+) next to Display adapters. Setting HDMI as the default audio playback device - HP HDX X16-1375DX | Multimedia - Windows Vista - Page 20
tuner according to the instructions provided in the printed Notebook Essentials guide included with the computer or in the user guide included with your optional require additional hardware or services, such as a high-speed Internet connection. The MediaSmart TV mode supports the following options: - HP HDX X16-1375DX | Multimedia - Windows Vista - Page 21
to view, and then press the OK button. The recorded program begins to play in the preview window. 4. To watch in full-screen format, press the right arrow to move the cursor to the preview window and then press the OK button. For more information on using MediaSmart, select to Start > Help - HP HDX X16-1375DX | Multimedia - Windows Vista - Page 22
-layer DVD drives and players. ● Blu-ray Disc (BD) R/RE SuperMulti Drive ● Blu-ray Disc (BD) ROM Drive with SuperMulti DVD±R/RW Double Layer (DL) support ● Blu-ray Disc (BD) ROM Drive with LightScribe/SuperMulti DVD±R/RW Double Layer (DL - HP HDX X16-1375DX | Multimedia - Windows Vista - Page 23
ray Disc (BD) drive, it can also read BDs. NOTE: Some of the optical drives listed may not be supported by your computer. The listed drives are not necessarily all of the supported optical drives. Some optical drives can also write to optical discs as described in the following table. Optical drive - HP HDX X16-1375DX | Multimedia - Windows Vista - Page 24
Playing a CD, DVD, or BD 1. Turn on the computer. 2. Press the release button (1) on the drive bezel to release the disc tray. 3. Pull out the tray (2). 4. Hold the disc by the edges to avoid touching the flat surfaces and position the disc label-side up over the tray spindle. NOTE: If the tray is - HP HDX X16-1375DX | Multimedia - Windows Vista - Page 25
, and then select one of the available options for each media type listed. 4. Click Save. NOTE: For more information about AutoPlay, refer to Help and Support. Configuring AutoPlay 21 - HP HDX X16-1375DX | Multimedia - Windows Vista - Page 26
fifth time becomes the permanent region setting on the DVD drive. The number of region changes remaining is displayed on the DVD Region tab. tasks such as installing software, running utilities, or changing Windows settings. Refer to Help and Support for more information. 3. Click the plus sign (+) - HP HDX X16-1375DX | Multimedia - Windows Vista - Page 27
to a disc. The write process is sensitive to vibration. NOTE: For details about using software included with the computer, refer to the software manufacturer's instructions, which may be provided with the software, on disc, or on the manufacturer's Web site. Observing the copyright warning 23 - HP HDX X16-1375DX | Multimedia - Windows Vista - Page 28
optical drive, you can use software such as Windows Media Player or CyberLink Power2Go to burn data and support all DVD formats. Refer to the user guide that came with your DVD player for a list of supported specific instructions, refer to the software manufacturer's instructions. These instructions - HP HDX X16-1375DX | Multimedia - Windows Vista - Page 29
Removing an optical disc (CD, DVD, or BD) 1. Press the release button (1) on the drive bezel to release the disc tray, and then gently pull out the tray (2) until it stops. 2. Remove the disc (3) from the tray by gently pressing down on the spindle while lifting the outer edges of the disc. Hold the - HP HDX X16-1375DX | Multimedia - Windows Vista - Page 30
shots in rapid succession. ● Connect-E-mail photos and video using the icon on the software interface. NOTE: For details about using webcam software, refer to the software manufacturer's instructions, which may be provided with the software, on disc, or on the manufacturer's Web site. 26 Chapter - HP HDX X16-1375DX | Multimedia - Windows Vista - Page 31
● The webcam may not work properly across some network firewalls. NOTE: If you are having trouble viewing or problem, reconfigure the firewall as necessary, and adjust the policies and settings of other intrusion detection systems. ● Whenever possible, place bright light sources behind the webcam - HP HDX X16-1375DX | Multimedia - Windows Vista - Page 32
properties You can adjust webcam properties using the Properties dialog box, which is accessible from various programs that use the integrated light would otherwise be obscured by blooming or silhouetting. For information about using the webcam, select Start > Help and Support. 28 Chapter - HP HDX X16-1375DX | Multimedia - Windows Vista - Page 33
7 Troubleshooting The following sections describe several common issues and resolutions. The optical disc tray does not open for removal of a CD, DVD, or BD 1. Insert the - HP HDX X16-1375DX | Multimedia - Windows Vista - Page 34
. ● Scan for hardware changes. Windows scans your system for installed hardware and installs any required drivers. ● Click Properties to see if the device is working properly: ◦ Click Troubleshoot to fix problems. ◦ Click the Driver tab to update, disable, or uninstall drivers for this device. NOTE - HP HDX X16-1375DX | Multimedia - Windows Vista - Page 35
is displayed, click No. After you click No, the computer may behave in either of the following ways: ◦ Playback may resume. - or - ◦ The playback window in the multimedia program may close. To return to playing the disc, click the Play button in your multimedia program to restart the disc. In - HP HDX X16-1375DX | Multimedia - Windows Vista - Page 36
, and then select Personalize > Display Settings. 2. Set Colors to Medium (16 bit). ◦ Disconnect external devices, such as a printer, scanner, camera, or handheld device. 32 Chapter 7 Troubleshooting - HP HDX X16-1375DX | Multimedia - Windows Vista - Page 37
information about a multimedia question not covered in this guide, select to Start > Help and Support. The process of burning a disc does not Reinstall the disc-burning device driver located in the DVD/CD-ROM drives category in Device Manager. A DVD playing in Windows Media Player produces no sound - HP HDX X16-1375DX | Multimedia - Windows Vista - Page 38
and select a time for Microsoft Update to check for updates to the Windows operating system and other Microsoft products. 6. If prompted to do so, restart your computer. Obtaining HP device drivers Follow either of the following procedures to obtain HP device drivers. 34 Chapter 7 Troubleshooting - HP HDX X16-1375DX | Multimedia - Windows Vista - Page 39
browser, and go to http://www.hp.com/support. 2. Select your country or region. 3. Click the option for software and driver downloads, and then type your computer model number in the product box. 4. Press enter, and then follow the on-screen instructions. A device driver must be reinstalled 35 - HP HDX X16-1375DX | Multimedia - Windows Vista - Page 40
11 configuring HDMI 14 copyright warning 23 D device drivers HP drivers 34 Microsoft drivers 34 digital dual array microphones, identifying 2 drives, S software installing 9 MediaSmart 8 multimedia 9 Windows Media Player 9 speakers 2 T tips, webcam 27 treble button 2 treble scroll zone 2 36 Index - HP HDX X16-1375DX | Multimedia - Windows Vista - Page 41
troubleshooting device driver 34 disc burning 33 disc play 31, 32 DVD movie play 32 external display 33 HP device drivers 34 Microsoft drivers 34 optical disc tray 29 optical drive detection 30 TV antenna/cable jack, identifying 3 TV, watching 16 V video, using 12 volume mute button 4 volume scroll - HP HDX X16-1375DX | Multimedia - Windows Vista - Page 42
-
 1
1 -
 2
2 -
 3
3 -
 4
4 -
 5
5 -
 6
6 -
 7
7 -
8
-
9
-
10
-
11
-
12
-
13
-
14
-
15
-
16
-
17
-
18
-
19
-
20
-
21
-
22
-
23
-
24
-
25
-
26
-
27
-
28
-
29
-
30
-
31
-
32
-
33
-
34
-
35
-
36
-
37
-
38
-
39
-
40
-
41
-
42
 |
 |

Multimedia
User Guide