HP HDX X18-1200 External Devices - Windows Vista
HP HDX X18-1200 - Premium Notebook PC Manual
 |
View all HP HDX X18-1200 manuals
Add to My Manuals
Save this manual to your list of manuals |
HP HDX X18-1200 manual content summary:
- HP HDX X18-1200 | External Devices - Windows Vista - Page 1
External Devices User Guide - HP HDX X18-1200 | External Devices - Windows Vista - Page 2
products and services. Nothing herein should be construed as constituting an additional warranty. HP shall not be liable for technical or editorial errors or omissions contained herein. First Edition: August 2008 Document Part Number: 487228-001 Product notice This user guide describes features - HP HDX X18-1200 | External Devices - Windows Vista - Page 3
Table of contents 1 Using a USB device Connecting a USB device ...2 Stopping and removing a USB device 2 2 Using an eSATA device Connecting an eSATA device ...3 Stopping and removing an eSATA device 4 3 Using a 1394 device Connecting a 1394 device ...6 Stopping and removing a 1394 device 6 4 - HP HDX X18-1200 | External Devices - Windows Vista - Page 4
iv - HP HDX X18-1200 | External Devices - Windows Vista - Page 5
is usually included with the device. For more information about device-specific software, refer to the manufacturer's instructions. Depending on the model, the computer may have up to 3 USB ports, which support USB 1.0, USB 1.1, and USB 2.0 devices. To add more USB ports, connect an optional hub or - HP HDX X18-1200 | External Devices - Windows Vista - Page 6
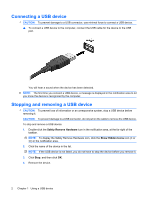
Connecting a USB device CAUTION: To prevent damage to a USB connector, use minimal force to connect a USB device. ▲ To connect a USB device to the computer, connect the USB cable for the device to the USB port. You will hear a sound when the device has been detected. NOTE: The first time you connect - HP HDX X18-1200 | External Devices - Windows Vista - Page 7
software, which is usually included with the device. For more information about device-specific software, refer to the manufacturer's instructions. NOTE: The eSATA port also supports an optional USB device. Connecting an eSATA device CAUTION: To prevent damage to an eSATA port connector, use minimal - HP HDX X18-1200 | External Devices - Windows Vista - Page 8
Stopping and removing an eSATA device CAUTION: To prevent loss of information or an unresponsive system, stop the eSATA device before removing it. CAUTION: To prevent damage to an eSATA connector, do not pull on the cable to remove the eSATA device. 1. Double-click the Safely Remove Hardware icon in - HP HDX X18-1200 | External Devices - Windows Vista - Page 9
data storage device to the computer. Scanners, digital cameras, and digital camcorders often require a 1394 connection. Some 1394 devices may require additional support software, which is usually included with the device. For more information about device-specific software, refer to the manufacturer - HP HDX X18-1200 | External Devices - Windows Vista - Page 10
Connecting a 1394 device CAUTION: To prevent damage to a 1394 port connector, use minimal force when connecting a 1394 device. ▲ To connect a 1394 device to the computer, connect the 1394 cable for the device to the 1394 port. You will hear a sound when the device has been detected. Stopping and - HP HDX X18-1200 | External Devices - Windows Vista - Page 11
4 Using the expansion port The expansion port connects the computer to an optional docking device or expansion product, so that additional ports and connectors can be used with the computer. NOTE: The computer has only one expansion port. The term expansion port 3 describes the type of expansion - HP HDX X18-1200 | External Devices - Windows Vista - Page 12
Index Symbols/Numerics 1394 cable, connecting 6 1394 devices connecting 6 description 5 stopping 6 1394 port 5 C cables 1394 6 eSATA 3 USB 2 E eSATA cable, connecting 3 eSATA devices connecting 3 description 3 removing 4 stopping 4 expansion port 7 H hubs 1 P ports 1394 5 expansion 7 USB 1 U USB - HP HDX X18-1200 | External Devices - Windows Vista - Page 13
-
 1
1 -
 2
2 -
 3
3 -
 4
4 -
 5
5 -
 6
6 -
 7
7 -
8
-
9
-
10
-
11
-
12
-
13
 |
 |

External Devices
User Guide