HP J4550 User Guide - Page 108
Clean the ink cartridges, To align the ink cartridges from the HP Photosmart Studio Software Mac OS - printer troubleshooting
 |
UPC - 883585774142
View all HP J4550 manuals
Add to My Manuals
Save this manual to your list of manuals |
Page 108 highlights
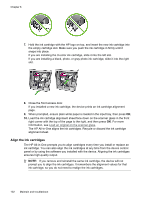
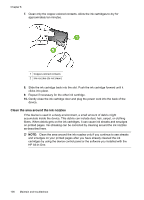
Chapter 8 3. Click the Device Services tab. 4. Click Align the ink Cartridges. The HP All-in-One prints an ink cartridge alignment sheet. 5. Load the ink cartridge alignment sheet face down on the scanner glass in the front right corner with the top of the page to the right, and then press OK. For more information, see Load an original on the scanner glass. The HP All-in-One aligns the ink cartridges. Recycle or discard the ink cartridge alignment sheet. To align the ink cartridges from the HP Photosmart Studio Software (Mac OS) 1. Load letter, A4, or legal unused plain white paper into the input tray. 2. HP Printer Utility (Mac OS): Open the HP Printer Utility. For more information, see HP Printer Utility (Mac OS). Click Align and follow the onscreen instructions. The HP All-in-One prints an ink cartridge alignment sheet. 3. Load the ink cartridge alignment sheet face down on the scanner glass in the front right corner with the top of the page to the right, and then press OK. For more information, see Load an original on the scanner glass. The HP All-in-One aligns the ink cartridges. Recycle or discard the ink cartridge alignment sheet. Clean the ink cartridges Use this feature when there is streaking, white lines through any of the lines of color or when a color is muddy. Do not clean ink cartridges unnecessarily, as this wastes ink and shortens the life of the ink nozzles. To clean the ink cartridges from the device control panel 1. Load letter, A4, or legal unused plain white paper into the input tray. 2. Press Setup. 3. Select Tools, and then select Clean Cartridge. The device prints a page that you can recycle or discard. If copy or print quality still seems poor after you clean the ink cartridges, try cleaning the ink cartridge contacts before replacing the affected ink cartridge. To clean the ink cartridges from the HP Photosmart Software 1. Load letter, A4, or legal unused plain white paper into the input tray. 2. In the HP Solution Center, click Settings, point to Print Settings, and then click Printer Toolbox. NOTE: You can also open the Printer Toolbox from the Print Properties dialog box. In the Print Properties dialog box, click the Services tab, and then click Service this device. The Printer Toolbox appears. 3. Click the Device Services tab. 104 Maintain and troubleshoot
-
 1
1 -
2
-
3
-
4
-
5
-
6
-
7
-
8
-
9
-
10
-
11
-
12
-
13
-
14
-
15
-
16
-
17
-
18
-
19
-
20
-
21
-
22
-
23
-
24
-
25
-
26
-
27
-
28
-
29
-
30
-
31
-
32
-
33
-
34
-
35
-
36
-
37
-
38
-
39
-
40
-
41
-
42
-
43
-
44
-
45
-
46
-
47
-
48
-
49
-
50
-
51
-
52
-
53
-
54
-
55
-
56
-
57
-
58
-
59
-
60
-
61
-
62
-
63
-
64
-
65
-
66
-
67
-
68
-
69
-
70
-
71
-
72
-
73
-
74
-
75
-
76
-
77
-
78
-
79
-
80
-
81
-
82
-
83
-
84
-
85
-
86
-
87
-
88
-
89
-
90
-
91
-
92
-
93
-
94
-
95
-
96
-
97
-
98
-
99
-
100
-
101
-
102
-
 103
103 -
 104
104 -
 105
105 -
 106
106 -
 107
107 -
 108
108 -
 109
109 -
 110
110 -
 111
111 -
 112
112 -
 113
113 -
114
-
115
-
116
-
117
-
118
-
119
-
120
-
121
-
122
-
123
-
124
-
125
-
126
-
127
-
128
-
129
-
130
-
131
-
132
-
133
-
134
-
135
-
136
-
137
-
138
-
139
-
140
-
141
-
142
-
143
-
144
-
145
-
146
-
147
-
148
-
149
-
150
-
151
-
152
-
153
-
154
-
155
-
156
-
157
-
158
-
159
-
160
-
161
-
162
-
163
-
164
-
165
-
166
-
167
-
168
-
169
-
170
-
171
-
172
-
173
-
174
-
175
-
176
-
177
-
178
-
179
-
180
-
181
-
182
 |
 |