HP J4550 User Guide - Page 146
Troubleshoot installation issues, Hardware installation suggestions
 |
UPC - 883585774142
View all HP J4550 manuals
Add to My Manuals
Save this manual to your list of manuals |
Page 146 highlights
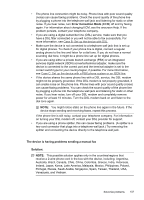
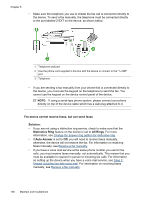
Chapter 8 The computer cannot receive faxes (Fax to PC) Cause: The HP Digital Imaging monitor is turned off. Solution: Check the taskbar and ensure that the HP Digital Imaging monitor is turned on at all times. Cause: The computer selected to receive faxes is turned off. Solution: Make sure the computer selected to receive faxes is switched on at all times. Cause: Different computers are configured for setup and receiving faxes and one of them may be switched off. Solution: If the computer receiving faxes is different from the one used for setup, both computers should be switched on at all times. Cause: Fax to PC is not activated or the computer is not configured to receive faxes. Solution: Activate Fax to PC and make sure the computer is configured to receive faxes. Cause: HP Digital Imaging Monitor is not operating properly. Solution: Restart the HP Digital Imaging Monitor or restart the computer. Troubleshoot installation issues If the following topics do not help, see Support and warranty for information about HP support. • Hardware installation suggestions • Software installation suggestions Hardware installation suggestions Check the device • Make sure that all packing tape and material have been removed from outside and inside the device. • Make sure that the device is loaded with paper. • Make sure that no lights are on or blinking except the Ready light, which should be on. If the Attention light is blinking, check for messages on the device control panel. Check the hardware connections • Make sure that any cords and cables that you are using are in good working order. • Make sure that the power cord is connected securely to both the device and to a working power outlet. • Make sure that the phone cord is connected to the 1-LINE port. 142 Maintain and troubleshoot
-
 1
1 -
2
-
3
-
4
-
5
-
6
-
7
-
8
-
9
-
10
-
11
-
12
-
13
-
14
-
15
-
16
-
17
-
18
-
19
-
20
-
21
-
22
-
23
-
24
-
25
-
26
-
27
-
28
-
29
-
30
-
31
-
32
-
33
-
34
-
35
-
36
-
37
-
38
-
39
-
40
-
41
-
42
-
43
-
44
-
45
-
46
-
47
-
48
-
49
-
50
-
51
-
52
-
53
-
54
-
55
-
56
-
57
-
58
-
59
-
60
-
61
-
62
-
63
-
64
-
65
-
66
-
67
-
68
-
69
-
70
-
71
-
72
-
73
-
74
-
75
-
76
-
77
-
78
-
79
-
80
-
81
-
82
-
83
-
84
-
85
-
86
-
87
-
88
-
89
-
90
-
91
-
92
-
93
-
94
-
95
-
96
-
97
-
98
-
99
-
100
-
101
-
102
-
103
-
104
-
105
-
106
-
107
-
108
-
109
-
110
-
111
-
112
-
113
-
114
-
115
-
116
-
117
-
118
-
119
-
120
-
121
-
122
-
123
-
124
-
125
-
126
-
127
-
128
-
129
-
130
-
131
-
132
-
133
-
134
-
135
-
136
-
137
-
138
-
139
-
140
-
 141
141 -
 142
142 -
 143
143 -
 144
144 -
 145
145 -
 146
146 -
 147
147 -
 148
148 -
 149
149 -
 150
150 -
 151
151 -
152
-
153
-
154
-
155
-
156
-
157
-
158
-
159
-
160
-
161
-
162
-
163
-
164
-
165
-
166
-
167
-
168
-
169
-
170
-
171
-
172
-
173
-
174
-
175
-
176
-
177
-
178
-
179
-
180
-
181
-
182
 |
 |