HP J4550 User Guide - Page 148
Clear jams, Clear paper jams - driver for windows 8
 |
UPC - 883585774142
View all HP J4550 manuals
Add to My Manuals
Save this manual to your list of manuals |
Page 148 highlights
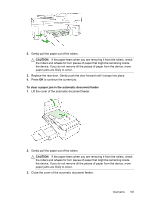
Chapter 8 • In the Windows device manager, make sure that the USB drivers have not been disabled. • If you are using a computer running Windows, and the computer cannot detect the device, run the uninstallation utility (util\ccc\uninstall.bat on the Starter CD) to perform a clean uninstallation of the device driver. Restart your computer, and reinstall the device driver. Check the computer system • Make sure that your computer is running one of the supported operating systems. • Make sure that the computer meets at least the minimum system requirements. Clear jams Occasionally, media becomes jammed during a job. Try the following remedies before you attempt to clear the jam. • Make sure that you are printing with media that meets specifications. For more information, see Understand specifications for supported media. • Make sure that you are printing with media that is not wrinkled, folded, or damaged. • Make sure that the device is clean. For more information, see Clean the device. • Make sure that the trays are loaded correctly and are not too full. For more information, see Load media. This section contains the following topics: • Clear paper jams • Avoid paper jams Clear paper jams If the paper was loaded in the main tray, you might need to clear the paper jam from the rear door. Paper can also jam in the automatic document feeder. Several common actions can cause paper to jam the automatic document feeder: • Placing too much paper in the document feeder tray. For information on the maximum number of sheets allowed in the automatic document feeder, see Load originals. • Using paper that is too thick or too thin for the device. • Trying to add paper to the document feeder tray while the device is feeding pages. To clear a paper jam from the rear door 1. Press in the tab on the left side of the rear door to release the door. Remove the door by pulling it away from the device. CAUTION: Trying to clear a paper jam from the front of the device can damage the print mechanism. Always access and clear paper jams through the rear door. 144 Maintain and troubleshoot
-
 1
1 -
2
-
3
-
4
-
5
-
6
-
7
-
8
-
9
-
10
-
11
-
12
-
13
-
14
-
15
-
16
-
17
-
18
-
19
-
20
-
21
-
22
-
23
-
24
-
25
-
26
-
27
-
28
-
29
-
30
-
31
-
32
-
33
-
34
-
35
-
36
-
37
-
38
-
39
-
40
-
41
-
42
-
43
-
44
-
45
-
46
-
47
-
48
-
49
-
50
-
51
-
52
-
53
-
54
-
55
-
56
-
57
-
58
-
59
-
60
-
61
-
62
-
63
-
64
-
65
-
66
-
67
-
68
-
69
-
70
-
71
-
72
-
73
-
74
-
75
-
76
-
77
-
78
-
79
-
80
-
81
-
82
-
83
-
84
-
85
-
86
-
87
-
88
-
89
-
90
-
91
-
92
-
93
-
94
-
95
-
96
-
97
-
98
-
99
-
100
-
101
-
102
-
103
-
104
-
105
-
106
-
107
-
108
-
109
-
110
-
111
-
112
-
113
-
114
-
115
-
116
-
117
-
118
-
119
-
120
-
121
-
122
-
123
-
124
-
125
-
126
-
127
-
128
-
129
-
130
-
131
-
132
-
133
-
134
-
135
-
136
-
137
-
138
-
139
-
140
-
141
-
142
-
 143
143 -
 144
144 -
 145
145 -
 146
146 -
 147
147 -
 148
148 -
 149
149 -
 150
150 -
 151
151 -
 152
152 -
 153
153 -
154
-
155
-
156
-
157
-
158
-
159
-
160
-
161
-
162
-
163
-
164
-
165
-
166
-
167
-
168
-
169
-
170
-
171
-
172
-
173
-
174
-
175
-
176
-
177
-
178
-
179
-
180
-
181
-
182
 |
 |