HP J4550 User Guide - Page 29
Paper Type/Quality, Print Quality - driver windows 7
 |
UPC - 883585774142
View all HP J4550 manuals
Add to My Manuals
Save this manual to your list of manuals |
Page 29 highlights
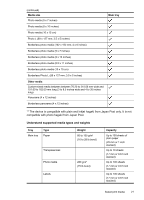
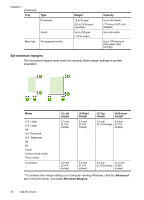
NOTE: Borderless printing is not supported on plain media. To print a borderless document (Windows) 1. Load the appropriate media. For more information, see Load media. 2. Open the file that you want to print. 3. From the application, open the print driver: a. Click File, and then click Print. b. Click Properties or Setup. 4. Click the Paper/Quality tab. 5. Select the media size from the Size is drop-down list. 6. Select the Borderless Printing check box. 7. Select the media source from the Source is drop-down list. 8. Select the media type from the Type is drop-down list. NOTE: Borderless printing is not supported on plain media. 9. If you are printing photos, select Best from the Print Quality drop-down list. Alternatively, select Maximum dpi, which provides up to 4800 x 1200 optimized dpi* for optimum print quality. *Up to 4800 x 1200 optimized dpi for color printing and 1200 input dpi. This setting might temporarily use a large amount of hard disk space (400 MB or more) and will print more slowly. 10. Change any other print settings, and then click OK. 11. Print the document. 12. If you printed on photo media with a tear-off tab, remove the tab to make the document completely borderless. To print a borderless document (Mac OS) 1. Load the appropriate media. For more information, see Load media. 2. Open the file that you want to print. 3. Click File, and then click Page Setup. 4. Verify that the correct printer is selected. 5. Select the borderless media size, and then click OK. 6. Click File, and then click Print. 7. Open the Paper Type/Quality panel. 8. Click the Paper tab, and then select the media type from the Paper type drop- down list. NOTE: Borderless printing is not supported on plain media. 9. If you are printing photos, select Best from the Quality drop-down list. Alternatively, select Maximum dpi, which provides up to 4800 x 1200 optimized dpi*. *Up to 4800 x 1200 optimized dpi for color printing and 1200 input dpi. This setting might temporarily use a large amount of hard disk space (400 MB or more) and will print more slowly. Print borderless 25
-
 1
1 -
2
-
3
-
4
-
5
-
6
-
7
-
8
-
9
-
10
-
11
-
12
-
13
-
14
-
15
-
16
-
17
-
18
-
19
-
20
-
21
-
22
-
23
-
 24
24 -
 25
25 -
 26
26 -
 27
27 -
 28
28 -
 29
29 -
 30
30 -
 31
31 -
 32
32 -
 33
33 -
 34
34 -
35
-
36
-
37
-
38
-
39
-
40
-
41
-
42
-
43
-
44
-
45
-
46
-
47
-
48
-
49
-
50
-
51
-
52
-
53
-
54
-
55
-
56
-
57
-
58
-
59
-
60
-
61
-
62
-
63
-
64
-
65
-
66
-
67
-
68
-
69
-
70
-
71
-
72
-
73
-
74
-
75
-
76
-
77
-
78
-
79
-
80
-
81
-
82
-
83
-
84
-
85
-
86
-
87
-
88
-
89
-
90
-
91
-
92
-
93
-
94
-
95
-
96
-
97
-
98
-
99
-
100
-
101
-
102
-
103
-
104
-
105
-
106
-
107
-
108
-
109
-
110
-
111
-
112
-
113
-
114
-
115
-
116
-
117
-
118
-
119
-
120
-
121
-
122
-
123
-
124
-
125
-
126
-
127
-
128
-
129
-
130
-
131
-
132
-
133
-
134
-
135
-
136
-
137
-
138
-
139
-
140
-
141
-
142
-
143
-
144
-
145
-
146
-
147
-
148
-
149
-
150
-
151
-
152
-
153
-
154
-
155
-
156
-
157
-
158
-
159
-
160
-
161
-
162
-
163
-
164
-
165
-
166
-
167
-
168
-
169
-
170
-
171
-
172
-
173
-
174
-
175
-
176
-
177
-
178
-
179
-
180
-
181
-
182
 |
 |