HP J4550 User Guide - Page 30
Set up speed-dial entries, Set up fax numbers as speed-dial entries or groups - solution center
 |
UPC - 883585774142
View all HP J4550 manuals
Add to My Manuals
Save this manual to your list of manuals |
Page 30 highlights
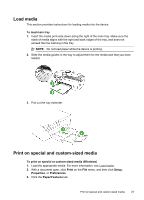
Chapter 2 10. Select the media source. If you are printing on thick or photo media, select the manual feed option. 11. Change any other print settings, and then click Print. 12. If you printed on photo media with a tear-off tab, remove the tab to make the document completely borderless. Set up speed-dial entries You can set up frequently used fax numbers as speed-dial entries. This lets you dial those numbers quickly by using the device control panel. • Set up fax numbers as speed-dial entries or groups • Print and view a list of speed-dial entries Set up fax numbers as speed-dial entries or groups You can store fax numbers or groups of fax numbers as speed-dial entries. For information about printing a list of the speed-dial entries that are set up, see Print and view a list of speed-dial entries. • Set up speed-dial entries • Set up a speed-dial group Set up speed-dial entries • HP Solution Center (Windows): Open the HP Solution Center and follow the instructions in the onscreen Help. • HP Device Manager (Mac OS): Launch HP Device Manager, click Information and Settings, and then select Fax Speed Dial Settings from the drop-down list. • Device control panel: Press Setup, select the Speed Dial option, and then press OK. ◦ To add or change an entry: Select New Speed Dial or Group Speed Dial, and then press the arrow keys to move to an unused entry number, or type a number on the keypad. Type the fax number, and then press OK. Include any pauses or other required numbers, such as an area code, an access code for numbers outside a PBX system (usually a 9 or 0), or a long-distance prefix. Type the name, and then press OK. ◦ To delete one entry or all entries: Select Delete Speed Dial, press the arrow keys to highlight the speed-dial entry that you want to delete, and then press OK. Set up a speed-dial group If you send information to the same group of fax numbers on a regular basis, you can set up a speed-dial entry for a group in order to simplify the task. The speed-dial entry for a group can be associated with a speed-dial button on the device control panel. 26 Use the device
-
 1
1 -
2
-
3
-
4
-
5
-
6
-
7
-
8
-
9
-
10
-
11
-
12
-
13
-
14
-
15
-
16
-
17
-
18
-
19
-
20
-
21
-
22
-
23
-
24
-
 25
25 -
 26
26 -
 27
27 -
 28
28 -
 29
29 -
 30
30 -
 31
31 -
 32
32 -
 33
33 -
 34
34 -
 35
35 -
36
-
37
-
38
-
39
-
40
-
41
-
42
-
43
-
44
-
45
-
46
-
47
-
48
-
49
-
50
-
51
-
52
-
53
-
54
-
55
-
56
-
57
-
58
-
59
-
60
-
61
-
62
-
63
-
64
-
65
-
66
-
67
-
68
-
69
-
70
-
71
-
72
-
73
-
74
-
75
-
76
-
77
-
78
-
79
-
80
-
81
-
82
-
83
-
84
-
85
-
86
-
87
-
88
-
89
-
90
-
91
-
92
-
93
-
94
-
95
-
96
-
97
-
98
-
99
-
100
-
101
-
102
-
103
-
104
-
105
-
106
-
107
-
108
-
109
-
110
-
111
-
112
-
113
-
114
-
115
-
116
-
117
-
118
-
119
-
120
-
121
-
122
-
123
-
124
-
125
-
126
-
127
-
128
-
129
-
130
-
131
-
132
-
133
-
134
-
135
-
136
-
137
-
138
-
139
-
140
-
141
-
142
-
143
-
144
-
145
-
146
-
147
-
148
-
149
-
150
-
151
-
152
-
153
-
154
-
155
-
156
-
157
-
158
-
159
-
160
-
161
-
162
-
163
-
164
-
165
-
166
-
167
-
168
-
169
-
170
-
171
-
172
-
173
-
174
-
175
-
176
-
177
-
178
-
179
-
180
-
181
-
182
 |
 |
