HP J4550 User Guide - Page 71
Set up faxing for the device, Print Configuration - printer cartridges
 |
UPC - 883585774142
View all HP J4550 manuals
Add to My Manuals
Save this manual to your list of manuals |
Page 71 highlights
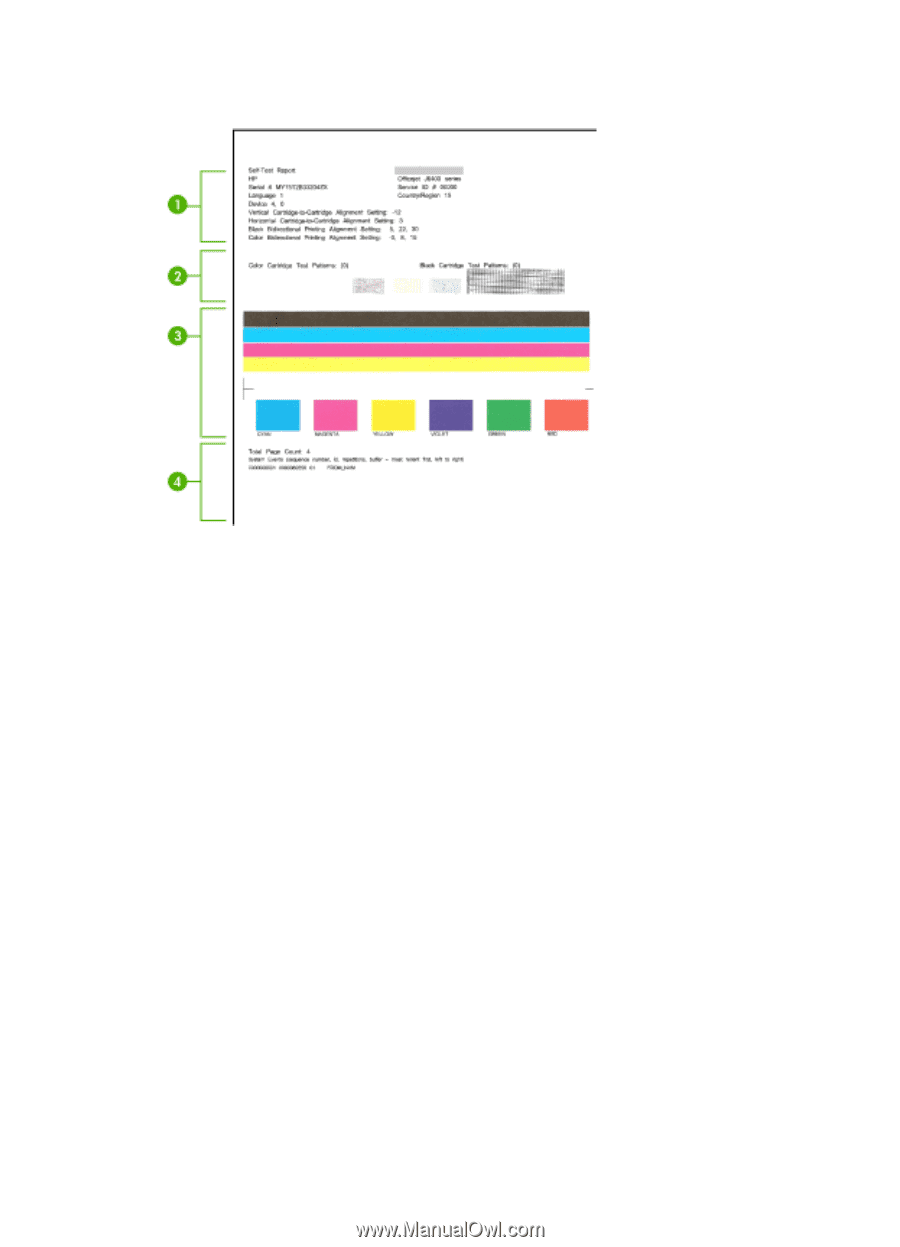
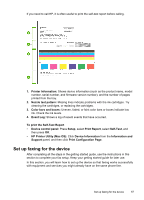
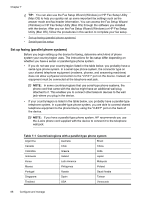
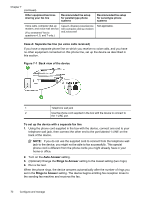
If you need to call HP, it is often useful to print the self-test report before calling. 1. Printer Information: Shows device information (such as the product name, model number, serial number, and firmware version number), and the number of pages printed from the tray. 2. Nozzle test pattern: Missing lines indicate problems with the ink cartridges. Try cleaning the cartridges, or replacing the cartridges. 3. Color bars and boxes: Uneven, faded, or faint color bars or boxes indicate low ink. Check the ink levels. 4. Event Log: Shows a log of recent events that have occurred. To print the Self-Test Report • Device control panel: Press Setup, select Print Report, select Self-Test, and then press OK. • HP Printer Utility (Mac OS): Click Device Information from the Information and Support panel, and then click Print Configuration Page. Set up faxing for the device After completing all the steps in the getting started guide, use the instructions in this section to complete your fax setup. Keep your getting started guide for later use. In this section, you will learn how to set up the device so that faxing works successfully with equipment and services you might already have on the same phone line. Set up faxing for the device 67
-
 1
1 -
2
-
3
-
4
-
5
-
6
-
7
-
8
-
9
-
10
-
11
-
12
-
13
-
14
-
15
-
16
-
17
-
18
-
19
-
20
-
21
-
22
-
23
-
24
-
25
-
26
-
27
-
28
-
29
-
30
-
31
-
32
-
33
-
34
-
35
-
36
-
37
-
38
-
39
-
40
-
41
-
42
-
43
-
44
-
45
-
46
-
47
-
48
-
49
-
50
-
51
-
52
-
53
-
54
-
55
-
56
-
57
-
58
-
59
-
60
-
61
-
62
-
63
-
64
-
65
-
 66
66 -
 67
67 -
 68
68 -
 69
69 -
 70
70 -
 71
71 -
 72
72 -
 73
73 -
 74
74 -
 75
75 -
 76
76 -
77
-
78
-
79
-
80
-
81
-
82
-
83
-
84
-
85
-
86
-
87
-
88
-
89
-
90
-
91
-
92
-
93
-
94
-
95
-
96
-
97
-
98
-
99
-
100
-
101
-
102
-
103
-
104
-
105
-
106
-
107
-
108
-
109
-
110
-
111
-
112
-
113
-
114
-
115
-
116
-
117
-
118
-
119
-
120
-
121
-
122
-
123
-
124
-
125
-
126
-
127
-
128
-
129
-
130
-
131
-
132
-
133
-
134
-
135
-
136
-
137
-
138
-
139
-
140
-
141
-
142
-
143
-
144
-
145
-
146
-
147
-
148
-
149
-
150
-
151
-
152
-
153
-
154
-
155
-
156
-
157
-
158
-
159
-
160
-
161
-
162
-
163
-
164
-
165
-
166
-
167
-
168
-
169
-
170
-
171
-
172
-
173
-
174
-
175
-
176
-
177
-
178
-
179
-
180
-
181
-
182
 |
 |