HP L1950g User Guide
HP L1950g - 19" LCD Monitor Manual
 |
UPC - 884420137160
View all HP L1950g manuals
Add to My Manuals
Save this manual to your list of manuals |
HP L1950g manual content summary:
- HP L1950g | User Guide - Page 1
HP L1750, L1950/L1950g, L1710, L1910, L1908w, L1908wm, L1945w, L1945wv, L2208w, L2245w/L2245wg, and L2445w LCD Monitors User Guide - HP L1950g | User Guide - Page 2
implied warranties of merchantability and fitness for a particular purpose, and is subject to change without notice. The warranties for Hewlett-Packard products are set forth in the express limited warranty statements accompanying such products. Nothing herein should be construed as constituting an - HP L1950g | User Guide - Page 3
About This Guide This guide provides information on setting up the monitor, installing drivers, using the on-screen display menu, troubleshooting and technical specifications. WARNING! Text set off in this manner indicates that failure to follow directions could result in bodily harm or loss of life - HP L1950g | User Guide - Page 4
iv About This Guide - HP L1950g | User Guide - Page 5
HP LCD Monitors ...1 2 Safety and Maintenance Guidelines Important Safety Information ...3 Maintenance Guidelines ...4 Cleaning the Monitor ...4 Shipping the Monitor ...4 3 Setting Up the Monitor Unfolding the Double-Hinged Monitor Pedestal Base 5 Unfolding the Single-Hinged Monitor Pedestal Base - HP L1950g | User Guide - Page 6
34 Installing the sRGB ICM File for Microsoft Windows Vista 34 Appendix A Troubleshooting Solving Common Problems ...35 Using the Worldwide Web ...37 Preparing to Call Technical Support 37 Appendix B Technical Specifications L1750 Model ...38 L1950/L1950g Model ...39 L1710 Model ...40 L1910 Model - HP L1950g | User Guide - Page 7
Power Cord Requirements 55 Product Environmental Notices ...56 Energy Star Compliance ...56 Materials Disposal ...56 Disposal of Waste Equipment by Users in Private Household in the European Union ...56 Chemical Substances ...57 Restriction of Hazardous Substances (RoHS 57 Appendix D LCD Monitor - HP L1950g | User Guide - Page 8
viii - HP L1950g | User Guide - Page 9
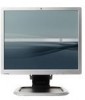
matrix, thin-film transistor (TFT) panel. The monitor models and features include: ● L1750 model, 43.2 cm (17-inch) diagonal viewable area display with 1280 × 1024 resolution, plus full-screen support for lower resolutions ● L1950/L1950g model, 48.3 cm (19-inch) diagonal viewable area display with - HP L1950g | User Guide - Page 10
languages for easy setup and screen optimization ● HP Display Assistant for adjusting monitor settings ● Software and documentation CD that includes software, monitor drivers, and product documentation ● Energy saver feature to meet requirements for reduced power consumption ● Intelligent Management - HP L1950g | User Guide - Page 11
and mechanical safety information. This guide is located on the Web at http://www.hp.com/ergo and/or on the documentation CD, if one is included with the monitor. CAUTION: For the protection of the monitor, as well as the computer, connect all power cords for the computer and its peripheral devices - HP L1950g | User Guide - Page 12
controls that are covered in the operating instructions. If the monitor is not operating properly or has been dropped or damaged, contact an authorized HP dealer, reseller, or service provider. ● Use only a power source and connection appropriate for this monitor, as indicated on the label/ back - HP L1950g | User Guide - Page 13
3 Setting Up the Monitor To set up the monitor, ensure that the power is turned off to the monitor, computer system, and other attached devices, then follow the instructions below. Unfolding the Double-Hinged Monitor Pedestal Base NOTE: The monitor is shipped with the base attached in a folded-flat - HP L1950g | User Guide - Page 14
hand. CAUTION: Do not touch the surface of the LCD panel. Pressure on the panel may cause nonuniformity of color or disorientation of the liquid crystals. If this occurs the screen will not recover to its normal condition. Figure 3-3 Unfolding the Monitor Pedestal Base 6 Chapter 3 Setting Up the - HP L1950g | User Guide - Page 15
Function AC Power Connector Connects the AC power cord to the monitor. Audio In (select models) Connects the audio cable to the monitor's internal to the monitor. USB Upstream Connector (select models) Connects the USB hub cable to the monitor's USB hub connector and to a host USB port/hub. - HP L1950g | User Guide - Page 16
Connector Connects the USB hub cable to the monitor's USB hub connector and to a host USB port/hub. USB Downstream Connectors (2) Connects optional USB devices to the monitor (2 additional downstream USB connectors are on the left side of the monitor's front panel). 8 Chapter 3 Setting Up the - HP L1950g | User Guide - Page 17
stand. Figure 3-6 Using the Cable Management Feature (Single-Hinged Base) After connecting the cables to monitor models with a double-hinged base, place the cables through the cable management channels on the sides of the monitor base. Figure 3-7 Using the Cable Management Feature (Double-Hinged - HP L1950g | User Guide - Page 18
on the front panel or through the On-Screen Display (OSD) feature by pressing the Menu button. ● For analog operation, use the VGA signal cable provided. Connect the VGA signal cable to the VGA connector on the rear of the monitor and the other end to the VGA connector on the computer. ● For digital - HP L1950g | User Guide - Page 19
USB hub connector on the rear panel of the computer, and the other end to the upstream USB connector on the monitor. Figure 3-9 Connecting the USB Cable Disconnect power from the equipment by unplugging the power cord from the electrical outlet. For your safety, do not place anything on power cords - HP L1950g | User Guide - Page 20
other end to an electrical wall outlet. Figure 3-10 Connecting the Power Cable Adjusting the Monitor NOTE: Your monitor model may look different than the model in the following illustrations. 1. Tilt the monitor's panel forward or backward to set it to a comfortable eye level. Figure 3-11 Tilting - HP L1950g | User Guide - Page 21
Swivel the monitor to the left or right for the best viewing angle (select models). Figure 3-12 Swiveling the Monitor 3. Adjust the monitor's height so that it is parallel to your eye height for a comfortable viewing position (select models). Figure 3-13 Adjusting the Height Adjusting the Monitor 13 - HP L1950g | User Guide - Page 22
occur on all LCD screens. * A prolonged period of time is 12 consecutive hours of non-use. NOTE: If pressing the power button has no effect, the Power Button Lockout feature may be enabled. To disable this feature, press and hold the monitor power button for 10 seconds. 14 Chapter 3 Setting Up the - HP L1950g | User Guide - Page 23
include two additional USB connectors on the side panel of the monitor. NOTE: You must connect the USB hub cable from the monitor to the computer to enable the USB 2.0 ports on the monitor. Refer to Step 4 in Connecting the Cables on page 10. Figure 3-15 Connecting USB Devices Using the Accessory - HP L1950g | User Guide - Page 24
power cables from the back of the monitor. 2. Lay the monitor face down on a flat surface. 3. Remove the screws on the back of the monitor that connect the monitor panel with the pedestal base. a. On the double-hinged base, there are four screws that connect the monitor panel to the pedestal base - HP L1950g | User Guide - Page 25
compliant with the VESA standard and is rated to support the weight of the monitor display panel. For best performance, it is important to use the power and video cables provided with the monitor. 2. Set the monitor panel down on a flat, soft, protected surface. Removing the Monitor Pedestal Base 17 - HP L1950g | User Guide - Page 26
of the monitor. Figure 3-19 Mounting the HP Quick Release 4. Insert four 10mm screws into the mounting holes and tighten. NOTE: Depending on your model, use the screws that were removed from the back of the monitor that connected the monitor panel with the pedestal base, or use the four M4 x 10 mm - HP L1950g | User Guide - Page 27
the HP Quick Release, and then press down firmly on the monitor to lock it in place. When the HP Quick Release locks, it will make a clicking sound. Figure 3-21 Inserting the Monitor Panel into the HP Quick Release 7. Reconnect the cables to the monitor panel. Removing the Monitor Pedestal Base 19 - HP L1950g | User Guide - Page 28
the Rating Labels The rating labels on the monitor provide the spare part number, product number, and serial number. You may need these numbers when contacting HP about the monitor model. The rating labels are located on the rear panel of the monitor display head. Figure 3-22 Locating the Rating - HP L1950g | User Guide - Page 29
can be downloaded from the HP monitors support Web site. See Downloading from the Worldwide Web on page 22 in this chapter. The Information File The .INF file defines monitor resources used by Microsoft Windows operating systems to ensure monitor compatibility with the computer's graphics adapter - HP L1950g | User Guide - Page 30
CD in the computer CD-ROM drive. The CD menu is displayed. 2. View the Monitor Driver Software Readme file. 3. Select Install Monitor Driver Software. 4. Follow the on-screen instructions. 5. Ensure that the proper resolution and refresh rates appear in the Windows Display control panel. NOTE: You - HP L1950g | User Guide - Page 31
to warm up for 20 minutes before adjusting. 2. Press the -/Auto button on the monitor front panel. ● You can also press the Menu button, then select Image Control from the OSD Main Menu. Refer to Adjusting the Monitor Settings on page 25 in this chapter. ● If the result is not satisfactory, continue - HP L1950g | User Guide - Page 32
menu and increases adjustment levels. ● When the OSD menu is inactive, an Input button chooses the video input signal input, VGA or DVI (select models have input select function). Green = Fully powered. Amber = Sleep mode. Flashing Amber = Sleep Timer mode. Turns the monitor on or off. 24 Chapter - HP L1950g | User Guide - Page 33
Use the On-Screen Display (OSD) to adjust the screen image based on your viewing preferences. To access the OSD, do the following: 1. If the monitor is not already on, press the Power button to turn on the monitor. 2. To access the OSD Menu, press the Menu button on the monitor's front panel. 3. To - HP L1950g | User Guide - Page 34
to the OSD Main Menu screen. This Save and Return option is only active if you change a menu item. Table 4-2 OSD Menu Icon Main is smaller in size than the monitor's capability and centers the image on the screen in the active viewing area Sharpness (select models) Adjusts the screen image to - HP L1950g | User Guide - Page 35
is On. Restores power to the monitor following an unexpected removal of power. Select: ● On ● Off The factory default is On. Displays the resolution, refresh rate and frequency information on the screen each time the OSD Main Menu is accessed. Select: ● On ● Off Adjusting the Monitor Settings 27 - HP L1950g | User Guide - Page 36
Off The factory default is Top. Allows the computer to control some OSD menu features such as brightness, contrast and color temperature. Set to: ● On ● Off The factory default is On. Turns off the power LED on the front panel of the monitor. The factory default is On. Provides the timer adjustment - HP L1950g | User Guide - Page 37
firmware version of the monitor. Backlight Hours Reports the total hours of backlight operation. Service Support: http:// www.hp.com/support Returns all OSD menu settings and DDC/CI controls to the factory default settings, except the Language. Exits the OSD menu screen. Adjusting the Monitor - HP L1950g | User Guide - Page 38
on the monitor's front panel buttons and On-Screen Display (OSD) menu. ● Defined preset display settings for each individual user in a multi-user environment. ● Multiple preset display settings for a single user based on content and ambient lighting. ● Asset Management and Power Management - HP L1950g | User Guide - Page 39
active. ● Monitor Going to Sleep-Indicates the screen display is entering a sleep mode. ● Check Video Cable-Indicates the video cable is not properly connected to the computer. ● OSD Lockout-The OSD can be enabled or disabled by pressing and holding the Menu button on the front panel for 10 seconds - HP L1950g | User Guide - Page 40
also extends the life of the backlight bulbs in the monitor. The Sleep Timer has five settings: ● Set Current Time ● Set Sleep Time ● Set On Time ● Timer: On/Off ● Sleep Now To set the timer: 1. Press the Menu button on the monitor front panel to display the OSD Menu. 2. Scroll down and highlight - HP L1950g | User Guide - Page 41
protect the LCD panel against image retention. Image retention can occur when the monitor is left on while displaying the same image for an extended period of time, leaving a shadow of the image on the screen. Installing the HP Display LiteSaver Software 1. Insert the CD in the computer CD-ROM - HP L1950g | User Guide - Page 42
the Color Temperature 1. Press the Menu button on the front panel of the monitor to launch the Main Menu of the OSD. 2. Select Color. 3. Select sRGB. 4. Select Save and Return to exit the menu. Installing the sRGB ICM File for Microsoft Windows 2000 and Windows XP NOTE: To complete the following - HP L1950g | User Guide - Page 43
Screen is blank. Power cord is disconnected. Connect the power cord. Power button on front panel of the monitor is turned off. Press the front panel power button. NOTE: If pressing the power button has no effect, press and hold the power button for 10 seconds to disable the power button lockout - HP L1950g | User Guide - Page 44
turn off, then the computer graphics driver is not compatible with the HP Display LiteSaver software. The monitor is off but it did not seem to The monitor's power saving enter into a low-power sleep mode. control is disabled. Check the monitor's OSD menu setting for power saving enable/disable - HP L1950g | User Guide - Page 45
, online assistance, community forums of IT experts, broad mutlivendor knowledge base, monitoring and diagnostic tools, go to http://www.hp.com/support Preparing to Call Technical Support If you cannot solve a problem using the trouble shooting tips in this section, you may need to call technical - HP L1950g | User Guide - Page 46
HP's base) Height Depth Width Maximum Graphic Resolution Optimum Graphic Resolution Text Mode Dot Pitch Horizontal Frequency Vertical Refresh Rate Environmental Requirements Temperature Operating Temperature Storage Temperature 43.2 cm TFT LCD 43.2 cm diagonal -5 to 35° -45 to 45° 6.8 kg 17 inches - HP L1950g | User Guide - Page 47
12192 m 0 to 40,000 feet Power Consumption (maximum) - HP L1950g | User Guide - Page 48
Table B-2 L1950/L1950g Specifications (continued) Power Source 100 - 240 VAC, 50/60 Hz Altitude: Operating 0 to 3657.6 m 0 to 12,000 feet Storage 0 to 12192 m 0 to 40,000 feet Power Consumption (maximum) - HP L1950g | User Guide - Page 49
Storage Power Consumption (maximum) Input Terminal 48.3 cm TFT LCD 48.3 cm diagonal -5 to 25° 4.9 kg 41.6 cm 19.2 cm 41.4 cm 1280 × 1024 (75 Hz) analog input 1280 x 1024 (60Hz) analog input 720 × 400 0.294 (H) × 0.294 (W) mm 24 to 83 kHz 50 to 77 Hz 19 inches 19-inch diagonal 10.8 lbs. 16.4 inches - HP L1950g | User Guide - Page 50
Storage Power Consumption (maximum) Input Terminal 48.3 cm wide screen TFT LCD 48.3 cm diagonal -5 to 25° 5.1 kg 37.0 cm 18.7 cm 44.6 cm 1440 x 900 (75 Hz) analog input 1440 x 900 (60Hz) analog input 720 × 400 0.2835 (H) × 0.2835 (W) mm 24 to 83 kHz 50 to 76 Hz 19 inches wide screen 19-inch - HP L1950g | User Guide - Page 51
Storage Power Consumption (maximum) Audio Input Terminal 48.3 cm wide screen TFT LCD 48.3 cm diagonal -5 to 25° 5.1 kg 37.0 cm 18.7 cm 44.6 cm 1440 x 900 (75 Hz) analog input 1440 x 900 (60Hz) analog input 720 × 400 0.2835 (H) × 0.2835 (W) mm 24 to 83 kHz 50 to 76 Hz 19 inches wide screen 19-inch - HP L1950g | User Guide - Page 52
Graphic Resolution Text Mode Dot Pitch Horizontal Frequency Vertical Refresh Rate Environmental Requirements Temperature Operating Temperature Storage Temperature Relative Humidity Power Source Altitude: Operating Storage Power Consumption (maximum) Input Terminal 48.3 cm wide screen TFT LCD 48 - HP L1950g | User Guide - Page 53
Graphic Resolution Text Mode Dot Pitch Horizontal Frequency Vertical Refresh Rate Environmental Requirements Temperature Operating Temperature Storage Temperature Relative Humidity Power Source Altitude: Operating Storage Power Consumption (maximum) Input Terminal 48.3 cm wide screen TFT LCD 48 - HP L1950g | User Guide - Page 54
Graphic Resolution Text Mode Dot Pitch Horizontal Frequency Vertical Refresh Rate Environmental Requirements Temperature Operating Temperature Storage Temperature Relative Humidity Power Source Altitude: Operating Storage Power Consumption (maximum) Input Terminal 55.9 cm wide screen TFT LCD 55 - HP L1950g | User Guide - Page 55
B-10 L2245w/L2245wg Specifications Display 55.9 cm wide screen Type TFT LCD Viewable Image Size 55.9 cm diagonal Tilt -5 to 35° Swivel -45 to 45° Maximum Weight (Unpacked) 7.6 kg Dimensions (include base) Height Depth Width 34.5 cm 16.0 cm 53.7 cm Maximum Graphic Resolution 1680 - HP L1950g | User Guide - Page 56
Graphic Resolution Text Mode Dot Pitch Horizontal Frequency Vertical Refresh Rate Environmental Requirements Temperature Operating Temperature Storage Temperature Relative Humidity Power Source Altitude: Operating Storage Power Consumption (maximum) Input Terminal 60.96 cm wide screen TFT LCD 60 - HP L1950g | User Guide - Page 57
Resolutions The display resolutions listed below are the most commonly used modes and are set as factory defaults. This monitor automatically recognized these preset modes and they will appear properly sized and centered on the screen. L1750, L1950/L1950g × 768 48.4 60.0 10 1024 × 768 56.5 70 - HP L1950g | User Guide - Page 58
640 × 480 37.5 3 720 × 400 31.5 4 800 × 600 37.9 5 800 × 600 46.9 6 832 × 624 49.7 7 1024 × 768 48.4 8 1024 × 768 60.0 9 1152 × 870 68.7 10 1280 × 960 60.0 11 1280 × 1024 64.0 12 1280 × 1024 80.0 13 1440 x 900 55.9 14 1600 x 1000 61.6 15 1680 x 1050 65.3 Vert - HP L1950g | User Guide - Page 59
720 × 400 4 800 × 600 5 800 × 600 6 832 × 624 7 1024 × 768 8 1024 × 768 9 1152 × 870 10 1280 × 960 11 1280 × 1024 12 1280 × 1024 13 1440 x 900 14 1600 x 1000 15 1680 x 1050 16 1920 x .0 75.1 60.0 60.0 75.0 59.9 60.0 60.0 59.9 59.9 Recognizing Preset Display Resolutions 51 - HP L1950g | User Guide - Page 60
is turned amber. When the monitor is in the reduced power state, the monitor will utilize less than 2 watts of power. There is a brief warm up period before the monitor will return to its normal operating mode. Refer to the computer manual for instructions on setting energy saver features (sometimes - HP L1950g | User Guide - Page 61
and, if not installed and used in accordance with the instructions, may cause harmful interference to radio communications. However, there or modifications made to this device that are not expressly approved by Hewlett Packard Company may void the user's authority to operate the equipment. Cables - HP L1950g | User Guide - Page 62
Company P. O. Box 692000, Mail Stop 530113 Houston, Texas 77269-2000 Or, call 1-800-HP-INVENT (1-800 474-6836) For questions regarding this FCC declaration, contact: Hewlett Packard Company P. O. Box 692000, Mail Stop 510101 Houston, Texas 77269-2000 Or, call (281) 514-3333 To identify this product - HP L1950g | User Guide - Page 63
comprising HP brand computers, keyboards and monitors that bear the "GS" approval mark, meet the applicable ergonomic requirements. The installation guides included with the products provide configuration information. Japanese Notice Korean Notice Power Cord Set Requirements The monitor power supply - HP L1950g | User Guide - Page 64
STAR Partner, Hewlett Packard Company has determined that this product meets the ENERGY STAR guidelines for energy efficiency. Specific details on using the Energy Saving features can be found in the energy saver or power management section of the computer manual. Materials Disposal This HP product - HP L1950g | User Guide - Page 65
No 1907/2006 of the European Parliament and Council). A chemical information report for this product can be found at http//www,hp.com/go/reach. Restriction of Hazardous Substances (RoHS) A Japanese regulatory requirement, defined by specification JIS C 0950, 2005, mandates that manufacturers provide - HP L1950g | User Guide - Page 66
11363-2006 11363-2006 58 Appendix C Agency Regulatory Notices - HP L1950g | User Guide - Page 67
visible on a specific background. To locate defective pixels, the monitor should be viewed under normal operating conditions, in normal operating mode at a supported resolution and refresh rate, from a distance of approximately 50 cm (20 in). HP expects that, over time, the industry will continue to
-
 1
1 -
 2
2 -
 3
3 -
 4
4 -
 5
5 -
 6
6 -
 7
7 -
8
-
9
-
10
-
11
-
12
-
13
-
14
-
15
-
16
-
17
-
18
-
19
-
20
-
21
-
22
-
23
-
24
-
25
-
26
-
27
-
28
-
29
-
30
-
31
-
32
-
33
-
34
-
35
-
36
-
37
-
38
-
39
-
40
-
41
-
42
-
43
-
44
-
45
-
46
-
47
-
48
-
49
-
50
-
51
-
52
-
53
-
54
-
55
-
56
-
57
-
58
-
59
-
60
-
61
-
62
-
63
-
64
-
65
-
66
-
67
 |
 |

HP L1750, L1950/L1950g, L1710, L1910,
L1908w, L1908wm, L1945w, L1945wv,
L2208w, L2245w/L2245wg, and L2445w LCD
Monitors
User Guide