HP LE1901w HP LE1901w/LE1901wm and LE2201w LCD Monitors User Guide - Page 28
Sleep Timer > Set Current Time, Set On Time hours - power lock button
 |
UPC - 884420692393
View all HP LE1901w manuals
Add to My Manuals
Save this manual to your list of manuals |
Page 28 highlights
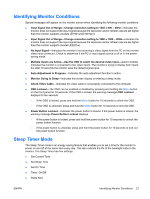
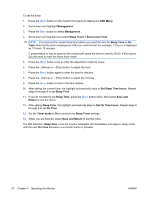
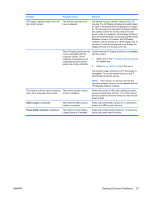
To set the timer: 1. Press the Menu button on the monitor front panel to display the OSD Menu. 2. Scroll down and highlight Management. 3. Press the Menu button to select Management. 4. Scroll down and highlight and select Sleep Timer > Set Current Time. NOTE: You must set the current local time before you reset the time for Sleep Time or On Time. Note that the time is displayed in a 24-hour clock format. For example, 1:15 p.m. is displayed as 13 hours 15 minutes. A power failure or loss of power to the monitor will cause the timer to reset to 00:00. If this occurs, you will need to reset the sleep timer mode. 5. Press the Menu button once to enter the adjustment mode for hours. 6. Press the - (Minus) or + (Plus) button to adjust the hour. 7. Press the Menu button again to enter the time for minutes. 8. Press the - (Minus) or + (Plus) button to adjust the minutes. 9. Press the Menu button to lock in the time chosen. 10. After setting the current time, the highlight automatically skips to Set Sleep Time hours. Repeat steps 6 through 9 to set Sleep Time. 11. If you do not want to set Sleep Time, press the Menu button twice, then select Save and Return to exit the menu. 12. After setting Sleep Time, the highlight automatically skips to Set On Time hours. Repeat steps 6 through 9 to set On Time. 13. Set the Timer mode to On to activate the Sleep Timer settings. 14. When you are finished, select Save and Return to exit the menu. The fifth selection, Sleep Now, turns the monitor backlights off immediately and stays in sleep mode until the next On Time activates or a monitor button is pressed. 22 Chapter 4 Operating the Monitor ENWW
-
 1
1 -
2
-
3
-
4
-
5
-
6
-
7
-
8
-
9
-
10
-
11
-
12
-
13
-
14
-
15
-
16
-
17
-
18
-
19
-
20
-
21
-
22
-
 23
23 -
 24
24 -
 25
25 -
 26
26 -
 27
27 -
 28
28 -
 29
29 -
 30
30 -
 31
31 -
 32
32 -
 33
33 -
34
-
35
-
36
-
37
-
38
-
39
-
40
-
41
-
42
-
43
-
44
-
45
 |
 |