HP LaserJet 9040/9050 Service Manual - Page 226
X PERMANENT, STORAGE WRITE FAIL, For help press, To continue, press, STORAGE ERROR, STORAGE FULL
 |
View all HP LaserJet 9040/9050 manuals
Add to My Manuals
Save this manual to your list of manuals |
Page 226 highlights
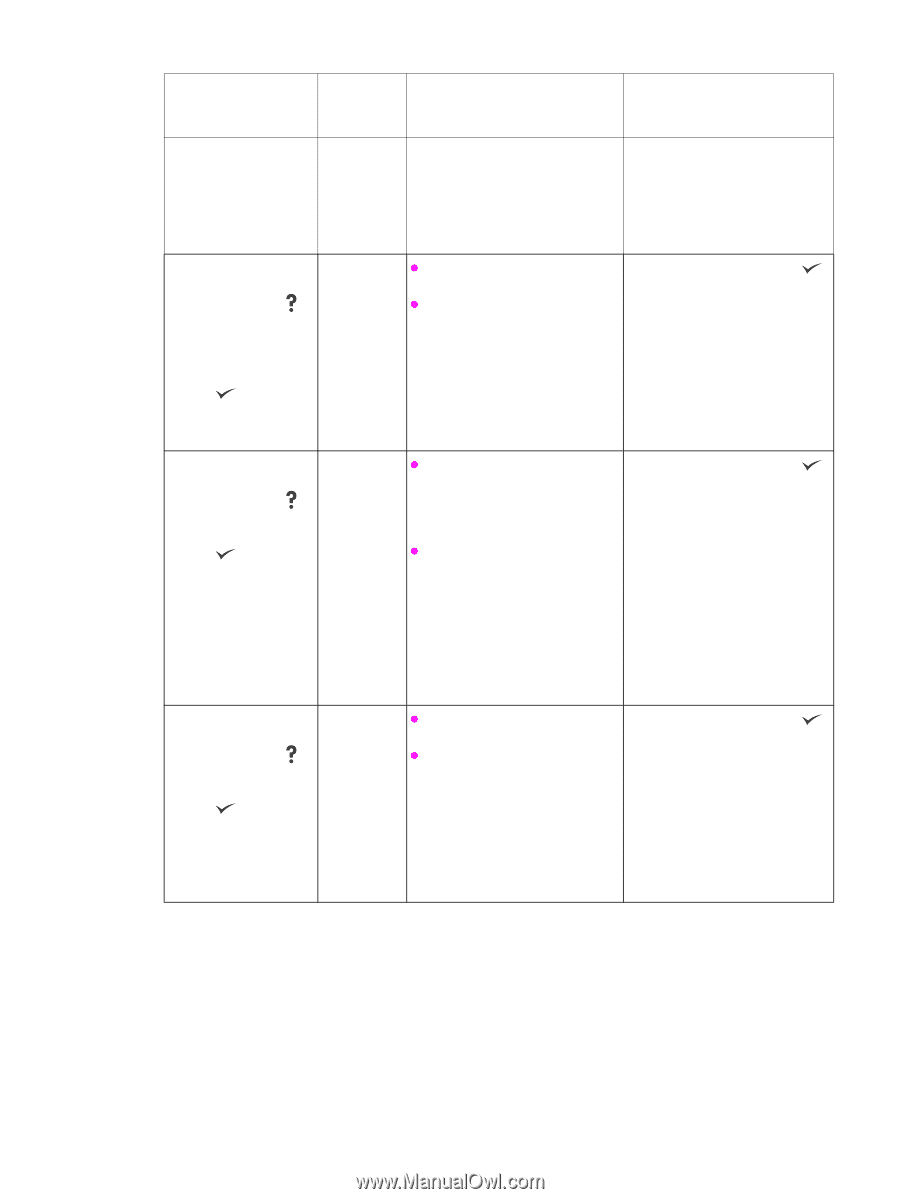
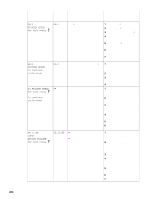
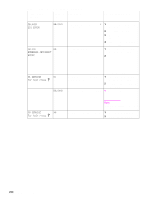
Table 21. Numeric error messages (continued) Control panel message Event-log Description error message Recommended action 67.X 68.X PERMANENT STORAGE WRITE FAIL For help press alternates with 68.X PERMANENT STORAGE WRITE FAIL To continue press 68.X 68.0 PERMANENT STORAGE ERROR For help press alternates with To continue press 68.0 68.1 PERMANENT STORAGE FULL For help press alternates with To continue press 68.1 The output device is not attached 1 when the printer is turned on. 2 z The printer NVRAM or hard 1 disk is failing to write. 2 z Printing can continue but there might be unexpected responses because an error 3 occurred in permanent storage. 4 5 6 z One or more of the printer 1 settings that were saved in the NVRAM or hard disk is invalid 2 and is reset to the factory default. 3 z Printing can continue, but unexpected responses might occur because an error 4 occurred in permanent storage. 5 6 7 z The printer NVRAM or hard 1 disk is full. 2 z Printing can continue, but unexpected responses might occur because an error 3 occurred in permanent storage. 4 5 6 At power-on, make sure that the output device is attached correctly. Make sure that the JetLink connector is installed correctly. To clear the error, press . Check the printer configuration. Turn off the printer, and then turn the printer on to continue. Reseat the hard disk. Reinitialize the hard disk. Replace the hard disk. To clear the error, press . Check the printer configuration. Turn off the printer, and then turn the printer on to continue. Print a configuration page. Resend the firmware. Perform a NVRAM initialization, and re-enter the configuration information. Replace the formatter. To clear the error, press . Check the printer configuration. Turn off the printer, and then turn the printer on to continue. Reseat the hard disk. Reinitialize the hard disk. Replace the hard disk. 210 Chapter 7 Troubleshooting
-
 1
1 -
2
-
3
-
4
-
5
-
6
-
7
-
8
-
9
-
10
-
11
-
12
-
13
-
14
-
15
-
16
-
17
-
18
-
19
-
20
-
21
-
22
-
23
-
24
-
25
-
26
-
27
-
28
-
29
-
30
-
31
-
32
-
33
-
34
-
35
-
36
-
37
-
38
-
39
-
40
-
41
-
42
-
43
-
44
-
45
-
46
-
47
-
48
-
49
-
50
-
51
-
52
-
53
-
54
-
55
-
56
-
57
-
58
-
59
-
60
-
61
-
62
-
63
-
64
-
65
-
66
-
67
-
68
-
69
-
70
-
71
-
72
-
73
-
74
-
75
-
76
-
77
-
78
-
79
-
80
-
81
-
82
-
83
-
84
-
85
-
86
-
87
-
88
-
89
-
90
-
91
-
92
-
93
-
94
-
95
-
96
-
97
-
98
-
99
-
100
-
101
-
102
-
103
-
104
-
105
-
106
-
107
-
108
-
109
-
110
-
111
-
112
-
113
-
114
-
115
-
116
-
117
-
118
-
119
-
120
-
121
-
122
-
123
-
124
-
125
-
126
-
127
-
128
-
129
-
130
-
131
-
132
-
133
-
134
-
135
-
136
-
137
-
138
-
139
-
140
-
141
-
142
-
143
-
144
-
145
-
146
-
147
-
148
-
149
-
150
-
151
-
152
-
153
-
154
-
155
-
156
-
157
-
158
-
159
-
160
-
161
-
162
-
163
-
164
-
165
-
166
-
167
-
168
-
169
-
170
-
171
-
172
-
173
-
174
-
175
-
176
-
177
-
178
-
179
-
180
-
181
-
182
-
183
-
184
-
185
-
186
-
187
-
188
-
189
-
190
-
191
-
192
-
193
-
194
-
195
-
196
-
197
-
198
-
199
-
200
-
201
-
202
-
203
-
204
-
205
-
206
-
207
-
208
-
209
-
210
-
211
-
212
-
213
-
214
-
215
-
216
-
217
-
218
-
219
-
220
-
 221
221 -
 222
222 -
 223
223 -
 224
224 -
 225
225 -
 226
226 -
 227
227 -
 228
228 -
 229
229 -
 230
230 -
 231
231 -
232
-
233
-
234
-
235
-
236
-
237
-
238
-
239
-
240
-
241
-
242
-
243
-
244
-
245
-
246
-
247
-
248
-
249
-
250
-
251
-
252
-
253
-
254
-
255
-
256
-
257
-
258
-
259
-
260
-
261
-
262
-
263
-
264
-
265
-
266
-
267
-
268
-
269
-
270
-
271
-
272
-
273
-
274
-
275
-
276
-
277
-
278
-
279
-
280
-
281
-
282
-
283
-
284
-
285
-
286
-
287
-
288
-
289
-
290
-
291
-
292
-
293
-
294
-
295
-
296
-
297
-
298
-
299
-
300
-
301
-
302
-
303
-
304
-
305
-
306
-
307
-
308
-
309
-
310
-
311
-
312
-
313
-
314
-
315
-
316
-
317
-
318
-
319
-
320
-
321
-
322
-
323
-
324
-
325
-
326
-
327
-
328
-
329
-
330
-
331
-
332
 |
 |