HP LaserJet 9040/9050 Service Manual - Page 258
SMALL, PAPER SPEED, Vertical dots, Vertical white lines, Repeating images, Misformed characters
 |
View all HP LaserJet 9040/9050 manuals
Add to My Manuals
Save this manual to your list of manuals |
Page 258 highlights
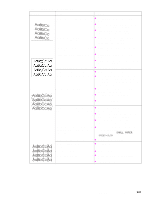
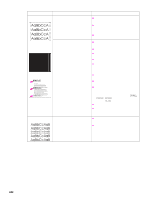
Table 29. Image defects (continued) Problem Cause Solution Vertical dots Vertical white lines The static charge eliminator teeth are z Clean the static charge eliminator. contaminated. Poor contact exists between the static z Clean the contacts, if contaminated. If the charge eliminator and the high- problem persists after cleaning, or parts voltage power supply. are damaged or deformed, replace them. The transfer charging roller is deformed or deteriorated. z Replace the transfer charging roller. The high-voltage power supply is defective. z Replace the high-voltage power supply. The print cartridge faulty. z Replace the print cartridge. Contamination in the laser path exists. z Clean the laser path (remove the laser/ scanner assembly and clean the lens). z Replace the laser/scanner assembly. The fuser is defective. z Replace the fuser assembly. Repeating images Misformed characters This type of defect might occur when z using preprinted forms, a large quantity of narrow media, or a fuser z mode that is set too high for the media. z z Print a few more pages and see if the problem corrects itself. Make sure that the media type and quality meet HP specifications. If you observe that this type of defect occurs on wide media (such as letter or A4) just after printing on narrow media (such as envelopes), you can set SMALL PAPER SPEED on the paper-handling menu to SLOW. This slows down printing. Check your fuser mode. Maintenance is due. z Print a copy of the supplies status page. If maintenance is due, order and install the preventive maintenance kit. The printer operating environment does not meet specifications. z Make sure that the printer operating environment meets specifications. Maintenance is due. z Print a copy of the supplies status page. If maintenance is due, order and install the preventive maintenance kit. 242 Chapter 7 Troubleshooting
-
 1
1 -
2
-
3
-
4
-
5
-
6
-
7
-
8
-
9
-
10
-
11
-
12
-
13
-
14
-
15
-
16
-
17
-
18
-
19
-
20
-
21
-
22
-
23
-
24
-
25
-
26
-
27
-
28
-
29
-
30
-
31
-
32
-
33
-
34
-
35
-
36
-
37
-
38
-
39
-
40
-
41
-
42
-
43
-
44
-
45
-
46
-
47
-
48
-
49
-
50
-
51
-
52
-
53
-
54
-
55
-
56
-
57
-
58
-
59
-
60
-
61
-
62
-
63
-
64
-
65
-
66
-
67
-
68
-
69
-
70
-
71
-
72
-
73
-
74
-
75
-
76
-
77
-
78
-
79
-
80
-
81
-
82
-
83
-
84
-
85
-
86
-
87
-
88
-
89
-
90
-
91
-
92
-
93
-
94
-
95
-
96
-
97
-
98
-
99
-
100
-
101
-
102
-
103
-
104
-
105
-
106
-
107
-
108
-
109
-
110
-
111
-
112
-
113
-
114
-
115
-
116
-
117
-
118
-
119
-
120
-
121
-
122
-
123
-
124
-
125
-
126
-
127
-
128
-
129
-
130
-
131
-
132
-
133
-
134
-
135
-
136
-
137
-
138
-
139
-
140
-
141
-
142
-
143
-
144
-
145
-
146
-
147
-
148
-
149
-
150
-
151
-
152
-
153
-
154
-
155
-
156
-
157
-
158
-
159
-
160
-
161
-
162
-
163
-
164
-
165
-
166
-
167
-
168
-
169
-
170
-
171
-
172
-
173
-
174
-
175
-
176
-
177
-
178
-
179
-
180
-
181
-
182
-
183
-
184
-
185
-
186
-
187
-
188
-
189
-
190
-
191
-
192
-
193
-
194
-
195
-
196
-
197
-
198
-
199
-
200
-
201
-
202
-
203
-
204
-
205
-
206
-
207
-
208
-
209
-
210
-
211
-
212
-
213
-
214
-
215
-
216
-
217
-
218
-
219
-
220
-
221
-
222
-
223
-
224
-
225
-
226
-
227
-
228
-
229
-
230
-
231
-
232
-
233
-
234
-
235
-
236
-
237
-
238
-
239
-
240
-
241
-
242
-
243
-
244
-
245
-
246
-
247
-
248
-
249
-
250
-
251
-
252
-
 253
253 -
 254
254 -
 255
255 -
 256
256 -
 257
257 -
 258
258 -
 259
259 -
 260
260 -
 261
261 -
 262
262 -
 263
263 -
264
-
265
-
266
-
267
-
268
-
269
-
270
-
271
-
272
-
273
-
274
-
275
-
276
-
277
-
278
-
279
-
280
-
281
-
282
-
283
-
284
-
285
-
286
-
287
-
288
-
289
-
290
-
291
-
292
-
293
-
294
-
295
-
296
-
297
-
298
-
299
-
300
-
301
-
302
-
303
-
304
-
305
-
306
-
307
-
308
-
309
-
310
-
311
-
312
-
313
-
314
-
315
-
316
-
317
-
318
-
319
-
320
-
321
-
322
-
323
-
324
-
325
-
326
-
327
-
328
-
329
-
330
-
331
-
332
 |
 |
