| Section |
Page |
| Theory of operation |
25 |
| Basic operation |
26 |
| Major print systems |
26 |
| Internal components |
27 |
| Operating sequence |
31 |
| Formatter system |
32 |
| Sleep mode |
32 |
| Input/output |
32 |
| USB |
32 |
| Embedded print server |
33 |
| Hard-disk |
33 |
| CPU |
33 |
| Memory |
33 |
| Random-access memory |
33 |
| Nonvolatile memory |
33 |
| DIMM slot |
33 |
| PJL overview |
34 |
| PML |
34 |
| Control panel |
34 |
| Engine-control system |
35 |
| DC controller PCA |
36 |
| Sensors, solenoids, and switches |
37 |
| Motors and fans |
38 |
| Failure detection |
38 |
| Motor failure |
38 |
| Fan motor failure |
38 |
| Engine power supply |
39 |
| Fuser-control circuit |
39 |
| Fuser temperature control |
40 |
| Low-voltage power supply |
41 |
| High-voltage power supply |
42 |
| Overcurrent/overvoltage protection |
43 |
| Image-formation system |
44 |
| Image-formation process |
45 |
| Block 1: Latent image formation |
47 |
| Step 1: Primary charging |
47 |
| Step 2: Laser-beam exposure |
47 |
| Block 2: Developing |
48 |
| Step 3: Developing |
48 |
| Block 3: Transfer |
49 |
| Step 4: Transfer |
49 |
| Step 5: Separation |
49 |
| Block 4: Fusing |
50 |
| Step 6: Fusing |
50 |
| Block 5: Drum cleaning |
51 |
| Step 7: Drum cleaning |
51 |
| Step 8: Drum charge elimination |
51 |
| Laser/scanner system |
52 |
| Laser failure detection |
54 |
| Pickup, feed, and delivery system |
55 |
| Pickup-and-feed block |
56 |
| Fuser/delivery block |
57 |
| Pressure roller pressure release control |
57 |
| Paper trays |
58 |
| Printing from Tray 1 |
58 |
| Printing from Tray 2 |
58 |
| Cassette media size detection and cassette presence detection |
58 |
| Jam detection |
60 |
| 1x500-sheet paper feeder |
64 |
| Pickup-and-feed operation (PF) |
65 |
| Cassette lift operation (PF) |
67 |
| Cassette media size detection and cassette presence detection (PF) |
67 |
| Cassette multiple-feed prevention (PF) |
67 |
| Jam detection (PF) |
67 |
| 1x1500-sheet paper deck |
68 |
| Pickup-and-feed operation (PD) |
69 |
| Cassette lift operation (PD) |
71 |
| Media size detection (PD) |
72 |
| Multiple-feed prevention (PD) |
72 |
| Jam detection (PF) |
72 |
| Envelope feeder |
73 |
| Pickup-and-feed operation (EF) |
74 |
| Multiple-feed prevention (EF) |
74 |
| Multiple-feed detection (EF) |
75 |
| Jam detection (EF) |
75 |
| Duplexer |
77 |
| Motor and fan control (DP) |
78 |
| Failure detection (DP) |
79 |
| Reverse-and-re-pickup operation (DP) |
79 |
| Side registration adjustment operation (DP) |
80 |
| Jam detection (DP) |
82 |
| Removal and replacement |
83 |
| Introduction |
84 |
| Removal and replacement strategy |
84 |
| Electrostatic discharge |
84 |
| Required tools |
85 |
| Types of screws |
86 |
| Service approach |
87 |
| Before performing service |
87 |
| After performing service |
87 |
| Post-service test |
87 |
| Print-quality test |
87 |
| Customer replaceable units (CRUs) |
88 |
| Print cartridge |
88 |
| Tray 2 |
89 |
| Tray 2 separation, pickup, and feed rollers |
90 |
| Transfer roller |
93 |
| Fuser |
94 |
| Remove the fuser |
94 |
| Formatter cover and formatter cage |
95 |
| Installing a new formatter |
97 |
| Hard drive |
98 |
| Remove the SSM |
98 |
| Remove the encrypted HHD |
100 |
| Installing a replacement hard drive |
102 |
| SSM firmware upgrade |
102 |
| HDD firmware upgrade |
103 |
| Memory DIMM |
104 |
| Remove the memory DIMM |
104 |
| Install the memory DIMM |
105 |
| Tray 1 pickup and feed rollers |
106 |
| Tray 1 separation roller |
109 |
| Rear output bin |
111 |
| Covers |
112 |
| Top-accessory cover |
112 |
| Envelope feed accessory covers |
113 |
| Duplex accessory or cover |
114 |
| Tray 2 extension door |
115 |
| Remove the Tray 2 extension door |
115 |
| Top cover |
116 |
| Remove the top cover |
116 |
| Right-side cover |
119 |
| Remove the right-side cover |
119 |
| Reinstall the right cover |
121 |
| Left-side cover |
122 |
| Remove the left-side cover |
122 |
| Right-front cover |
124 |
| Remove the right-front cover |
124 |
| Rear-upper cover |
127 |
| Remove the rear-upper cover |
127 |
| Front cover |
129 |
| Remove the front cover |
129 |
| Main assemblies |
131 |
| Registration assembly |
131 |
| Control-panel assembly |
133 |
| Remove the control-panel assembly |
133 |
| Walk-up USB port and cable |
135 |
| Remove the walk-up USB port and cable |
135 |
| Inner connecting PCA |
138 |
| Remove the inner connecting PCA |
138 |
| Reinstall the inner connecting PCA |
140 |
| Fan FN102 |
141 |
| Remove fan FN102 |
141 |
| Fan FN103 |
143 |
| Remove fan FN103 |
143 |
| Pickup-motor assembly (M101) |
145 |
| Remove the pickup-motor assembly |
145 |
| Drum-motor assembly (M102) |
147 |
| Remove the drum motor |
147 |
| Lifter-motor assembly (M103) |
149 |
| Remove the lifter motor |
149 |
| DC controller PCA |
152 |
| Remove the DC controller PCA |
152 |
| Reinstallation tip |
153 |
| Installing a new formatter and a new DC controller |
153 |
| Pickup-drive assembly |
155 |
| Remove the pickup-drive assembly |
155 |
| Reinstall the pickup-drive assembly |
160 |
| Fuser-motor assembly (M299) |
161 |
| Remove the fuser-motor assembly |
161 |
| Drum-drive assembly |
163 |
| Remove the drum-drive assembly |
163 |
| Reinstall the drum-drive assembly |
165 |
| Fan FN101 |
166 |
| Remove fan FN101 |
166 |
| Fan FN301 |
168 |
| Remove fan FN301 |
168 |
| Environmental sensor (TH3) |
170 |
| Remove the environmental sensor (TH3) |
170 |
| High voltage power supply |
172 |
| Remove the high-voltage power-supply assembly |
172 |
| Feed-guide assembly |
176 |
| Remove the feed-guide assembly |
176 |
| Reinstall the feed-guide assembly |
178 |
| Tray 1 paper-pickup assembly |
179 |
| Remove the Tray 1 pickup assembly |
179 |
| Feed-roller assembly |
181 |
| Remove the feed-roller assembly |
181 |
| Laser/scanner assembly |
182 |
| Remove the laser/scanner assembly |
182 |
| Paper-delivery assembly |
185 |
| Remove the paper-delivery assembly |
185 |
| Reinstall the paper-delivery assembly |
188 |
| 1,500-sheet paper deck (PD) |
189 |
| Separation roller (PD) |
189 |
| Rear cover (PD) |
191 |
| Right-side cover (PD) |
192 |
| 1,500-sheet paper deck left-side cover |
193 |
| Remove the left-side cover |
193 |
| Door (PD) |
196 |
| Motor (PD) |
198 |
| Remove the Motor (PD) |
198 |
| Driver PCA (PD) |
200 |
| Remove the Driver PCA (PD) |
200 |
| Lift-drive assembly (PD) |
202 |
| Remove the Lift-drive assembly (PD) |
202 |
| Solve problems |
205 |
| Solve problems checklist |
206 |
| Menu map |
208 |
| Preboot menu options |
209 |
| Current settings pages |
216 |
| Troubleshooting process |
217 |
| Determine the problem source |
217 |
| Pre-troubleshooting checklist |
217 |
| Troubleshooting flowchart |
218 |
| Power subsystem |
220 |
| Power-on checks |
220 |
| Overview |
220 |
| Tools for troubleshooting |
223 |
| Component diagnostics |
223 |
| LED diagnostics |
223 |
| Understand lights on the formatter |
223 |
| HP Jetdirect LEDs |
224 |
| Heartbeat LED |
224 |
| Connectivity LED |
224 |
| Connectivity LED, product initialization |
225 |
| Connectivity LED, product operating |
227 |
| Engine diagnostics |
228 |
| Engine test button |
228 |
| Formatter test |
228 |
| Print/Stop test |
229 |
| Drum rotation test |
229 |
| Paper-path test (and automatic sensor test) |
230 |
| Paper path sensors test (automatic) |
230 |
| Manual sensor test |
232 |
| Top of page sensor (PS103) |
234 |
| Pre-feed sensor (PS102) |
235 |
| Fuser delivery sensor (PS700) |
236 |
| Duplex sensor (PS1502) |
237 |
| Media width sensors 1/2 (PS106/108) |
238 |
| Output bin full sensor (PS104) |
239 |
| Tray 1 paper present sensor (PS105) |
240 |
| Tray 2 paper present sensor (PS101) |
241 |
| Tray 2 top of stack sensor (PS107) |
242 |
| Tray 2 paper size switches (SW102) |
243 |
| Tray/Bin manual sensor test |
244 |
| Print/stop test |
244 |
| Component tests |
245 |
| Diagrams |
247 |
| Block diagrams |
247 |
| Main assemblies |
247 |
| Main parts |
248 |
| Motors and fans |
249 |
| PCAs |
250 |
| 500-sheet feeder |
250 |
| 1,500-sheet feeder |
251 |
| Connectors |
253 |
| DC controller PCA connectors |
253 |
| Product base connectors |
255 |
| 500-sheet paper tray connectors |
256 |
| 1,500-sheet paper tray connectors |
256 |
| Duplexer connectors |
257 |
| Envelope feeder connectors |
257 |
| General timing chart |
258 |
| Circuit diagrams |
259 |
| Internal print-quality test pages |
265 |
| Print-quality-troubleshooting pages |
265 |
| Clean the paper path |
266 |
| Set up an auto cleaning page |
266 |
| Print configuration page |
267 |
| Configuration page |
267 |
| HP embedded Jetdirect page |
269 |
| Print quality troubleshooting tools |
270 |
| Repetitive image defect ruler |
270 |
| Control-panel menus |
271 |
| Retrieve Job from USB menu |
271 |
| Retrieve Job from Device Memory menu |
271 |
| Supplies menu |
272 |
| Trays menu |
273 |
| Administration menu |
274 |
| Reports menu |
274 |
| General Settings menu |
274 |
| Retrieve From USB Settings menu |
277 |
| General Print Settings menu |
277 |
| Default Print Options menu |
279 |
| Display Settings menu |
279 |
| Manage Supplies menu |
280 |
| Manage Trays menu |
281 |
| Stapler/Stacker Settings menu |
282 |
| Multi-Bin Mailbox Settings menu |
282 |
| Network Settings menu |
283 |
| Troubleshooting menu |
287 |
| Device Maintenance menu |
288 |
| Backup/Restore menu |
288 |
| Calibrate/Cleaning menu |
288 |
| USB Firmware Upgrade menu |
289 |
| Service menu |
289 |
| Interpret control-panel messages, status-alert messages, and event code errors |
290 |
| 10.00.33 |
290 |
| 10.00.35 |
290 |
| 10.00.60 |
290 |
| 10.00.69 |
291 |
| 10.00.91 |
291 |
| 10.0X.Y0 Supply memory error |
291 |
| 10.23.35 |
292 |
| 10.23.50 |
292 |
| 10.23.51 |
292 |
| 10.23.52 |
292 |
| 10.23.60 |
292 |
| 10.23.70 Printing Past Very Low |
293 |
| 10.26.15 |
293 |
| 10.26.50 |
293 |
| 10.26.60 |
294 |
| 10.XX.34 Used Supply In Use |
294 |
| 10.XX.40 Genuine HP Supplies Installed |
294 |
| 10.XX.41 Unsupported Supply In Use |
295 |
| 10.XX.70 Printing past very low |
295 |
| 10.YY.15 Install <supply> |
295 |
| 10.YY.35 Incompatible <supply> |
296 |
| 11.00.YY Internal clock error |
296 |
| 13.00.00 |
296 |
| 13.00.EE |
297 |
| 13.A3.FF |
297 |
| 13.D3.DZ |
297 |
| 13.E5.FF |
297 |
| 13.EA.EE |
298 |
| 13.EE.FF |
298 |
| 13.FF.EE |
298 |
| 13.FF.FF |
298 |
| 13.WX.EE |
298 |
| 13.WX.FF |
299 |
| 13.WX.YZ Fuser Area Jam |
299 |
| 13.WX.YZ Fuser wrap jam |
299 |
| 13.WX.YZ Jam below control panel |
299 |
| 13.WX.YZ Jam in Tray 1 |
299 |
| 13.WX.YZ Jam in Tray <X> |
300 |
| 13.WX.YZ Jam inside envelope feeder |
300 |
| 13.WX.YZ Jam inside top cover |
300 |
| 14.00.XX |
300 |
| 20.00.00 Insufficient memory: <Device> To continue, touch “OK” |
301 |
| 21.00.00 Page Too Complex |
301 |
| 32.08.AX |
301 |
| 32.1C.XX |
302 |
| 32.21.00 |
308 |
| 33.01.XX |
309 |
| 33.XX.YY Used board/disk |
309 |
| 40.00.01 USB I/O buffer overflow To continue, touch “OK” |
309 |
| 40.00.02 Embedded I/O buffer overflow To continue, touch “OK” |
309 |
| 40.00.05 Embedded I/O bad transmission To continue, touch “OK” |
310 |
| 41.02.00 Error |
310 |
| 41.03.YZ Unexpected size in envelope feeder To use another tray, touch \ |
310 |
| 41.03.YZ Unexpected size in tray <X> |
311 |
| 41.05.YZ Unexpected type in tray <X> |
312 |
| 41.XX.YZ Error To continue, touch “OK” |
314 |
| 42.XX.YY |
315 |
| 47.00.XX |
315 |
| 47.01.XX |
315 |
| 47.02.XX |
316 |
| 47.03.XX |
316 |
| 47.04.XX |
316 |
| 47.05.00 |
316 |
| 47.06.XX |
316 |
| 47.WX.YZ Printer Calibration Failed To continue, touch “OK” |
317 |
| 49.XX.YY To continue turn off then on |
318 |
| 50.WX.YZ Fuser error To continue turn off then on |
318 |
| 51.00.YY Error |
320 |
| 52.XX.00 Error To continue turn off then on |
320 |
| 54.XX.YY Error |
321 |
| 55.00.YY DC controller error To continue turn off then on |
322 |
| 55.0X.YY DC controller error To continue turn off then on |
322 |
| 56.00.YY Error To continue turn off then on |
322 |
| 57.00.0Y Error To continue turn off then on |
323 |
| 58.00.0Y Error To continue turn off then on |
324 |
| 59.00.YY error To continue turn off then on |
324 |
| 59.A2.0x Error |
325 |
| 60.00.0Y Tray <Y> lifting error |
326 |
| 62.00.00 No system To continue turn off then on |
326 |
| 65.X0.A1 Output accessory disconnected |
327 |
| 66.80.YY Stapler/Stacker failure |
327 |
| 69.11.YY Error To continue turn off then on |
329 |
| 70.00.00 Error To continue turn off then on |
329 |
| 79.XX.YY Error To continue turn off then on |
330 |
| 80.0X.YY Embedded JetDirect error |
330 |
| 81.YY.ZZ EIO-1 Card Failure |
332 |
| 82.73.46 OR 82.73.47 |
333 |
| 98.00.01 Corrupt data in firmware volume |
334 |
| 98.00.02 Corrupt data in solutions volume |
334 |
| 98.00.03 Corrupt data in configuration volume |
334 |
| 98.00.04 Corrupt data in job data volume |
334 |
| 99.00.01 Upgrade not performed file is corrupt |
335 |
| 99.00.02 Upgrade not performed timeout during receive |
335 |
| 99.00.03 Upgrade not performed error writing to disk |
335 |
| 99.00.04 Upgrade not performed timeout during receive |
335 |
| 99.00.05 Upgrade not performed timeout during receive |
336 |
| 99.00.06 Upgrade not performed error reading upgrade |
336 |
| 99.00.07 Upgrade not performed error reading upgrade |
336 |
| 99.00.08 Upgrade not performed error reading upgrade |
336 |
| 99.00.09 Upgrade canceled by user |
337 |
| 99.00.10 Upgrade canceled by user |
337 |
| 99.00.11 Upgrade canceled by user |
337 |
| 99.00.12 Upgrade not performed the file is invalid |
337 |
| 99.00.13 Upgrade not performed the file is invalid |
338 |
| 99.00.14 Upgrade not performed the file is invalid |
338 |
| 99.00.2X |
338 |
| 99.09.60 Unsupported disk |
339 |
| 99.09.61 Unsupported disk |
339 |
| 99.09.62 Unknown disk |
339 |
| 99.09.63 Incorrect disk |
340 |
| 99.09.64 Disk malfunction |
340 |
| 99.09.65 Disk data error |
340 |
| 99.09.66 No disk installed |
340 |
| 99.09.67 Disk is not bootable please download firmware |
340 |
| 99.XX.YY |
341 |
| <binname> full Remove all paper from bin |
341 |
| <Supply> low OR Supplies low |
341 |
| <Supply> very low OR Supplies very low |
342 |
| [File System] device failure To clear press “OK” |
342 |
| [File System] file operation failure To clear press “OK” |
342 |
| [File System] file system is full To clear press “OK” |
342 |
| [File System] is not initialized |
343 |
| [File System] is write protected |
343 |
| Accept bad signature |
343 |
| Bad optional tray connection |
343 |
| Canceling |
344 |
| Canceling... <jobname> |
344 |
| Cartridge Low |
344 |
| Cartridge Memory Abnormal |
344 |
| Cartridge Out |
344 |
| Checking engine |
345 |
| Checking paper path |
345 |
| Chosen personality not available To continue, touch “OK” |
345 |
| Cleaning do not grab paper |
345 |
| Cleaning... |
346 |
| Clearing event log |
346 |
| Clearing paper path |
346 |
| Close stapler/stacker multi bin mailbox door |
346 |
| Close top cover |
346 |
| Cooling device |
347 |
| Creating cleaning page... |
347 |
| Data received To print last page press “OK” |
347 |
| Event log is empty |
347 |
| Expected drive missing |
348 |
| External device initializing |
348 |
| Face Down Tray Full |
348 |
| FIM Load Error Send full FIM on <X> port |
348 |
| Fuser Kit low |
348 |
| Fuser Kit very low To continue, touch “OK” |
349 |
| Genuine HP cartridge installed |
349 |
| Genuine HP supply installed |
349 |
| HP Secure hard drive disabled |
349 |
| Incompatible <supply> |
350 |
| Incompatible supplies |
350 |
| Initializing... |
350 |
| Install fuser unit |
350 |
| Install supplies |
351 |
| Install supply |
351 |
| Internal disk device failure To clear press “OK” |
351 |
| Internal disk file operation failed |
351 |
| Internal disk file system is full |
352 |
| Internal disk is write protected |
352 |
| Internal disk not found |
352 |
| Internal disk not functional |
352 |
| Internal disk not initialized |
352 |
| Internal disk spinning up |
353 |
| Job not stapled due to mixed sizes |
353 |
| Load Tray <X>: [Type], [Size] |
353 |
| Load Tray <X>: [Type], [Size] To use another tray, press “OK” |
354 |
| Loading program <XX> |
354 |
| Manually feed output stack Then touch \ |
354 |
| Manually feed: <Type><Size> |
354 |
| Manually feed: <Type><Size> To use another tray, press “OK” |
355 |
| Moving solenoid |
355 |
| Moving solenoid and motor |
355 |
| No job to cancel |
355 |
| NON HP SUPPLY INSTALLED |
356 |
| Output Bin Full |
356 |
| Paused… |
356 |
| Performing Paper Path Test… |
356 |
| Please Wait... |
356 |
| Printing Configuration... |
357 |
| Printing Event Log... |
357 |
| Printing File Directory... |
357 |
| Printing Font List... |
357 |
| Printing Fuser Test Page... |
357 |
| Printing Help Page... |
358 |
| Printing Menu Map... |
358 |
| Printing Registration Page… |
358 |
| Printing stopped |
358 |
| Printing Supplies Status Page... |
358 |
| Printing Usage Page... |
358 |
| Printing…engine test |
359 |
| Processing duplex job Do not grab paper until job completes |
359 |
| Processing job from tray <X>... Do not grab paper until job completes |
359 |
| Processing... |
359 |
| Processing... copy <X> of <Y> |
359 |
| RAM disk device failure To clear press “OK” |
360 |
| RAM disk file operation failed To clear press “OK” |
360 |
| RAM disk file system is full To clear press “OK” |
360 |
| RAM disk is write protected To clear press “OK” |
360 |
| RAM disk not initialized |
360 |
| Ready |
361 |
| Ready <IP Address> |
361 |
| Receiving Upgrade |
361 |
| Remove one print cartridge |
361 |
| Remove USB accessory |
361 |
| Replace <supply> |
362 |
| Replace supplies |
362 |
| Resend external accessory firmware |
363 |
| Resend Upgrade |
363 |
| Restore Factory Settings |
363 |
| ROM disk device failed To clear press “OK” |
363 |
| ROM disk file operation failed To clear press “OK” |
363 |
| ROM disk file system is full To clear press “OK” |
364 |
| ROM disk is write protected To clear press “OK” |
364 |
| ROM disk not initialized To clear press “OK” |
364 |
| Rotating Motor |
364 |
| Size Mis-Match |
364 |
| Size mismatch in Tray <X> |
365 |
| Sleep mode on |
365 |
| Staple Cartridge low |
365 |
| Staple Cartridge very low |
365 |
| Stapler/Stacker staple jam |
366 |
| Supplies low |
366 |
| SUPPLY MEMORY WARNING |
366 |
| The unit has corrupt data |
366 |
| Tray <X> empty: [Type], [Size] |
367 |
| Tray <X> lifting |
368 |
| Tray <X> open |
368 |
| Tray <X> overfilled |
369 |
| Type mismatch Tray |
369 |
| Unsupported drive installed To continue, touch “OK” |
369 |
| Unsupported supply in use OR Unsupported supply installed To continue, touch “OK” |
370 |
| Unsupported tray configuration |
370 |
| Unsupported USB accessory detected Remove USB accessory |
370 |
| Upgrade Error |
370 |
| USB accessory not functional |
371 |
| USB hubs are not fully supported Some operations may not work properly |
371 |
| USB is write protected To clear press “OK” |
371 |
| USB needs too much power |
371 |
| USB needs too much power Remove USB and Then Turn Off then On |
371 |
| USB not initialized |
372 |
| USB storage accessory removed Clearing any associated data |
372 |
| USB storage device failure To clear press “OK” |
372 |
| USB storage file operation failed To clear press “OK” |
372 |
| USB storage file system is full To clear press “OK” |
372 |
| Used supply installed To continue, touch “OK” OR Used supply in use |
373 |
| Waiting for tray <X> to lift |
373 |
| Windows Login Required to Use this Feature |
373 |
| Event-log messages |
374 |
| Print an event log |
375 |
| View an event log |
376 |
| Clear an event log |
376 |
| Clear jams |
377 |
| Jam locations |
378 |
| Common causes of jams |
379 |
| Clear jams from the input trays |
380 |
| Clear jams from Tray 1 |
380 |
| Clear jams from Tray 2 or an optional 500-sheet tray |
380 |
| Clear jams from the optional 1,500-sheet tray |
381 |
| Clear jams from the optional duplexer |
383 |
| Clear jams from the optional envelope feeder |
385 |
| Clear jams from the output areas |
387 |
| Clear jams from the rear output bin |
387 |
| Clear jams from the optional stacker or stapler/stacker |
388 |
| Clear paper jams from the optional stacker or stapler/stacker |
388 |
| Clear staple jams from the optional stapler/stacker |
389 |
| Clear jams from the optional 5-bin mailbox |
391 |
| Clear jams from the fuser |
393 |
| Clear jams from the print-cartridge (top cover) |
397 |
| Change jam recovery |
399 |
| Paper does not feed automatically |
400 |
| The product does not pick up paper |
400 |
| The product picks up multiple sheets of paper |
400 |
| Prevent paper jams |
400 |
| Use manual print modes |
402 |
| Solve image-quality problems |
404 |
| Print-quality examples |
404 |
| Clean the product |
412 |
| Clean the paper path |
412 |
| Set up an auto cleaning page |
412 |
| Solve performance problems |
413 |
| Solve connectivity problems |
414 |
| Solve direct-connect problems |
414 |
| Solve network problems |
414 |
| Service mode functions |
415 |
| Service menu |
415 |
| Product resets |
416 |
| Restore factory-set defaults |
416 |
| Clean Disk and Partial Clean functions |
417 |
| Active and repository firmware locations |
417 |
| Partial Clean |
418 |
| Execute a Partial Clean |
418 |
| Clean Disk |
419 |
| Execute a Clean Disk |
419 |
| Product updates |
421 |
| Determine the installed revision of firmware |
421 |
| Perform a firmware upgrade |
421 |
| Embedded Web Server |
421 |
| USB storage device (Preboot menu) |
422 |
| USB storage device (control-panel menu) |
423 |
| Parts and diagrams |
425 |
| Order parts by authorized service providers |
426 |
| Order parts, accessories, and supplies |
426 |
| Supplies part numbers |
426 |
| Customer-self repair parts |
426 |
| Accessories part numbers |
428 |
| Related documentation and software |
429 |
| How to use the parts lists and diagrams |
430 |
| Assembly locations |
431 |
| Base product (no optional trays or accessories) |
431 |
| Covers |
434 |
| Product base |
434 |
| Internal components |
436 |
| Internal components (1 of 3) |
436 |
| Internal components (2 of 3) |
438 |
| Internal components (3 of 3) |
440 |
| High-voltage power supply |
442 |
| Cassette (Tray 2) |
444 |
| Cassette (custom media) |
446 |
| Paper feed roller assembly |
448 |
| Registration assembly |
450 |
| Tray 1 (MP) pickup assembly |
452 |
| Paper delivery assembly |
454 |
| Fuser assembly |
456 |
| PCAs (product base) |
458 |
| Input devices |
460 |
| 1x500-sheet feeder |
460 |
| Covers (1x500) |
460 |
| Main body (1x500) |
462 |
| Cassette (1x500) |
464 |
| PCA (1x500) |
466 |
| 1x1500-sheet paper deck |
468 |
| Covers (1x1500) |
468 |
| Front door assembly (1x1500) |
470 |
| Main body (1x500; 1 of 2) |
472 |
| Main body (1x500; 2 of 2) |
474 |
| Paper pickup assembly (1x500) |
476 |
| PCA (1x1500) |
478 |
| Duplexer |
480 |
| Main body (duplexer) |
480 |
| PCA (duplexer) |
482 |
| Envelope feeder |
484 |
| Covers (envelope feeder) |
484 |
| Main body (1 of 2; envelope feeder) |
486 |
| Main body (2 of 2; envelope feeder) |
488 |
| PCA (envelope feeder) |
490 |
| Output devices |
492 |
| Stapler/stacker multi-bin mailbox (MBM) |
492 |
| Covers (MBM) |
492 |
| Main body (MBM) |
494 |
| Main body (MBM; 1 of 2) |
494 |
| Main body (MBM; 2 of 2) |
496 |
| PCA (MBM) |
498 |
| Stacker and Stapler/Stacker (S and S/S) |
500 |
| Covers (S and S/S) |
500 |
| Main body (SS) |
502 |
| Main body (S) |
504 |
| Middle assemblies (S and S/S) |
506 |
| Stapler/Stacker middle assembly (1 of 2; S/S) |
506 |
| Stapler/Stacker middle assembly (2 of 2; S/S) |
508 |
| Stacker middle assembly (1 of 2; S) |
510 |
| Stacker middle assembly (2 of 2; S) |
512 |
| PCA (S and S/S) |
514 |
| Alphabetical parts list |
516 |
| Numerical parts list |
525 |
| Service and support |
535 |
| Hewlett-Packard limited warranty statement |
536 |
| HP's Premium Protection Warranty: LaserJet print cartridge limited warranty statement |
538 |
| Data stored on the print cartridge |
539 |
| End User License Agreement |
540 |
| Customer self-repair warranty service |
543 |
| Customer support |
544 |
| Repack the product |
545 |
| Product specifications |
547 |
| Physical specifications |
548 |
| Power consumption, electrical specifications, and acoustic emissions |
548 |
| Operating environment |
549 |
| Regulatory information |
551 |
| FCC regulations |
552 |
| Environmental product stewardship program |
553 |
| Protecting the environment |
553 |
| Ozone production |
553 |
| Power consumption |
553 |
| Toner consumption |
553 |
| Paper use |
553 |
| Plastics |
553 |
| HP LaserJet print supplies |
554 |
| Return and recycling instructions |
554 |
| United States and Puerto Rico |
554 |
| Multiple returns (more than one cartridge) |
554 |
| Single returns |
554 |
| Shipping |
554 |
| Residents of Alaska and Hawaii |
555 |
| Non-U.S. returns |
555 |
| Paper |
555 |
| Material restrictions |
555 |
| Disposal of waste equipment by users in private households in the European Union |
556 |
| Chemical substances |
556 |
| Material Safety Data Sheet (MSDS) |
556 |
| For more information |
556 |
| Declaration of Conformity |
558 |
| Certificate of Volatility |
560 |
| Types of memory |
560 |
| Volatile memory |
560 |
| Non-volatile memory |
560 |
| Hard-disk-drive memory |
560 |
| Safety statements |
561 |
| Laser safety |
561 |
| Canadian DOC regulations |
561 |
| VCCI statement (Japan) |
561 |
| Power cord instructions |
561 |
| Power cord statement (Japan) |
561 |
| EMC statement (China) |
562 |
| EMC statement (Korea) |
562 |
| EMI statement (Taiwan) |
562 |
| Product Stability |
562 |
| Laser statement for Finland |
562 |
| GS statement (Germany) |
563 |
| Substances Table (China) |
564 |
| Restriction on Hazardous Substances statement (Turkey) |
564 |
 1
1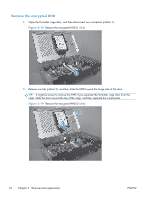 100
100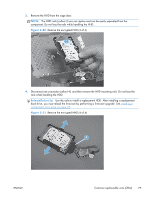 101
101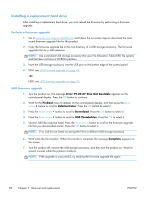 102
102 103
103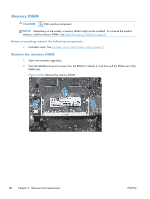 104
104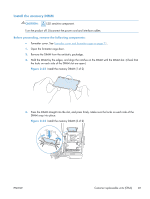 105
105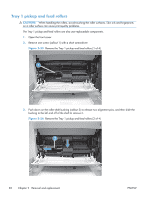 106
106 107
107 108
108 109
109 110
110

