HP LaserJet Enterprise 700 HP LaserJet Enterprise 700 M712 - User Guide - Page 22
Connect the product to a computer by using a USB cable and install the software (Windows)
 |
View all HP LaserJet Enterprise 700 manuals
Add to My Manuals
Save this manual to your list of manuals |
Page 22 highlights
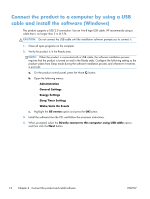
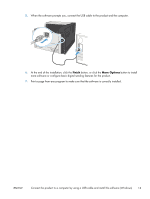
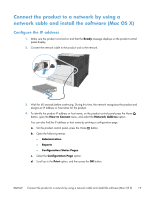
Connect the product to a computer by using a USB cable and install the software (Windows) This product supports a USB 2.0 connection. Use an A-to-B type USB cable. HP recommends using a cable that is no longer than 2 m (6.5 ft). CAUTION: Do not connect the USB cable until the installation software prompts you to connect it. 1. Close all open programs on the computer. 2. Verify the product is in the Ready state. NOTE: When the product is connected with a USB cable, the software installation process requires that the product is turned on and in the Ready state. Configure the following setting so the product wakes from Sleep mode during the software installation process and whenever it receives a print job: a. On the product control panel, press the Home button. b. Open the following menus: ◦ Administration ◦ General Settings ◦ Energy Settings ◦ Sleep Timer Settings ◦ Wake/Auto On Events c. Highlight the All events option and press the OK button. 3. Install the software from the CD, and follow the on-screen instructions. 4. When prompted, select the Directly connect to this computer using USB cable option, and then click the Next button. 12 Chapter 2 Connect the product and install software ENWW
-
 1
1 -
2
-
3
-
4
-
5
-
6
-
7
-
8
-
9
-
10
-
11
-
12
-
13
-
14
-
15
-
16
-
 17
17 -
 18
18 -
 19
19 -
 20
20 -
 21
21 -
 22
22 -
 23
23 -
 24
24 -
 25
25 -
 26
26 -
 27
27 -
28
-
29
-
30
-
31
-
32
-
33
-
34
-
35
-
36
-
37
-
38
-
39
-
40
-
41
-
42
-
43
-
44
-
45
-
46
-
47
-
48
-
49
-
50
-
51
-
52
-
53
-
54
-
55
-
56
-
57
-
58
-
59
-
60
-
61
-
62
-
63
-
64
-
65
-
66
-
67
-
68
-
69
-
70
-
71
-
72
-
73
-
74
-
75
-
76
-
77
-
78
-
79
-
80
-
81
-
82
-
83
-
84
-
85
-
86
-
87
-
88
-
89
-
90
-
91
-
92
-
93
-
94
-
95
-
96
-
97
-
98
-
99
-
100
-
101
-
102
-
103
-
104
-
105
-
106
-
107
-
108
-
109
-
110
-
111
-
112
-
113
-
114
-
115
-
116
-
117
-
118
-
119
-
120
-
121
-
122
-
123
-
124
-
125
-
126
-
127
-
128
-
129
-
130
-
131
-
132
-
133
-
134
-
135
-
136
-
137
-
138
-
139
-
140
-
141
-
142
-
143
-
144
-
145
-
146
-
147
-
148
-
149
-
150
-
151
-
152
-
153
-
154
-
155
-
156
-
157
-
158
-
159
-
160
-
161
-
162
-
163
-
164
-
165
-
166
-
167
-
168
-
169
-
170
-
171
-
172
-
173
-
174
-
175
-
176
-
177
-
178
-
179
-
180
-
181
-
182
-
183
-
184
-
185
-
186
 |
 |