HP LaserJet Pro CP1025 HP LaserJet Pro CP1020 - User Guide - Page 105
Solve problems checklist, Step 1: Make sure that the product is set up correctly
 |
View all HP LaserJet Pro CP1025 manuals
Add to My Manuals
Save this manual to your list of manuals |
Page 105 highlights
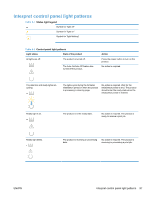
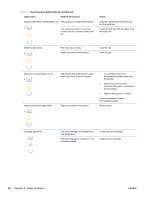
Solve problems checklist Follow these steps when trying to solve a problem with the product. ● Step 1: Make sure that the product is set up correctly ● Step 2: Check the cabling or wireless connection (network models only) ● Step 3: Check to see if any control-panel lights are lit ● Step 4: Check the paper ● Step 5: Check the software ● Step 6: Test print functionality ● Step 7: Check the supplies ● Step 8: Try sending a print job from a computer Step 1: Make sure that the product is set up correctly Make sure that the product is set up correctly. 1. Press the power button to turn on the product or to deactivate the Auto-On\Auto-Off mode. 2. Check the power-cable connections. 3. Make sure that the line voltage is correct for the product power configuration. (See the label that is on the back of the product for voltage requirements.) If you are using a power strip and its voltage is not within specifications, plug the product directly into the wall. If it is already plugged into the wall, try a different outlet. 4. Make sure that the print cartridge is installed correctly. 5. If none of these measures restores power, contact HP Customer Care. Step 2: Check the cabling or wireless connection (network models only) 1. Check the cable connection between the product and the computer. Make sure that the connection is secure. 2. Make sure that the cable itself is not faulty by using a different cable, if possible. Step 3: Check to see if any control-panel lights are lit The control panel should indicate ready status. If an error message appears, resolve the error. Step 4: Check the paper 1. Make sure that the paper that you are using meets specifications. 2. Make sure that the paper is loaded correctly in the input tray. ENWW Solve problems checklist 93
-
 1
1 -
2
-
3
-
4
-
5
-
6
-
7
-
8
-
9
-
10
-
11
-
12
-
13
-
14
-
15
-
16
-
17
-
18
-
19
-
20
-
21
-
22
-
23
-
24
-
25
-
26
-
27
-
28
-
29
-
30
-
31
-
32
-
33
-
34
-
35
-
36
-
37
-
38
-
39
-
40
-
41
-
42
-
43
-
44
-
45
-
46
-
47
-
48
-
49
-
50
-
51
-
52
-
53
-
54
-
55
-
56
-
57
-
58
-
59
-
60
-
61
-
62
-
63
-
64
-
65
-
66
-
67
-
68
-
69
-
70
-
71
-
72
-
73
-
74
-
75
-
76
-
77
-
78
-
79
-
80
-
81
-
82
-
83
-
84
-
85
-
86
-
87
-
88
-
89
-
90
-
91
-
92
-
93
-
94
-
95
-
96
-
97
-
98
-
99
-
 100
100 -
 101
101 -
 102
102 -
 103
103 -
 104
104 -
 105
105 -
 106
106 -
 107
107 -
 108
108 -
 109
109 -
 110
110 -
111
-
112
-
113
-
114
-
115
-
116
-
117
-
118
-
119
-
120
-
121
-
122
-
123
-
124
-
125
-
126
-
127
-
128
-
129
-
130
-
131
-
132
-
133
-
134
-
135
-
136
-
137
-
138
-
139
-
140
-
141
-
142
-
143
-
144
-
145
-
146
-
147
-
148
-
149
-
150
-
151
-
152
-
153
-
154
-
155
-
156
-
157
-
158
-
159
-
160
-
161
-
162
-
163
-
164
-
165
-
166
-
167
-
168
-
169
-
170
-
171
-
172
-
173
-
174
 |
 |