HP Nc2400 Multimedia
HP Nc2400 - Compaq Business Notebook Manual
 |
UPC - 883585088331
View all HP Nc2400 manuals
Add to My Manuals
Save this manual to your list of manuals |
HP Nc2400 manual content summary:
- HP Nc2400 | Multimedia - Page 1
Multimedia User Guide - HP Nc2400 | Multimedia - Page 2
2006 Hewlett-Packard Development Company, L.P. Microsoft and Windows are U.S. registered trademarks of Microsoft Corporation. The information contained herein is subject to change without notice. The only warranties for HP products and services are set forth in the express warranty statements - HP Nc2400 | Multimedia - Page 3
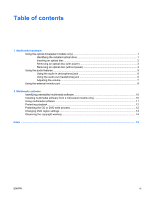
1 Identifying the installed optical drive 1 Inserting an optical disc ...2 Removing an optical disc (with power 3 Removing an optical disc (without power 4 Using the audio features ...5 Using the audio-in (microphone) jack 6 Using the audio-out (headphone) jack 6 Adjusting the volume ...7 Using - HP Nc2400 | Multimedia - Page 4
iv ENWW - HP Nc2400 | Multimedia - Page 5
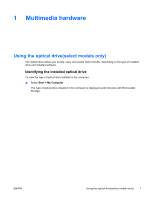
1 Multimedia hardware Using the optical drive(select models only) The optical drive allows you to play, copy, and create CDs or DVDs, depending on the type of installed drive and installed software. Identifying the installed optical drive To view the type of optical drive installed in the computer: - HP Nc2400 | Multimedia - Page 6
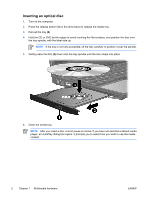
Inserting an optical disc 1. Turn on the computer. 2. Press the release button (1) on the drive bezel to release the media tray. 3. Pull out the tray (2). 4. Hold the CD or DVD by the edges to avoid touching the flat surfaces, and position the disc over the tray spindle, with the label-side up. NOTE - HP Nc2400 | Multimedia - Page 7
an optical disc (with power) If the computer is running on external or battery power: 1. Turn on the computer. 2. Press the release button (1) on the drive bezel to release the media tray, and then pull out the tray (2). 3. Remove the disc (3) from the tray by gently pressing down on the spindle - HP Nc2400 | Multimedia - Page 8
an optical disc (without power) If external or battery power is unavailable: 1. Insert the end of a paper clip (1) into the release access in the front bezel of the drive. 2. Press in gently until the tray is released, and then pull out the tray (2). 3. Remove the disc (3) from the tray by gently - HP Nc2400 | Multimedia - Page 9
table describe the audio features of the computer. Component (1) Volume mute button (2) Volume scroll zone (3) Audio-in (microphone) jack (4) Audio-out (headphone) jack (5) Speaker Description Mutes and restores computer sound. Adjusts volume. Slide your finger to the left to decrease volume and - HP Nc2400 | Multimedia - Page 10
audio-in (microphone) jack The computer is equipped with a stereo (dual-channel) microphone jack that supports a stereo array and not plug a single sound channel (monaural) connector into the headphone jack. In addition to connecting headphones, the headphone jack is used to connect the audio input - HP Nc2400 | Multimedia - Page 11
volume scroll zone from right to left. ● To increase the volume, slide your finger across the volume scroll zone from left to right. ● Microsoft® Windows® volume control: a. Click the Volume icon in the notification area, at the far right of the taskbar. b. Increase or decrease the volume by moving - HP Nc2400 | Multimedia - Page 12
Using the external monitor port The external monitor port connects an external display device, such as an external monitor or projector, to the computer. To connect a display device, connect the device cable to the external monitor port. NOTE If a properly connected external display device does not - HP Nc2400 | Multimedia - Page 13
with the computer, the following multimedia tasks may be supported: ● Playing digital media, including audio and video CDs, audio and video DVDs, and Internet radio ● Creating or copying data CDs ● Creating, editing, and burning audio CDs ● Creating, editing, and burning a video or movie to a DVD - HP Nc2400 | Multimedia - Page 14
models only) To install multimedia software from a CD included with the computer: 1. Insert the multimedia software CD into the optical drive. 2. When the installation wizard opens, follow the installation instructions on the screen. 3. Restart the computer if prompted. Repeat the installation - HP Nc2400 | Multimedia - Page 15
to use. For example, if you want to use Windows Media Player to play an audio CD, select Windows Media Player. NOTE Some programs may be located in subfolders. 2. Insert the media disc, such as an audio CD, into the optical drive. 3. Follow the instructions on the screen. - or - 1. Insert the media - HP Nc2400 | Multimedia - Page 16
a source disc to a destination disc or from a network drive to a destination disc. Instead, copy from a source disc or network drive to your hard drive, and then copy from your hard drive to the destination disc. Do not use the computer keyboard or move the computer while the computer is writing to - HP Nc2400 | Multimedia - Page 17
change settings through the operating system: 1. Select Start > My Computer. 2. Right-click in the window and select Properties > Hardware tab > Device Manager. 3. Click DVD/CD-ROM drives, right-click the DVD drive for which you want to change region settings, and then click Properties. 4. Make the - HP Nc2400 | Multimedia - Page 18
Observing the copyright warning It is a criminal offense, under applicable copyright laws, to make unauthorized copies of copyrightprotected material, including computer programs, films, broadcasts, and sound recordings. Do not use this computer for such purposes. 14 Chapter 2 Multimedia software - HP Nc2400 | Multimedia - Page 19
jacks audio-in (microphone) 5, 6 audio-out (headphone) 5, 6 M microphones, supported 6 monitor, connecting 8 multimedia software described 9 identifying 10 installing 10 using 11 mute button 5, 7 O optical disc inserting 2 removing, with power 3 removing, without power 4 writing to 12 optical drive - HP Nc2400 | Multimedia - Page 20
16 Index ENWW - HP Nc2400 | Multimedia - Page 21
- HP Nc2400 | Multimedia - Page 22
-
 1
1 -
 2
2 -
 3
3 -
 4
4 -
 5
5 -
 6
6 -
 7
7 -
8
-
9
-
10
-
11
-
12
-
13
-
14
-
15
-
16
-
17
-
18
-
19
-
20
-
21
-
22
 |
 |

Multimedia
User Guide