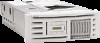
HP NetServer LT 6000r HP Netserver Mass Storage Upgrade Guide
HP NetServer LT 6000r Manual
 |
View all HP NetServer LT 6000r manuals
Add to My Manuals
Save this manual to your list of manuals |
HP NetServer LT 6000r manual content summary:
- HP NetServer LT 6000r | HP Netserver Mass Storage Upgrade Guide - Page 1
HP NetServer LH 3000/3000r and LH 6000/6000r Mass Storage Upgrade Guide HP Part Number 5969-2159 Printed in October 1999 - HP NetServer LT 6000r | HP Netserver Mass Storage Upgrade Guide - Page 2
Cupertino, CA 95014 USA © Copyright 1999, Hewlett-Packard Company. Audience Assumptions This guide is for the person who installs, administers, and troubleshoots network servers. Hewlett-Packard Company assumes you are qualified in the servicing of computer equipment and trained in recognizing - HP NetServer LT 6000r | HP Netserver Mass Storage Upgrade Guide - Page 3
10: Install Hard Disk Drive Modules 20 Hot-Swap Disk Drive Configurations 20 Installing Hot-Swap Drives 24 Step 11: Reconnect Power Cords and Other Cables 24 Step 12: Verify Installation 25 Verifying Hard Disk Drive Operation 25 3 Configure Mass Storage 29 About RAID or Non-RAID Operation 29 - HP NetServer LT 6000r | HP Netserver Mass Storage Upgrade Guide - Page 4
Contents A Warranty and Support 39 Hardware Accessories Limited Warranty 39 HP Repair and Telephone Support 39 B Regulatory Information 41 Index...43 iv - HP NetServer LT 6000r | HP Netserver Mass Storage Upgrade Guide - Page 5
1 Introduction About This Guide This guide contains instructions for installing an accessory second hot-swap mass storage cage into your HP NetServer LH 3000 or LH 3000r, or your LH 6000 or LH 6000r. The HP NetServer LH 3000 and the HP NetServer LH 6000 are the floor-standing pedestal configurations - HP NetServer LT 6000r | HP Netserver Mass Storage Upgrade Guide - Page 6
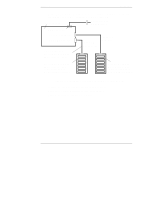
Chapter 1 Introduction Chapter 2 of this guide tells how to install the second hot-swap mass storage Drive Bay in Pedestal Orientation) Figure 1-2. Cabling the Secondary Hot-Swap Mass Storage Cage Chapter 3 tells how to configure the hot-swap disk drives. Appendix A contains warranty and support - HP NetServer LT 6000r | HP Netserver Mass Storage Upgrade Guide - Page 7
Introduction Precautions Follow the procedures listed below to ensure safe handling of components and to prevent harm to both you and the HP NetServer: WARNING Hazardous voltages and high energy levels are present inside the HP NetServer. ALWAYS disconnect the AC power cord(s) from the NetServer - HP NetServer LT 6000r | HP Netserver Mass Storage Upgrade Guide - Page 8
Chapter 1 Introduction Verify Contents CAUTION An insulating sheet shown in Figure 1-3 covers the cage's backplane and part of one side. connect the hot-swap mass storage cage • HP NetServer LH 3000/3000r and LH 6000/6000r Mass Storage Upgrade Guide (this document) If anything is missing or damaged, - HP NetServer LT 6000r | HP Netserver Mass Storage Upgrade Guide - Page 9
documents supplied with your HP NetServer: • HP NetServer LH 3000/3000r Installation Guide • HP NetServer LH 6000/6000r Installation Guide • Integrated HP NetRAID Controller Configuration Guide The HP NetServer Ultra2 SCSI Hot-swap Hard Disk Drive and Tray User Guide is supplied with accessory - HP NetServer LT 6000r | HP Netserver Mass Storage Upgrade Guide - Page 10
- HP NetServer LT 6000r | HP Netserver Mass Storage Upgrade Guide - Page 11
10: Install Hard Disk Drive Modules • Step 11: Reconnect Power Cords and Other Cables • Step 12: Verify Installation After you finish the installation, go to Chapter 3 to configure your mass storage. Step 1: Power Down and Disconnect Do the following to power down and disconnect the HP NetServer - HP NetServer LT 6000r | HP Netserver Mass Storage Upgrade Guide - Page 12
prevent the rack from rolling. Failure to use the anti-tip foot or feature and the leveler feet could result in serious injury. 1. If the HP NetServer is installed in a rack, extend the HP NetServer from the rack. Refer to your HP NetServer installation guide for instructions. 8 - HP NetServer LT 6000r | HP Netserver Mass Storage Upgrade Guide - Page 13
Installation 2. Remove Cover 1 as described in your HP NetServer installation guide. 3. The HP NetServer has a cover plate on its chassis front over place while you install the cage. Do not install hard disk drives before you install the cage. If you are installing a hot-swap mass - HP NetServer LT 6000r | HP Netserver Mass Storage Upgrade Guide - Page 14
CD-ROM drive. CAUTION As you insert the cage, be careful not to damage the insulating sheet covering the cage's backplane and part of one easier access to the SCSI connectors. Refer to the HP NetServer Duplex Kit Installation Guide for instructions. 3. When the cage is correctly positioned, press - HP NetServer LT 6000r | HP Netserver Mass Storage Upgrade Guide - Page 15
the two circular access holes in the chassis shown in Figure 2-3, insert and tighten two screws supplied with the upgrade kit. ◊ HP NetServer LH 3000 and LH 6000 access holes are on the side of the chassis. ◊ HP NetServer LH 3000r and LH 6000r access holes are on the top of the chassis. Figure - HP NetServer LT 6000r | HP Netserver Mass Storage Upgrade Guide - Page 16
or 2-5. Grasp one of the I/O fan modules, depress the latch on the back of the module, and pull the module straight out from the HP NetServer. Repeat this for the other I/O fan. Latches on I/O Fans Thumbscrew on Air Baffle Figure 2-4. Remove I/O Fan from HP NetServer in Pedestal Configuration 12 - HP NetServer LT 6000r | HP Netserver Mass Storage Upgrade Guide - Page 17
Thumbscrew on Air Baffle Installation Figure 2-5. Remove I/O Fans from Rack-Mounted HP NetServer NOTE To improve access to the back of the secondary hot-swap mass storage cage, you can remove the air baffle indicated in Figures 2-4 and 2-5. - HP NetServer LT 6000r | HP Netserver Mass Storage Upgrade Guide - Page 18
instructions. l To operate both mass storage cages as non-RAID, HP NetRAID series adapter to control the mass storage cage not connected to the I/O baseboard. NOTE If a duplex board is installed in the primary or secondary mass storage cage, refer to the HP NetServer Duplex Kit Installation Guide - HP NetServer LT 6000r | HP Netserver Mass Storage Upgrade Guide - Page 19
the secondary mass storage cage to the SCSI B connector on the I/O baseboard, install the SCSI cable supplied with the kit as follows: 1. Carefully pull aside the cables for the flexible disk drive and CD-ROM drive to gain access to the SCSI B connector on the I/O baseboard, which is shown in Figure - HP NetServer LT 6000r | HP Netserver Mass Storage Upgrade Guide - Page 20
Chapter 2 Installation 2. Connect the SCSI cable's 68-pin connector labeled "To I/O Board" to the SCSI B connector on the I/O baseboard, as shown in Figure 2-6. To attach the 68-pin connector, press on the center of the connector strain relief and press the connector into place, as shown in Figure - HP NetServer LT 6000r | HP Netserver Mass Storage Upgrade Guide - Page 21
Chapter 2 Installation 3. Connect the SCSI cable's 68-pin connector labeled "To SCSI Mass Storage Device" to the SCSI connector on the cage's backplane, as shown in Figure 2-8. Figure 2-8. Attach SCSI Cable Connector to Cage's Backplane 17 - HP NetServer LT 6000r | HP Netserver Mass Storage Upgrade Guide - Page 22
socket on the backplane of the mass storage cage, as shown in Figure 2-9. Figure 2-9. Connect Power Harness to Backplane of Mass Storage Cage 2. Connect the P2 connector on the power harness to the power socket on the backplane of the mass storage cage. Verify that the latch on the connector is - HP NetServer LT 6000r | HP Netserver Mass Storage Upgrade Guide - Page 23
are identical. Replace them as follows: 1. Orient one I/O fan to the accessory board guide, as shown in Figure 2-10. Accessory Board Guide I/O Fan I/O Fan Figure 2-10. Insert Fan Assemblies (Shown for Pedestal Configuration) 2. Insert the fan module and press it firmly into the connector. 3. Repeat - HP NetServer LT 6000r | HP Netserver Mass Storage Upgrade Guide - Page 24
desired. Step 10: Install Hard Disk Drive Modules Hot-Swap Disk Drive Configurations NOTE If a duplex board is installed in the secondary mass storage cage, refer to the HP NetServer Duplex Kit Installation Guide or your HP NetServer installation guide for drive configurations and SCSI addresses - HP NetServer LT 6000r | HP Netserver Mass Storage Upgrade Guide - Page 25
drive blockers, which prevent installation of drive modules into unsupported positions. Drive Blockers prevent installation of drive modules into unsupported positions Figure 2-11. Drive configurations are shown in your HP NetServer installation guide and the HP NetServer Duplex Kit Installation - HP NetServer LT 6000r | HP Netserver Mass Storage Upgrade Guide - Page 26
configurations and SCSI addresses (IDs) for the secondary cage in a pedestal HP NetServer. Load drive modules with all necessary drive spacers starting at the bottom of the cage, as described in "Installing Hot-Swap Drives" later in this chapter. Filler panels must occupy all locations without disk - HP NetServer LT 6000r | HP Netserver Mass Storage Upgrade Guide - Page 27
Chapter 2 Installation Below are single-bus (no duplex board) hot-swap drive configurations and SCSI addresses (IDs) for the secondary cage in a rack-mounted HP NetServer. Load drive modules with all necessary drive spacers starting at the bottom of the cage, as described in "Installing Hot-Swap - HP NetServer LT 6000r | HP Netserver Mass Storage Upgrade Guide - Page 28
to prevent damage, as described in HP NetServer Ultra2 SCSI Hot-swap Hard Disk Drive and Tray User Guide. CAUTION Do NOT operate the HP NetServer with any missing drive spacers or filler panels. Otherwise, overheating can damage disk drive modules. Step 11: Reconnect Power Cords and Other Cables - HP NetServer LT 6000r | HP Netserver Mass Storage Upgrade Guide - Page 29
verify the hard disk drive modules. Refer to your HP NetServer's installation guide, or download HP DiagTools and its guide. To download, go to http://www.hp.com/go/netserver/, select Technical Support, and then select Troubleshooting. Download the latest version of HP DiagTools and the guide for it - HP NetServer LT 6000r | HP Netserver Mass Storage Upgrade Guide - Page 30
activity indications for all of the disk drive modules that you installed: 1. Turn on power to the HP NetServer and display monitor. 2. During the Power On Self Test (POST) early in the boot sequence, watch the two LED indicators on each hard disk drive module. ◊ Status LEDs: All LEDs quickly cycle - HP NetServer LT 6000r | HP Netserver Mass Storage Upgrade Guide - Page 31
when you inspect them or when you reinsert the module. c. Reinstall the disk drive module, as described in the HP NetServer Ultra2 SCSI Hot-swap Hard Disk Drive and Tray User Guide. d. Restart the HP NetServer to determine whether the LED indicators become illuminated during the POST now. If not - HP NetServer LT 6000r | HP Netserver Mass Storage Upgrade Guide - Page 32
- HP NetServer LT 6000r | HP Netserver Mass Storage Upgrade Guide - Page 33
Disks" configuration) is quick and easy. ◊ All NOSs supported by your HP NetServer can be installed on non-RAID hard disk drives. ◊ Non-RAID configuration is described in "Non-RAID Configuration" later in this chapter. NOTE All hard disk drives connected to SCSI A and SCSI B on the I/O baseboard - HP NetServer LT 6000r | HP Netserver Mass Storage Upgrade Guide - Page 34
ensure that Ultra2 SCSI support is enabled for the secondary hot-swap mass storage cage, run HP NetRAID Express Tools. For instructions, refer to one of the guides listed above. Non-RAID Configuration Drives in the secondary hot-swap mass storage cage can be controlled in non-RAID mode by the SCSI - HP NetServer LT 6000r | HP Netserver Mass Storage Upgrade Guide - Page 35
the boot priority of hard disk drive controllers, also use the Symbios Configuration Utility to set the channel to be searched first for a bootable drive, as described in "Run Symbios Configuration Utility" in later this chapter. Start Setup Utility 1. If the HP NetServer and display monitor are - HP NetServer LT 6000r | HP Netserver Mass Storage Upgrade Guide - Page 36
drives mismatch" indicates that configuration information in the integrated HP NetRAID controller's NVRAM differs from configuration information in hard disk drives , restart the HP NetServer, and press the F2 function key as soon as the message appears. 3. If a power-on password has been set, - HP NetServer LT 6000r | HP Netserver Mass Storage Upgrade Guide - Page 37
and press Enter to choose it. 9. The Hard Drive Priority list displays the order in which hard disk drive controllers will be searched for a bootable device. If you need to change the priorities, follow the on-screen instructions. When the hard drive priorities are correct, press Esc twice to return - HP NetServer LT 6000r | HP Netserver Mass Storage Upgrade Guide - Page 38
mass storage cages connected to SCSI A and B on the I/O baseboard. This is the default value. CAUTION If your HP NetServer was previously operating in RAID mode (Enable HP NetRAID), changing to non-RAID mode (Enable LVD SCSI) could cause data loss. Be sure your data is backed up before you change - HP NetServer LT 6000r | HP Netserver Mass Storage Upgrade Guide - Page 39
. If you receive an error message during the boot process, refer to "Troubleshooting" in the HP NetServer LH 3000/3000r or LH 6000/6000r Installation Guide(s) or the online help. Some power-up (boot) messages are routine. 2. As soon as you see the message Press Ctrl-C to start Symbios Configuration - HP NetServer LT 6000r | HP Netserver Mass Storage Upgrade Guide - Page 40
the boot order of the SCSI B controller. ◊ 0 marks the controller of the SCSI channel searched first for a bootable drive. ◊ 1 marks the controller of the SCSI channel searched second for a bootable drive. ◊ A blank indicates that the controller's SCSI channel is not searched for a bootable - HP NetServer LT 6000r | HP Netserver Mass Storage Upgrade Guide - Page 41
. Any SCSI devices controlled by a SCSI controller without a boot order number will NOT be displayed during the boot process. If no drives in the secondary hot-swap mass storage cage are detected, refer to Chapter 2 as you do the following: 1. Turn off power to the HP NetServer, and unplug the - HP NetServer LT 6000r | HP Netserver Mass Storage Upgrade Guide - Page 42
to the HP NetServer Ultra2 SCSI Hot-swap Hard Disk Drive and Tray User Guide to do the following: remove the module from the cage; reinstall the disk drive into the tray, and reinstall the module into the cage. Restart the HP NetServer to see if the drive is detected. ∗ If so, the problem is solved - HP NetServer LT 6000r | HP Netserver Mass Storage Upgrade Guide - Page 43
price upon return of the hardware accessory product. The customer may be required to run HP-supplied configuration and diagnostic programs before a replacement will be dispatched or an on-site visit is authorized. HP Repair and Telephone Support Refer to the HP NetServer Warranty and Service/Support - HP NetServer LT 6000r | HP Netserver Mass Storage Upgrade Guide - Page 44
- HP NetServer LT 6000r | HP Netserver Mass Storage Upgrade Guide - Page 45
ISO/IEC Guide 22 and EN 45014 Manufacturer's Name: Address: declares, that the product Hewlett-Packard Company 10955 Tantau Avenue Cupertino, CA 95014 USA Product Name: Model Number(s): Product Options: Second Drive Cage D9158A N/A conforms to the following Product Specifications: Safety: IEC - HP NetServer LT 6000r | HP Netserver Mass Storage Upgrade Guide - Page 46
- HP NetServer LT 6000r | HP Netserver Mass Storage Upgrade Guide - Page 47
mass storage, 29 non-RAID, 30 RAID, 30 Contents of kit, 4 Cover plate, 9 D Default settings, 34 Disconnecting the HP NetServer, 7 Disk drives configuring, 29 verifying, 37 Documents, 5 Drive spacers, 24 E Embedded LAN and SCSI Settings, 34 Environmental specifications, 41 Error message, 31 - HP NetServer LT 6000r | HP Netserver Mass Storage Upgrade Guide - Page 48
, 12, 15 I/O fans, 12, 19 Indicators, LED, 26 Insulating sheet, 4, 10 K Kit contents, 4 L LEDs, 25 Light pipes, LED, 27 LVD SCSI, 34 M Management Menu, 32 N Non-RAID configuration, 29, 30 NVRAM, 32 P Power cord retainer, 24 Power harness, 18 Powering down the HP NetServer, 7 R RAID configuration, 29
-
 1
1 -
 2
2 -
 3
3 -
 4
4 -
 5
5 -
 6
6 -
 7
7 -
8
-
9
-
10
-
11
-
12
-
13
-
14
-
15
-
16
-
17
-
18
-
19
-
20
-
21
-
22
-
23
-
24
-
25
-
26
-
27
-
28
-
29
-
30
-
31
-
32
-
33
-
34
-
35
-
36
-
37
-
38
-
39
-
40
-
41
-
42
-
43
-
44
-
45
-
46
-
47
-
48
 |
 |
HP NetServer
LH 3000/3000r and
LH 6000/6000r
Mass Storage Upgrade Guide
HP Part Number 5969-2159
Printed in October 1999