HP Notebook 100 Armada 100S Series Reference Guide
HP Notebook 100 Manual
 |
View all HP Notebook 100 manuals
Add to My Manuals
Save this manual to your list of manuals |
HP Notebook 100 manual content summary:
- HP Notebook 100 | Armada 100S Series Reference Guide - Page 1
only in accordance with the terms of the agreement. Product names mentioned herein may be trademarks and/or registered trademarks of their respective companies. Reference Guide Compaq Armada 100S Series First Edition June 2000 Part Number 198212-001 - HP Notebook 100 | Armada 100S Series Reference Guide - Page 2
. • Power Management You can automatically and manually conserve power by setting up the Power Management capabilities of your notebook. • Internal Modem (available on select models ) Supports fax and data communications functions that allow your notebook to be connected to a network environment - HP Notebook 100 | Armada 100S Series Reference Guide - Page 3
drive, Ultra DMA-33/66 supported • 24X CD-ROM drive • 32MB or 64MB of system memory, expanding up to 160MB or 192MB SDRAM with a 128-MB memory module upgrade (model dependent) • Internal 128KB L2 cache memory • Color TFT or HPA display (model dependent) • Notebook keyboard • TouchPad pointing device - HP Notebook 100 | Armada 100S Series Reference Guide - Page 4
"Hard Drive" in Chapter 2 for more information.) 2. Infrared Port This infrared port complies with IrDA 1.1 and ASK standards. It allows you to connect your notebook to an IR device wirelessly. (See "Connecting an Infrared Device" in Chapter 4 for important notes.) 3. CD-ROM Drive This is the CD-ROM - HP Notebook 100 | Armada 100S Series Reference Guide - Page 5
Use a cable to lock your notebook to an appropriate location for security. 2. Power Button Pressing this button turns the notebook power ON or OFF. 3. RJ vicinity of the leak. 4. PC Card Slot Open the display to access the PC Card slot. (See "Installing a PC Card" in Chapter 4 for more information - HP Notebook 100 | Armada 100S Series Reference Guide - Page 6
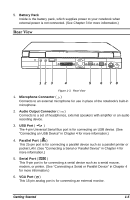
.) Rear View 12 3 4 5 6 78 Figure 1-3. Rear View 1. Microphone Connector ( ) Connects to an external microphone for use in place of the notebook's built-in microphone. 2. Audio Output Connector ( ) Connects to a set of headphones, external speakers with amplifier or an audio recording device - HP Notebook 100 | Armada 100S Series Reference Guide - Page 7
7. PS/2 Mouse/Keyboard Port ( ) This 6-pin mini-DIN port is for connecting a PS/2 keyboard or mouse. 8. Power Connector ( ) This is for connecting the AC adapter. 1-6 Getting Started - HP Notebook 100 | Armada 100S Series Reference Guide - Page 8
Front View 1. Display Latch The display latch keeps the notebook firmly closed. To open the computer, press the display latch toward the right, then lift the display. 2. Diskette Drive This is the 3.5-inch diskette drive of your notebook, often referred as drive A. (See "Diskette Drive" in Chapter - HP Notebook 100 | Armada 100S Series Reference Guide - Page 9
Power Management" in Chapter 2 for information on Suspend-to-RAM mode.) Battery Power Indicator • Turns on when the notebook is operating on battery power. • Blinks when the notebook, using battery power, is in Suspend-to-RAM mode. (See "Introducing Power Management" in Chapter 2 for information on - HP Notebook 100 | Armada 100S Series Reference Guide - Page 10
is activated. Scroll Lock Indicator turns on when the Scroll Lock function is activated. 3. Microphone This is the built-in microphone of your notebook. 4. Keyboard This keyboard provides all the functions of a full-size 87/90-key keyboard. (See "Keyboard" in Chapter 2 for information.) 5. TouchPad - HP Notebook 100 | Armada 100S Series Reference Guide - Page 11
from the electrical outlet to the AC adapter and onto your notebook. When the Battery Charge Indicator ( ) on the notebook glows orange, the AC adapter is charging the battery. 3. To fully charge the battery, leave the notebook power off, and wait until the Battery Charge Indicator glows green - HP Notebook 100 | Armada 100S Series Reference Guide - Page 12
POST). This checks the status of major notebook devices including the system board, memory, video, keyboard, and disk drive. Some status messages from POST will the Setup Configuration Utility (SCU) program. (See Chapter 5 for instructions on running SCU.) NOTE: The SCU program allows you to enter - HP Notebook 100 | Armada 100S Series Reference Guide - Page 13
disk instead of a diskette. If you must boot up from drive A, make sure the booting diskette is clean. Booting with Windows 98 The notebook is located on the operating system manual or on the bottom side of the notebook. You notebook comes with a CD-ROM that contains software drivers you need to - HP Notebook 100 | Armada 100S Series Reference Guide - Page 14
are using an operating system such as Microsoft Windows 98 that has the "Shut Down" command, simply select the command and the notebook will turn off automatically. Otherwise, turn off the notebook by pressing the Power Button. 4. Turn off the power to any connected external devices. 5. To close the - HP Notebook 100 | Armada 100S Series Reference Guide - Page 15
drive, hard drive, CD-ROM drive, keyboard, and TouchPad. It also introduces power management and gives you tips in care and maintenance. Diskette Drive Your notebook comes with a diskette drive designated as drive A. A diskette drive allows you to load new programs into your - HP Notebook 100 | Armada 100S Series Reference Guide - Page 16
it with the arrow facing up and towards the drive. Slide the disk into the drive until it clicks into place. Figure 2-2. Inserting a format a diskette, please consult your operating system manual. CAUTION: 1. Never turn off or reset the notebook while the diskette drive in-use indicator is on - HP Notebook 100 | Armada 100S Series Reference Guide - Page 17
Your notebook comes with a CD-ROM drive, which uses removable 5.25-inch compact disks that look like standard music CD-ROMs. The compact disk is an ROM is correctly inserted into the tray, then close the tray. 3. Do not leave the CD-ROM tray open. Moreover, avoid touching the lens in the tray with - HP Notebook 100 | Armada 100S Series Reference Guide - Page 18
procedure to insert or remove a CD-ROM. 1. Turn on the notebook. 2. Push the eject button Ê and the CD-ROM tray will 2 1 Figure 2-3. Inserting a CD-ROM 4. Slide the tray back into the drive bay. Manually Releasing a CD-ROM In the unlikely event that you are unable to release the CD-ROM tray by - HP Notebook 100 | Armada 100S Series Reference Guide - Page 19
programs. Hot key functions are assigned to [Fn]+[F5] through [Fn]+[F12] by your notebook. Hotkeys refer to a combination of keys that can be pressed at any time to activate special activates the "Suspend-to-RAM" or "Suspend-to-Disk" mode according to the setting of SCU. Using the Notebook 2-5 - HP Notebook 100 | Armada 100S Series Reference Guide - Page 20
(SCU) program is checked, you can not directly use the alpha keys on the notebook keyboard. To use the alpha keys, hold down the [Fn] key first or press 3. Some software may not be able to use the numeric keypad on the notebook. If so, use the numeric keypad on an external keyboard instead. Cursor- - HP Notebook 100 | Armada 100S Series Reference Guide - Page 21
key ( ÿ ) and one Application Logo key ( ). The two keys are used with other keys to perform software-specific functions. (See your Microsoft operating system manual.) Fn Key The [Fn] key, at the lower left corner of the keyboard, is used with other keys to perform alternative functions. Using the - HP Notebook 100 | Armada 100S Series Reference Guide - Page 22
TouchPad Your notebook integrates a TouchPad pointing device, compatible with the Microsoft Mouse and PS/2-type mouse, which allows you to take advantage of software that , "tapping" on the TouchPad as an alternative method of pressing the left button will no longer be valid. 2-8 Using the Notebook - HP Notebook 100 | Armada 100S Series Reference Guide - Page 23
directory, release the left button. The file will drop into the new location. You can also do drag and drop operations using the TouchPad as a " in Chapter 5 for instructions.) Automatic Power Management Local Power Management Local Power Management controls notebook subsystems. When a subsystem is - HP Notebook 100 | Armada 100S Series Reference Guide - Page 24
mode can be set up in the Setup Configuration Utility (SCU) program. The notebook suspends to RAM (memory) or disk (hard drive) depending on the "Suspend Controls" setting in the SCU program. Manual Power Management You can manually initiate Suspend mode at any time in one of these ways: • By - HP Notebook 100 | Armada 100S Series Reference Guide - Page 25
display. • Take care of the battery pack by following the instructions described in "Important Notes on Using Battery Pack" in Chapter 3. Traveling • Before traveling with your notebook, it is recommended that you backup your hard disk data into diskettes. As a precautionary measure, bring along an - HP Notebook 100 | Armada 100S Series Reference Guide - Page 26
AC (Alternating Current) to DC (Direct Current) power because your notebook runs on DC power, but an electrical outlet usually provides AC power. It operates in the range of 100∼240V AC. The battery pack automatically recharges while your notebook is connected to AC power. Battery Operations 3-1 - HP Notebook 100 | Armada 100S Series Reference Guide - Page 27
There is danger of explosion if the battery is incorrectly replaced. Replace the battery only with the notebook manufacturer's optional battery packs. Discard used batteries according to the dealer's instructions. If you often use the battery power for a long period of time while traveling, you may - HP Notebook 100 | Armada 100S Series Reference Guide - Page 28
3. First push away the small locking latch (Figure 3-1 Œ) on the battery pack, then slide the locking latch (Figure 3-1 •) on the side of the notebook to unlock and lift (Figure 3-1 Ž) the battery pack out of the compartment. Figure 3-1. Removing the Battery Pack 4. Install new battery pack into the - HP Notebook 100 | Armada 100S Series Reference Guide - Page 29
When the battery is being recharged, keep the notebook power off and wait until it is fully recharged capacity and useful life potential. • Do not leave the battery completely discharged for too long as this save all files and close all applications. Problem Solving • If the difference between the - HP Notebook 100 | Armada 100S Series Reference Guide - Page 30
, make sure you have saved your information and connected the notebook to AC power. • Leave the battery pack in place unless you are replacing it. to use the battery power for the first time. • Protect your notebook from extremes in temperature. (See "Environmental Specifications" in Appendix A for - HP Notebook 100 | Armada 100S Series Reference Guide - Page 31
: if you are using the audio subsystem, PC Card, hard or diskette drives, the battery may quickly deplete its charge. Always respond to the Low Battery warning by suspending your notebook to disk, turning off the notebook, or connecting the notebook to AC adapter. If you do not take any action - HP Notebook 100 | Armada 100S Series Reference Guide - Page 32
corresponds to that of the electrical outlet. Consult the monitor's manual for instructions. 2. Make sure the notebook is not turned on. 3. On the rear of the notebook, plug the monitor's D-type signal connector to the notebook's VGA port, marked as (Figure 1-3 #6). 4. Ensure power is properly - HP Notebook 100 | Armada 100S Series Reference Guide - Page 33
Plug the mouse cable into the serial port, marked as the rear of the notebook. (Figure 1-3 #5) on 4. Restart (reboot) the notebook, then install the mouse drivers from the manufacturer or select a compatible driver from the Windows Control Panel by clicking StartàSettingsàControl PanelàAdd/Remove - HP Notebook 100 | Armada 100S Series Reference Guide - Page 34
as (Figure 1-3 #3), on the rear of the notebook allows you to connect an USB device. The USB is specified to be an industry standard extension to the PC architecture. It features a wide range of applications such as multiple connections (i.e., support for concurrent operation of many devices) and - HP Notebook 100 | Armada 100S Series Reference Guide - Page 35
are memory cards, fax/modem cards, and PCMCIA Type III 1.8-inch hard drive. Contact your Compaq authorized dealer or reseller for a list of third party PC Cards qualified for this notebook. The PC Cards that conform to the PCMCIA 2.1 standard can be used with your notebook. CardBus is also supported - HP Notebook 100 | Armada 100S Series Reference Guide - Page 36
instructions. Notebook Upgrade You can upgrade your notebook by adding memory for a maximum of 160MB (for 32MB models) or for a maximum of 192MB (for 64-MB models). However, to avoid damage during the installation procedure, follow the instructions included with the notebook or consult your Compaq - HP Notebook 100 | Armada 100S Series Reference Guide - Page 37
5 Setup Configuration Utility This chapter provide instructions on how to configure your system using the Setup Configuration Utility (SCU). Introduction The SCU program allows you to configure the system BIOS settings. Those settings are vital for your notebook to identify the types of installed - HP Notebook 100 | Armada 100S Series Reference Guide - Page 38
Startup Memory Disks Components Power Exit Floppy Drive A = 1.44 Mb Floppy Drive B = None Hard Drive C = 2067 MB Hard Drive D = 0 MB Hard Drive E = 0 MB Hard Drive F = 0 MB Serial Port 1 = COM1, 3F8, IRQ 4 640 KB Serial Port 2 = COM2, 2F8, IRQ 3 56320 KB Parallel Port = LPT1, Addr 378, IRQ 7 CPU - HP Notebook 100 | Armada 100S Series Reference Guide - Page 39
For most items, simply move the pointer with the TouchPad/mouse and left-click on the intended item. To cancel your selection, click the right button. For some items, you will need to select with the arrow keys. Setup Configuration Utility 5-3 - HP Notebook 100 | Armada 100S Series Reference Guide - Page 40
Using the Keyboard Keyboard information can be found at the bottom of the screen. You can also use the shortcut key, which is highlighted in a different color on the screen. Described below is the general procedure to complete a setting by use of the keyboard: 1. Select a menu title with the left/ - HP Notebook 100 | Armada 100S Series Reference Guide - Page 41
" item, when enabled, speeds up the booting procedure by bypassing the memory test. When this item is selected, no submenu will display. A A Õ CD-ROM Õ Drive Hard Disk C. NOTE: If you set all booting options to the same device (say, Hard Disk C), then the notebook will try to boot from that device - HP Notebook 100 | Armada 100S Series Reference Guide - Page 42
the new password twice to complete the setting. NOTE: 1. If you want to clear a previous password, you can enter the old password and leave the following fields blank. 2. The administrator password is required for booting and entering SCU, so the "Verify password when..." setting can not be changed - HP Notebook 100 | Armada 100S Series Reference Guide - Page 43
the password is required only when the system is restored from "Suspend-to-disk" status. 5. When setting the user password, if you do not specify any be set up. Memory Menu The Memory pull-down menu, as shown below, allows you to change the settings for memory usage. Memory Cache Systems Cache - HP Notebook 100 | Armada 100S Series Reference Guide - Page 44
FDC Diskette Drives √ Internal HDC IDE Settings _ Virus Alert The followings describe in sequence all the items of the Disks menu. Internal FDC The "Internal FDC" item sets if an internal floppy drive is present. When this item is selected, no submenu will display. A check - HP Notebook 100 | Armada 100S Series Reference Guide - Page 45
The "HDD Block transfer" item, if enabled, allows you to use hard disk with large capacity. The default setting is Enabled. Virus Alert The "Virus Alert" : Enabling the Virus Alert option may cause problems with some software applications. If a problem is suspected, disable the Virus Alert option - HP Notebook 100 | Armada 100S Series Reference Guide - Page 46
Components Menu The Components pull-down menu, as shown below, allows you to change the settings for various components. Components COM Ports LPT Port √ Keyboard Numlock Keyboard Repeat The followings describe in sequence all the items of the Components menu. COM Ports The "COM Ports" item sets the - HP Notebook 100 | Armada 100S Series Reference Guide - Page 47
IRQ5 ( ) Enhanced Parallel (EPP) ( ) LPT3, Addr 3BC, IRQ7 (• ) Extended Capabilities (ECP) ( ) DMA 0 ( ) DMA 1 (• ) DMA 3 EPP Type: EPP 1.7 Your system supports EPP (Enhanced Parallel Port) and ECP (Extended Capabilities Port) standards which turn the standard parallel port into a high speed bi - HP Notebook 100 | Armada 100S Series Reference Guide - Page 48
, contains the Power Management settings which help save power. Power √ Enable Power Saving Timeout Settings Suspend Controls _ Ring Resume Resume Timer Advance CPU Controls The followings describe in sequence all the items of the Power menu. Enable Power Saving The "Enable Power Saving" item is the - HP Notebook 100 | Armada 100S Series Reference Guide - Page 49
, 2 Min, 5 Min, 10 Min, 15 Min, and Always On. Disk Timeout The "Disk Timeout" item sets the time-out period for the hard drive to power down if it is not in use during the set period. The hard disk will power up again when next accessed. The available options are 30 Sec, 1 Min, - HP Notebook 100 | Armada 100S Series Reference Guide - Page 50
period. The Suspend mode is determined by the "Suspend Type" item in the "Suspend Controls" submenu. It can be Suspend-to-RAM or Suspend-to-Disk. When Suspend-to-RAM mode is initiated, several subsystems will enter standby or power-off mode to conserve power. The system will wake up from - HP Notebook 100 | Armada 100S Series Reference Guide - Page 51
it stays inactive for the timing set in the "Suspend Timeout" item (see "Suspend Timeout" in "Timeout Settings" menu). The available options are Suspend To Disk and Suspend To RAM. Ring Resume The "Ring Resume" item enables or disables the system's waking up from Suspend-to-RAM mode when the modem - HP Notebook 100 | Armada 100S Series Reference Guide - Page 52
under normal condition. The available options range from 6% to full speed (Disabled). Note that although this item sets the usage of CPU resource, the CPU can still reach its full speed if the system is under a heavy job load. The default setting is Disabled. Clock Run Enable This item sets - HP Notebook 100 | Armada 100S Series Reference Guide - Page 53
system. Exit without saving the changes you have made. Load factory default values for all the items. Restore previous values for all the items. Show BIOS version information. Setup Configuration Utility 5-17 - HP Notebook 100 | Armada 100S Series Reference Guide - Page 54
files, specify the path d:\Win2000\, then browse the path to locate the file you need. For the latest version of these drivers, go to the Compaq website at http://www.compaq.com. Installing the VIA Bridge Driver This driver allows the notebook to recognize the VIA chipset on the system board. The - HP Notebook 100 | Armada 100S Series Reference Guide - Page 55
" button. 3. Select "Drivers" tab, then press "Update Drivers" button. 4. When prompted, browse to locate the driver, d:\Win98\Vga\Trident\T842055.inf. 5. Follow the on-screen instructions to complete the installation. When prompted, restart the notebook. 6-2 Software Drivers and Utilities - HP Notebook 100 | Armada 100S Series Reference Guide - Page 56
the on-screen instructions to complete the installation. When prompted, restart your notebook. NOTE: According to dual-view specification, you will find two unidentified monitors on your device list after installing the VGA driver. You have to manually adjust your monitor type as laptop 1024X786 (13 - HP Notebook 100 | Armada 100S Series Reference Guide - Page 57
a location only," then click Next. 5. Browse to d:\Win2000\Modem\Askey\Mdmchipv.inf. 6. Follow the on-screen instructions to complete the installation. Restart your notebook when installation is complete. Installing the VIA 3-Mode Floppy Disk Driver The "VIA Floppy 3 Mode Disk Driver" supports the - HP Notebook 100 | Armada 100S Series Reference Guide - Page 58
Controller. The dialog box appears to display the properties of driver for the current floppy disk controller. This property sheet now has three tabs, General, Resources and a new tab, Driver. 6. Select the Driver tab. NOTE: You will not see Driver tab if you are running Windows 95/98 US version or - HP Notebook 100 | Armada 100S Series Reference Guide - Page 59
list. Click the "Properties" button. 7. Select the "Driver" tab, the click the "Update Drivers" button. 8. When prompted for a location, browse to d:\Win98\Fir. 9. Follow the on-screen instructions to complete the installation. Restart the notebook when installation is completed. NOTE: If you are - HP Notebook 100 | Armada 100S Series Reference Guide - Page 60
Disk function of your notebook. You can locate the file under the \Utility directory on the CD-ROM. To utilize the program, follow this command syntax: HIBERNAT -Pnn where nn specifies the size (in MB) of the partition. You must specify a memory and data held in video memory. You can clear the - HP Notebook 100 | Armada 100S Series Reference Guide - Page 61
NOTE: The specifications are subject to change without notice. Notebook, Memory, and Main Components • System Processor AMD K6-2+ series processor Note: For the latest information on the processor supported by your notebook, ask your Compaq authorized dealer or reseller. • RAM 64MB or 32MB SDRAM - HP Notebook 100 | Armada 100S Series Reference Guide - Page 62
Card Slots Compliant with PCMCIA 2.1/JEIDA 4.1 specifications along with ExCA extension and PC CARD standard, one PC Card slot for one Type I, Type II or Type III application supporting CardBus • Audio Subsystem Supports 3D sound and wavetable capacity, fully compatible with Microsoft Windows Sound - HP Notebook 100 | Armada 100S Series Reference Guide - Page 63
manual for possible remedies. If you still have a problem after trying all the suggested remedies in this appendix, contact your Compaq authorized dealer or reseller. Common Problems When you encounter a problem, begin by performing a careful visual inspection. Check the exterior of the notebook - HP Notebook 100 | Armada 100S Series Reference Guide - Page 64
diskette, the diskette may be full. Use another diskette. Problem: The message "non-system disk" or "disk error" appears on the screen after you turn on the your Compaq authorized service provider to replace the RTC battery. Problem: The battery cannot be fully recharged. B-2 Troubleshooting - HP Notebook 100 | Armada 100S Series Reference Guide - Page 65
Problem: The PC Card driver is installed. • Check if software-dependent volume control is set too low. Problem: Distorted sound is produced. • Ensure the volume control is not set too high or too low. In most cases, high settings can cause the audio electronics to distort the sound. Troubleshooting
-
 1
1 -
 2
2 -
 3
3 -
 4
4 -
 5
5 -
 6
6 -
 7
7 -
8
-
9
-
10
-
11
-
12
-
13
-
14
-
15
-
16
-
17
-
18
-
19
-
20
-
21
-
22
-
23
-
24
-
25
-
26
-
27
-
28
-
29
-
30
-
31
-
32
-
33
-
34
-
35
-
36
-
37
-
38
-
39
-
40
-
41
-
42
-
43
-
44
-
45
-
46
-
47
-
48
-
49
-
50
-
51
-
52
-
53
-
54
-
55
-
56
-
57
-
58
-
59
-
60
-
61
-
62
-
63
-
64
-
65
 |
 |

Notice
The information in this guide is subject to change without notice.
COMPAQ COMPUTER CORPORATION SHALL NOT BE LIABLE FOR
TECHNICAL OR EDITORIAL ERRORS OR OMISSIONS CONTAINED
HEREIN; NOR FOR INCIDENTAL OR CONSEQUENTIAL DAMAGES
RESULTING FROM THE FURNISHING, PERFORMANCE, OR USE OF
THIS MATERIAL.
This guide contains information protected by copyright. No part of this
guide may be photocopied or reproduced in any form without prior
written consent from Compaq Computer Corporation.
© 2000 Compaq Computer Corporation. All rights reserved. Published
in the U.S.A., U.K, Singapore, and Taiwan.
Compaq
is registered in the U.S. Patent and Trademark Office.
Microsoft, MS-DOS, and Windows are trademarks or registered
trademarks of Microsoft Corporation.
Software described herein is furnished under a license agreement or
nondisclosure agreement. The software may be used or copied only in
accordance with the terms of the agreement.
Product names mentioned herein may be trademarks and/or registered
trademarks of their respective companies.
Reference Guide
Compaq Armada 100S Series
First Edition June 2000
Part Number 198212-001
Compaq Computer Corporation