HP Officejet 4500 User Guide - Page 17
Change product settings, Select the mode, Windows, the HP Utility Mac OS X - scanning software
 |
View all HP Officejet 4500 manuals
Add to My Manuals
Save this manual to your list of manuals |
Page 17 highlights
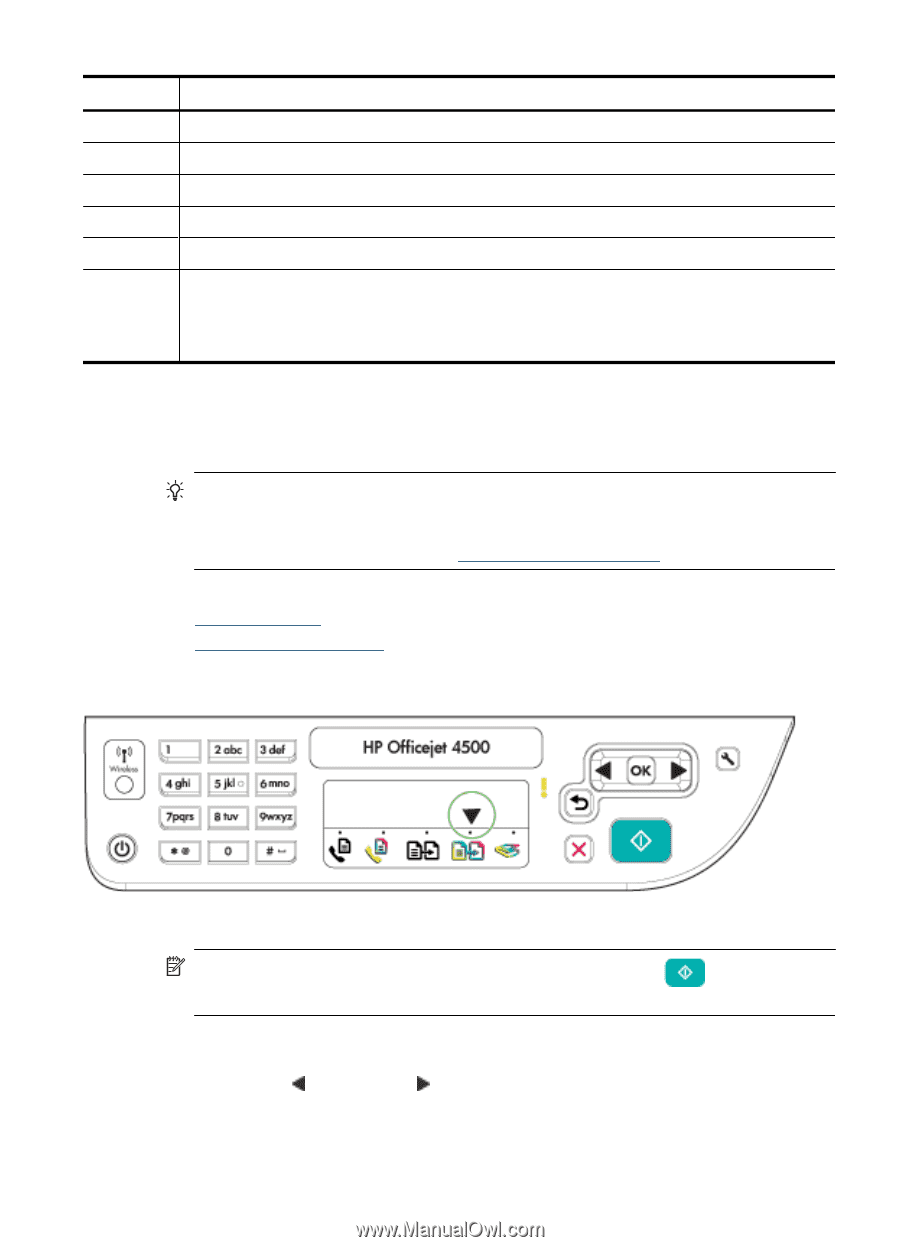
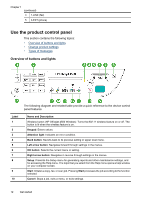
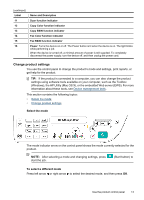
(continued) Label 11 12 13 14 15 16 Name and Description Scan function indicator Copy Color function indicator Copy B&W function indicator Fax Color function indicator Fax B&W function indicator Power: Turns the device on or off. The Power button is lit when the device is on. The light blinks while performing a job. When the device is turned off, a minimal amount of power is still supplied. To completely disconnect the power supply, turn the device off, and then unplug the power cord. Change product settings You use the control panel to change the product's mode and settings, print reports, or get help for the product. TIP: If the product is connected to a computer, you can also change the product settings using software tools available on your computer, such as the Toolbox (Windows), the HP Utility (Mac OS X), or the embedded Web server (EWS). For more information about these tools, see Device management tools. This section contains the following topics: • Select the mode • Change product settings Select the mode The mode indicator arrow on the control panel shows the mode currently selected for the product. NOTE: After selecting a mode and changing settings, press start the job. (Start button) to To select a different mode Press left arrow or right arrow to select the desired mode, and then press OK. Use the product control panel 13
-
 1
1 -
2
-
3
-
4
-
5
-
6
-
7
-
8
-
9
-
10
-
11
-
 12
12 -
 13
13 -
 14
14 -
 15
15 -
 16
16 -
 17
17 -
 18
18 -
 19
19 -
 20
20 -
 21
21 -
 22
22 -
23
-
24
-
25
-
26
-
27
-
28
-
29
-
30
-
31
-
32
-
33
-
34
-
35
-
36
-
37
-
38
-
39
-
40
-
41
-
42
-
43
-
44
-
45
-
46
-
47
-
48
-
49
-
50
-
51
-
52
-
53
-
54
-
55
-
56
-
57
-
58
-
59
-
60
-
61
-
62
-
63
-
64
-
65
-
66
-
67
-
68
-
69
-
70
-
71
-
72
-
73
-
74
-
75
-
76
-
77
-
78
-
79
-
80
-
81
-
82
-
83
-
84
-
85
-
86
-
87
-
88
-
89
-
90
-
91
-
92
-
93
-
94
-
95
-
96
-
97
-
98
-
99
-
100
-
101
-
102
-
103
-
104
-
105
-
106
-
107
-
108
-
109
-
110
-
111
-
112
-
113
-
114
-
115
-
116
-
117
-
118
-
119
-
120
-
121
-
122
-
123
-
124
-
125
-
126
-
127
-
128
-
129
-
130
-
131
-
132
-
133
-
134
-
135
-
136
-
137
-
138
-
139
-
140
-
141
-
142
-
143
-
144
-
145
-
146
-
147
-
148
-
149
-
150
-
151
-
152
-
153
-
154
-
155
-
156
-
157
-
158
-
159
-
160
-
161
-
162
-
163
-
164
-
165
-
166
-
167
-
168
-
169
-
170
-
171
-
172
-
173
-
174
-
175
-
176
-
177
-
178
-
179
-
180
-
181
-
182
-
183
-
184
-
185
-
186
-
187
-
188
-
189
-
190
-
191
-
192
-
193
-
194
-
195
-
196
-
197
-
198
-
199
-
200
-
201
-
202
-
203
-
204
-
205
-
206
-
207
-
208
-
209
-
210
-
211
-
212
-
213
-
214
-
215
-
216
-
217
-
218
-
219
-
220
-
221
-
222
-
223
-
224
-
225
-
226
-
227
-
228
 |
 |